← Three.js from Scratch · all parts
Three.js from Scratch, Part 1: Your First Scene
This is the first article in a series about 3D on the web: Three.js, WebGL and, later on, WebGPU. I have been building frontend and real-time 3D software for more than 15 years, and most of what I know I learned by breaking small scenes until they made sense. That is the plan here too: small steps, real code, and a screenshot of what you should see after each one.
The audience is frontend developers. If you have never touched 3D, you will be fine. If you already have a spinning cube somewhere in a side project, I will try to explain why things work, which is what tends to matter once scenes get bigger.
By the end of this article you will have this, running in your browser. Drag it around:
Open the demo full screen ↗ · Source on GitHub ↗
What is coming in this series
Roughly, the plan is:
- Your first scene (this article): scene, camera, renderer, lights, the render loop.
- Geometry, materials and textures: what a mesh is made of and how surfaces react to light.
- Models, light and shadows: real models, animation, HDR light and shadows.
- Your first shaders:
ShaderMaterial, GLSL basics, and what the GPU is actually doing. - WebGPU and TSL: Three.js's
WebGPURenderer, the TSL shading language and compute shaders. - Post-processing and bloom: render targets,
EffectComposer, bloom and anti-aliasing, and the same chain with TSL nodes. - Faster frames: measuring a frame, draw calls,
InstancedMeshandBatchedMesh, LOD, texture and shadow budgets, anddispose(). - Interaction and physics (next): picking objects with
Raycaster, dragging them, and a physics engine.
The order may change as I write, but the direction will not: from "it renders" to "I know why it renders like that".
What Three.js is, and how it relates to WebGL and WebGPU
Your browser gives you two low-level ways to talk to the GPU:
- WebGL (in practice WebGL 2 today) is a JavaScript version of OpenGL ES. It is everywhere, and it is very low level: you upload buffers of numbers, compile shader programs, and issue draw calls. Drawing a single lit cube from scratch takes a surprising amount of code.
- WebGPU is the newer API, designed around how modern GPUs work (closer to Vulkan, Metal and Direct3D 12). It also adds general-purpose compute shaders.
Three.js is a library that sits on top of these. Instead of buffers and draw calls, you work with objects you can reason about: a scene, a camera, meshes, materials, lights. Three.js turns them into GPU commands for you. The project was started by Ricardo Cabello (mrdoob) in 2010 and is still the most widely used 3D library for the web.
Three.js has two renderers:
WebGLRenderer, the classic one, which we use in this article. Current versions require WebGL 2.WebGPURenderer(imported fromthree/webgpu), which uses WebGPU and falls back to WebGL 2 when WebGPU is not available. We will get to it later in the series.
The good news: scenes, cameras, geometries, lights and most of the API are the same for both. What you learn here carries over.
Everything in this article uses Three.js r186 (npm version
0.186.1), the current release at the time of writing.
Setup
You need a page, a <script type="module"> and a way to import three. There are two common ways to get it.
Option A: no build step, import map + CDN
This is the fastest way to start. An import map tells the browser where the bare specifier three lives, so your code can import * as THREE from 'three' exactly like it would in a bundled project. The second entry maps three/addons/ to the examples folder, where things like OrbitControls live.
<!doctype html>
<html lang="en">
<head>
  <meta charset="utf-8">
  <meta name="viewport" content="width=device-width, initial-scale=1">
  <title>My first Three.js scene</title>
  <style>
    html, body { margin: 0; height: 100%; background: #000; }
    canvas { display: block; }
  </style>
  <script type="importmap">
    {
      "imports": {
        "three": "https://cdn.jsdelivr.net/npm/three@0.186.1/build/three.module.js",
        "three/addons/": "https://cdn.jsdelivr.net/npm/three@0.186.1/examples/jsm/"
      }
    }
  </script>
</head>
<body>
  <script type="module">
    import * as THREE from 'three';
    // your code goes here
  </script>
</body>
</html>
Pin the version in the URL. Three.js changes between releases, and you do not want your page to change under you.
One gotcha: ES modules do not load from file://. Serve the folder with any static server, for example npx serve . or python3 -m http.server.
The canvas { display: block; } rule matters more than it looks. A canvas is an inline element by default, and the few pixels of space under the text baseline will give you scrollbars on a full-screen scene.
Option B: npm + Vite
For a real project you will want a bundler. Vite is the easiest:
npm create vite@latest my-scene -- --template vanilla
cd my-scene
npm install three
npm run dev
If you use TypeScript (the vanilla-ts template), also install the types with npm install -D @types/three.
The imports are the same as in Option A, because the three package exports its addons under three/addons/:
import * as THREE from 'three';
import { OrbitControls } from 'three/addons/controls/OrbitControls.js';
This is why I like the import map approach for learning: the code you write is identical, only where three comes from changes.
Three things you always need: scene, camera, renderer
Every Three.js app has the same three pieces:
- a Scene, the container for everything you want to draw;
- a Camera, the point of view you draw it from;
- a Renderer, which takes the scene and the camera and produces pixels on a
<canvas>.
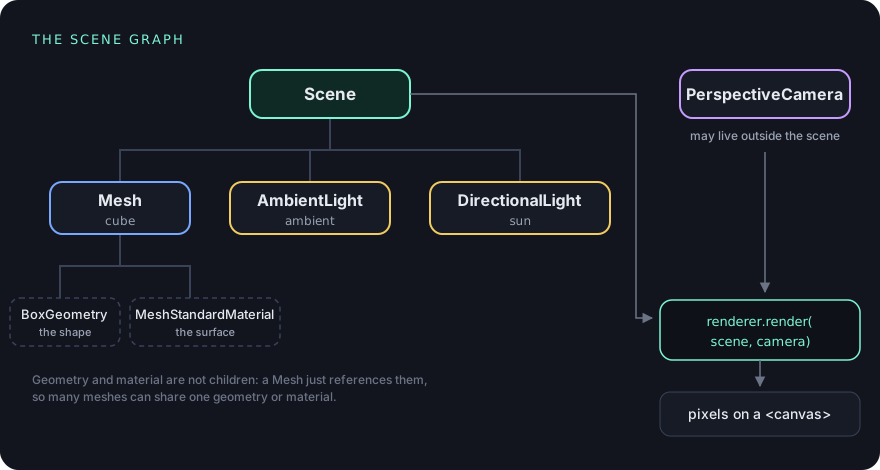
The scene is a tree, usually called a scene graph. Every object in it (meshes, lights, groups, even cameras) is an Object3D with a position, rotation and scale. When you move a parent, its children move with it. We will lean on that a lot later; for now the tree is flat.
Here is the minimal version:
import * as THREE from 'three';

const scene = new THREE.Scene();

const camera = new THREE.PerspectiveCamera(60, innerWidth / innerHeight, 0.1, 100);
camera.position.set(0, 1.5, 4);
camera.lookAt(0, 0, 0);

const renderer = new THREE.WebGLRenderer({ antialias: true });
renderer.setSize(innerWidth, innerHeight);
document.body.appendChild(renderer.domElement);

renderer.render(scene, camera);
WebGLRenderer creates its own <canvas>, available as renderer.domElement, and we append it to the page. setSize sets both the drawing buffer size and the canvas CSS size. antialias: true smooths the jagged edges of triangles.
The camera, and its four numbers
PerspectiveCamera(fov, aspect, near, far) describes a pyramid with its tip cut off, called the view frustum. Only what is inside it gets drawn.
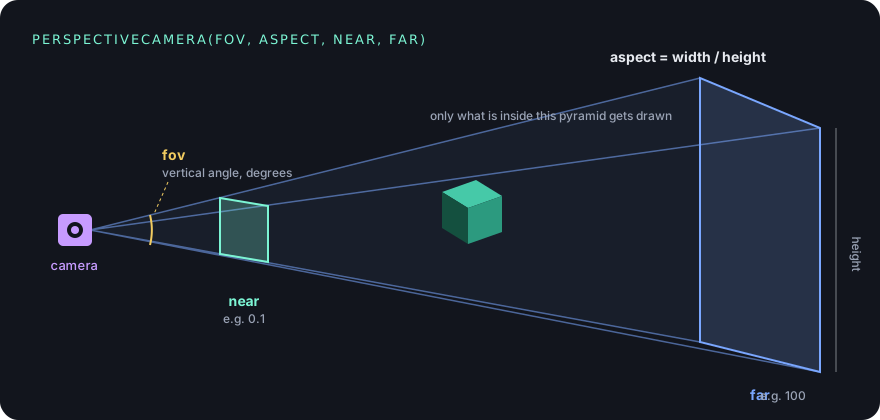
- fov is the vertical field of view in degrees. 45 to 75 looks natural; bigger values give a wide-angle, fish-eye look.
- aspect is width divided by height. If it does not match the canvas, everything looks stretched. We will keep it in sync on resize.
- near and far are the distances to the closest and farthest planes that get drawn. Anything closer than
nearor farther thanfaris clipped. Do not setnearto something tiny like0.00001"just in case": the depth buffer has limited precision, and a huge far/near ratio causes surfaces to flicker through each other (z-fighting).
Three.js uses a right-handed coordinate system with Y up. The camera looks down its negative Z axis. By putting it at (0, 1.5, 4) and calling lookAt(0, 0, 0), we move it back and slightly up, looking at the origin.
Run this and you get... a black page.

That is correct. The scene is empty, so the renderer just clears the canvas to its default colour, which is black. Not exciting, but everything is wired up.
The first mesh: geometry + material
A visible object in Three.js is usually a Mesh, and a mesh is two things:
- a geometry: the shape, stored as vertices and triangles.
BoxGeometry,SphereGeometry,PlaneGeometryand friends generate common shapes for you. - a material: how the surface looks, its colour, how shiny or rough it is, and how it reacts to light.
scene.background = new THREE.Color(0x1b1f2a);

const geometry = new THREE.BoxGeometry(1.4, 1.4, 1.4);
const material = new THREE.MeshStandardMaterial({ color: 0x3fc8a8 });
const cube = new THREE.Mesh(geometry, material);
cube.rotation.set(0.4, 0.7, 0);
scene.add(cube);
I also set scene.background to a dark blue-grey. You will see why in a second.
Notice that rotations are in radians, not degrees. 0.7 radians is about 40 degrees. THREE.MathUtils.degToRad() converts if you prefer to think in degrees.
We asked for a nice teal cube. Here is what we get:
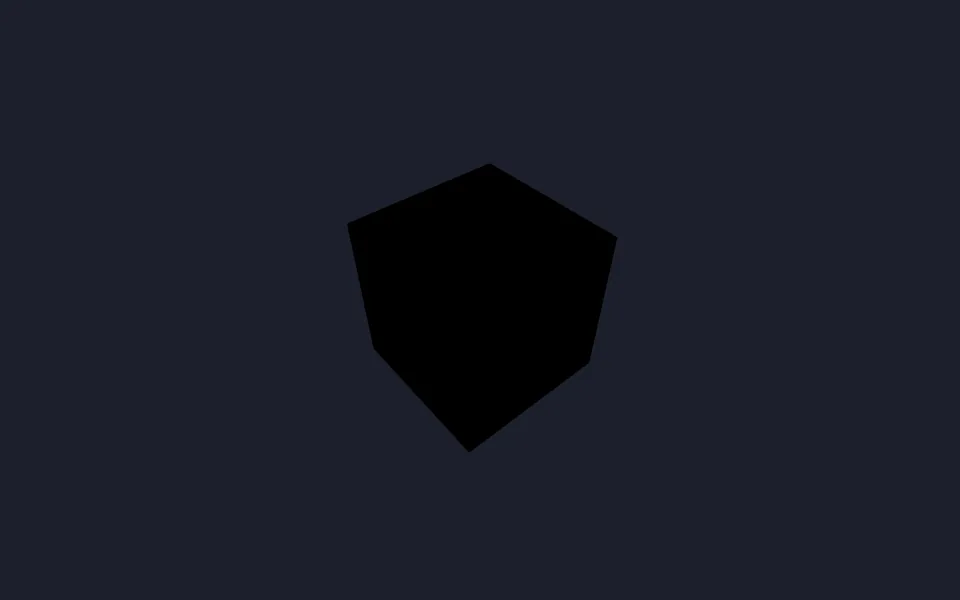
A black silhouette. Without the background colour, it would have been black on black and you would have thought nothing rendered at all. This is probably the most common "my scene is broken" moment in Three.js.
Why MeshStandardMaterial is black without light
MeshStandardMaterial is a physically based material (PBR). It does not "have" a colour the way a CSS box does. Its color describes how much of the incoming light the surface reflects, per channel. The shader computes, for every pixel: how much light arrives here, from which directions, and how much of it bounces towards the camera.
With no lights in the scene (and no environment map), the amount of incoming light is zero. Zero times any colour is zero. So: black.
If you just want to check that your geometry is there, use MeshBasicMaterial, which ignores lighting and always draws its flat colour. But flat colour also means no shading, so a cube looks like a flat hexagon. For anything that should look 3D, add light.
Let there be light: AmbientLight + DirectionalLight
Three.js has several light types. These are the common ones:
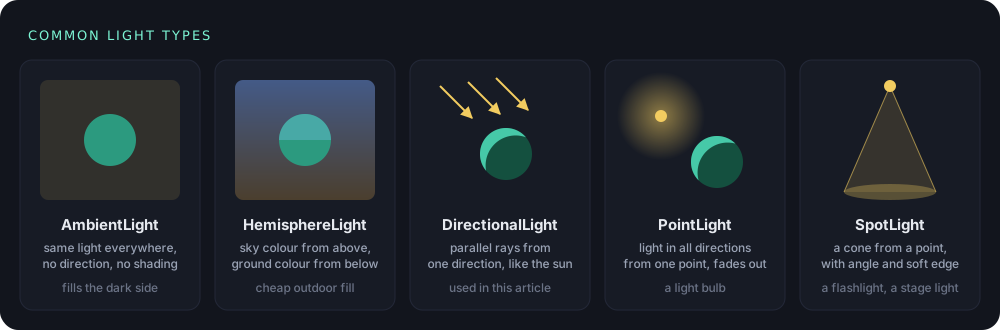
A classic beginner setup uses two:
const ambient = new THREE.AmbientLight(0xffffff, 0.4);
scene.add(ambient);

const sun = new THREE.DirectionalLight(0xffffff, 2.5);
sun.position.set(3, 4, 2);
scene.add(sun);
- DirectionalLight behaves like the sun: all rays are parallel and come from one direction, from the light's
positiontowards itstarget(the origin by default). Faces turned towards it are bright, faces turned away are dark. This is what gives the cube its shape. - AmbientLight adds the same amount of light to every surface, from no direction at all. On its own it looks flat, exactly like
MeshBasicMaterial. Its job is to lift the shadowed side so it is not pure black.
About the numbers: since r155, Three.js uses physically based light units by default, so intensities like 2.5 for a directional light are normal. If you copy code from an old tutorial and everything looks too dark or too bright, this is often why.
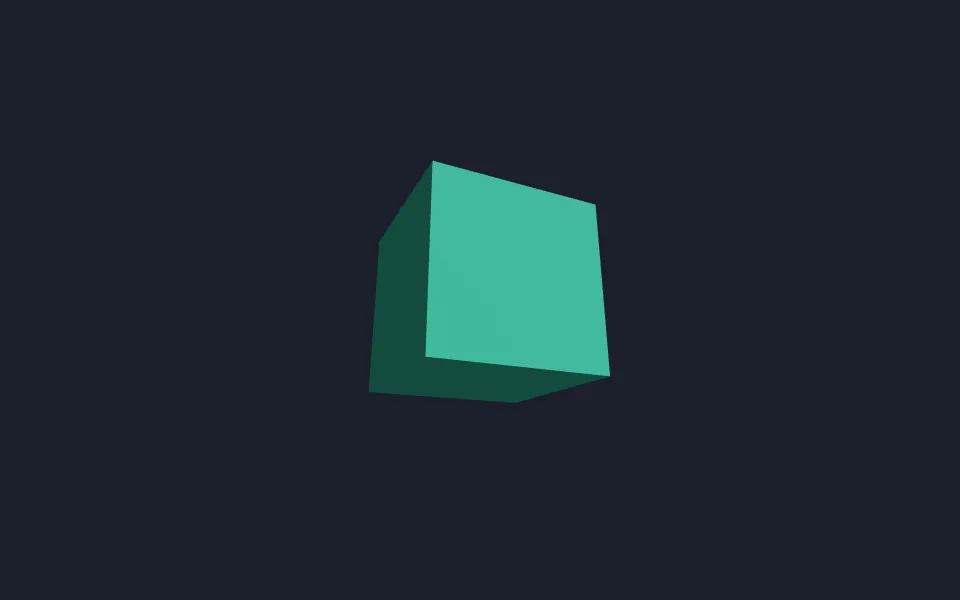
Try setting the ambient intensity to 0 and to 2. With 0, the side away from the sun goes pitch black. With 2, the cube starts to look flat again. Lighting is a balance between the two.
The animation loop: renderer.setAnimationLoop
So far we called renderer.render() once. To animate, we need to render every frame. You may have seen this pattern with requestAnimationFrame:
function tick() {
  requestAnimationFrame(tick);
  renderer.render(scene, camera);
}
tick();
Three.js has a built-in version, and I recommend it:
renderer.setAnimationLoop((time) => {
  cube.rotation.x = 0.4 + time * 0.0004;
  cube.rotation.y = 0.7 + time * 0.0007;
  renderer.render(scene, camera);
});
Why setAnimationLoop instead of your own requestAnimationFrame?
- It is required for WebXR. In VR, frames must be driven by the headset, not by the page, and
setAnimationLoophandles that switch for you. - It is the standard way to drive
WebGPURenderertoo, so the same loop works when we switch renderers later. - You can stop it with
renderer.setAnimationLoop(null).
If you opened step-3.html and wondered why the cube was already turning: this is the loop it uses. The callback receives a timestamp in milliseconds. I use it to compute the rotation directly from time, instead of adding a fixed amount per frame. That keeps the speed the same on a 60 Hz laptop and a 120 Hz phone. If you increment by a constant every frame, the cube spins twice as fast on the 120 Hz screen.
Resizing and devicePixelRatio
Two things go wrong as soon as someone resizes the window or opens your page on a phone.
The window size changes. The canvas keeps its old size and the camera keeps its old aspect ratio, so the picture gets stretched or cut off. The fix is to update both:
function onResize() {
  camera.aspect = innerWidth / innerHeight;
  camera.updateProjectionMatrix();
  renderer.setPixelRatio(Math.min(devicePixelRatio, 2));
  renderer.setSize(innerWidth, innerHeight);
}
addEventListener('resize', onResize);
updateProjectionMatrix() is the important line. The camera caches its projection matrix, and changing aspect (or fov, near, far) does nothing until you call it.
Screens have more pixels than CSS says. On a "retina" display, one CSS pixel is 2 or 3 physical pixels, and window.devicePixelRatio tells you the ratio. If you ignore it, the canvas is rendered at CSS resolution and stretched, which looks blurry. renderer.setPixelRatio() fixes that.
Why Math.min(devicePixelRatio, 2)? Because the cost grows with the square of the ratio. At 3x you render 9 times as many pixels as at 1x; at 2x, 4 times as many. On a phone, going from 2x to 3x costs more than twice the GPU work for a difference that is hard to see. Capping at 2 is a common, sensible default.
Here I resize to the window because the canvas is full screen. If your canvas lives inside a layout, size it to its container instead (for example with a ResizeObserver and canvas.clientWidth / clientHeight). The idea is the same.
Bonus: OrbitControls
A static camera is fine, but being able to drag the scene around makes it much easier to understand what you are looking at. OrbitControls is an addon that does exactly that:
import { OrbitControls } from 'three/addons/controls/OrbitControls.js';

const controls = new OrbitControls(camera, renderer.domElement);
controls.enableDamping = true;
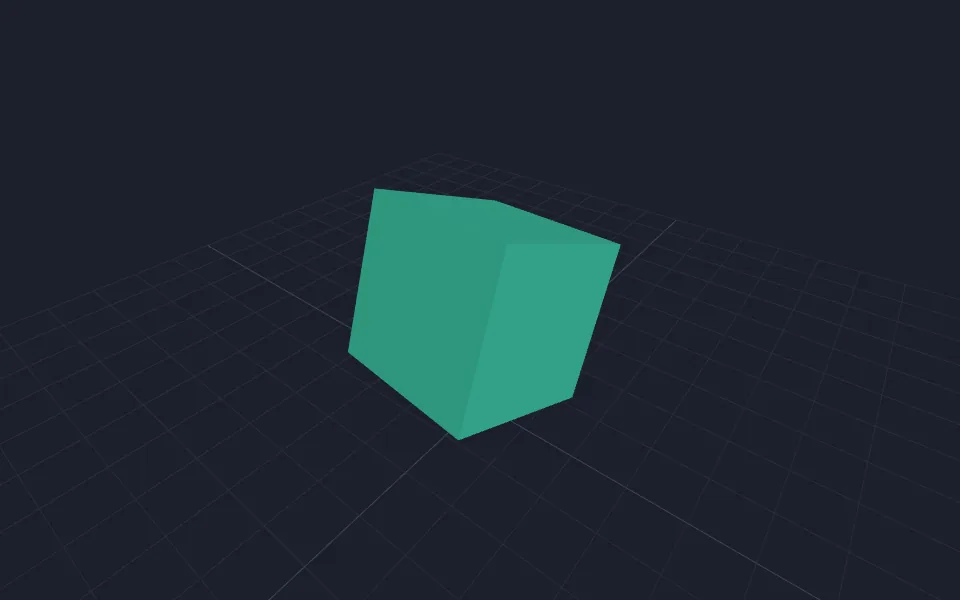
Drag to rotate around the target, scroll to zoom, right-drag (or two-finger drag) to pan. With enableDamping, the motion eases out smoothly instead of stopping dead. Damping has one requirement: call controls.update() every frame, inside the animation loop.
The controls point the camera at controls.target (the origin by default), so we no longer need camera.lookAt(). I also added a GridHelper as a floor. Without some reference in the scene, it is hard to tell whether the camera moves or the cube does.
The full code
Here is everything in one file. Save it as index.html, serve the folder, and open it. It is the same code as the live demo.
<!doctype html>
<html lang="en">
<head>
  <meta charset="utf-8">
  <meta name="viewport" content="width=device-width, initial-scale=1">
  <title>Your first Three.js scene</title>
  <style>
    html, body { margin: 0; height: 100%; background: #000; }
    canvas { display: block; }
  </style>
  <script type="importmap">
    {
      "imports": {
        "three": "https://cdn.jsdelivr.net/npm/three@0.186.1/build/three.module.js",
        "three/addons/": "https://cdn.jsdelivr.net/npm/three@0.186.1/examples/jsm/"
      }
    }
  </script>
</head>
<body>
  <script type="module">
    import * as THREE from 'three';
    import { OrbitControls } from 'three/addons/controls/OrbitControls.js';

    // Scene and camera
    const scene = new THREE.Scene();
    scene.background = new THREE.Color(0x1b1f2a);

    const camera = new THREE.PerspectiveCamera(60, innerWidth / innerHeight, 0.1, 100);
    camera.position.set(0, 1.5, 4);

    // Renderer
    const renderer = new THREE.WebGLRenderer({ antialias: true });
    renderer.setPixelRatio(Math.min(devicePixelRatio, 2));
    renderer.setSize(innerWidth, innerHeight);
    document.body.appendChild(renderer.domElement);

    // A mesh = geometry + material
    const geometry = new THREE.BoxGeometry(1.4, 1.4, 1.4);
    const material = new THREE.MeshStandardMaterial({ color: 0x3fc8a8, roughness: 0.45 });
    const cube = new THREE.Mesh(geometry, material);
    scene.add(cube);

    // A floor grid, so you can see the camera move
    const grid = new THREE.GridHelper(10, 20, 0x3a4258, 0x262c3b);
    grid.position.y = -1.2;
    scene.add(grid);

    // Lights
    scene.add(new THREE.AmbientLight(0xffffff, 0.4));
    const sun = new THREE.DirectionalLight(0xffffff, 2.5);
    sun.position.set(3, 4, 2);
    scene.add(sun);

    // Orbit controls: drag to rotate, scroll to zoom, right-drag to pan
    const controls = new OrbitControls(camera, renderer.domElement);
    controls.enableDamping = true;
    controls.target.set(0, 0, 0);

    // Keep the canvas sharp and undistorted when the window changes size
    function onResize() {
      camera.aspect = innerWidth / innerHeight;
      camera.updateProjectionMatrix();
      renderer.setPixelRatio(Math.min(devicePixelRatio, 2));
      renderer.setSize(innerWidth, innerHeight);
    }
    addEventListener('resize', onResize);

    // Animation loop
    renderer.setAnimationLoop((time) => {
      cube.rotation.x = 0.4 + time * 0.0004;
      cube.rotation.y = 0.7 + time * 0.0007;
      controls.update();
      renderer.render(scene, camera);
    });
  </script>
</body>
</html>
The step-by-step versions are in the repo too: step-1.html, step-2.html, step-3.html.
A few things to try
- Swap
BoxGeometryforTorusKnotGeometry(0.8, 0.28, 160, 24)and watch how the light wraps around curves. - Change
roughnessbetween0and1, and setmetalness: 1. (A fully metallic surface with no environment map looks very dark. That is a hint about the next article.) - Move
sun.positionin the animation loop and watch the shading follow it. - Set
fovto20, then to110, and move the camera to compensate.
Next time
Our cube is lit, but its surface is a single flat colour. In the next article we look at what a mesh is really made of: the vertices, normals and UVs inside a geometry, how the different materials react to light, and how to put a texture on a surface without it looking washed out (there is a colour space story here). See you there.