← Three.js from Scratch · all parts
Three.js from Scratch, Part 2: Geometry, Materials and Textures
In Part 1 we built a scene, a camera, a renderer and a lit cube that you can drag around. The cube looked like a cube, but its surface was one flat colour. In this article we open the mesh up and look at what it is made of: the numbers inside a geometry, how the different materials turn light into colour, and how to put an image on a surface without it coming out pale and washed out.
We keep the scene from Part 1 (same camera, same two lights, same OrbitControls) and change what is inside it. By the end, the cube and the floor are covered in tiles that catch the light along their edges. The panel in the corner switches each texture on and off, so you can see what every one of them adds:
Open the demo full screen ↗ · Source on GitHub ↗
As in Part 1, everything here uses Three.js r186 (npm version
0.186.1) through the same import map. Every step below is a single HTML file you can open from the repo.
What a mesh is made of
Quick reminder from Part 1: a Mesh is a geometry (the shape) plus a material (how the surface looks). The mesh itself only adds a position, rotation and scale in the scene graph.
const cube = new THREE.Mesh(
  new THREE.BoxGeometry(1.4, 1.4, 1.4),
  new THREE.MeshStandardMaterial({ color: 0x3fc8a8 })
);
That one statement hides a lot. BoxGeometry generated a few arrays of numbers. MeshStandardMaterial picked a shader program that turns those numbers, the lights and the camera into pixels. Let's look at both halves, starting with the numbers.
Inside a geometry: BufferGeometry
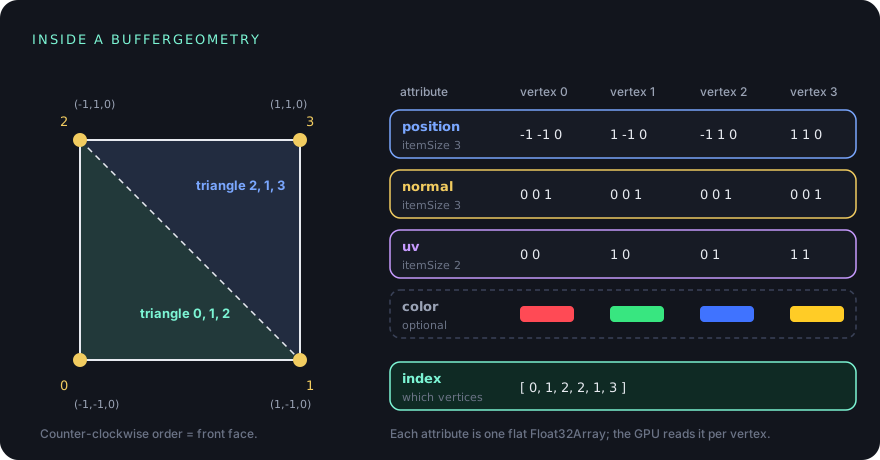
Every geometry in Three.js is a BufferGeometry. BoxGeometry, SphereGeometry and the rest are just BufferGeometry subclasses that fill in the arrays for you. Those arrays are called attributes, and each one stores one value per vertex:
position: where the vertex is, three numbers (x, y, z).normal: which way the surface faces at that vertex, three numbers. Lighting depends on it.uv: which point of a texture belongs to this vertex, two numbers. More on these below.- optionally
color, and anything else you want to feed to a shader.
On top of the attributes, an index says which vertices make up each triangle. The GPU draws every surface as triangles; a square is two of them.
Building a quad by hand
The best way to see this is to build a geometry yourself. Here is exactly the square from the diagram:
const geometry = new THREE.BufferGeometry();

const positions = new Float32Array([
  -1, -1, 0,  // 0: bottom left
   1, -1, 0,  // 1: bottom right
  -1,  1, 0,  // 2: top left
   1,  1, 0,  // 3: top right
]);
const normals = new Float32Array([
  0, 0, 1,
  0, 0, 1,
  0, 0, 1,
  0, 0, 1,
]);
const uvs = new Float32Array([
  0, 0,
  1, 0,
  0, 1,
  1, 1,
]);
const colors = new Float32Array([
  1.0, 0.25, 0.3,  // red
  0.2, 0.9, 0.5,   // green
  0.25, 0.45, 1.0, // blue
  1.0, 0.8, 0.15,  // yellow
]);

geometry.setAttribute('position', new THREE.BufferAttribute(positions, 3));
geometry.setAttribute('normal', new THREE.BufferAttribute(normals, 3));
geometry.setAttribute('uv', new THREE.BufferAttribute(uvs, 2));
geometry.setAttribute('color', new THREE.BufferAttribute(colors, 3));
geometry.setIndex([0, 1, 2, 2, 1, 3]);

const material = new THREE.MeshStandardMaterial({
  vertexColors: true,
  roughness: 0.6,
  side: THREE.DoubleSide,
});
const quad = new THREE.Mesh(geometry, material);
scene.add(quad);
A few things to notice:
- Each attribute is a flat
Float32Array. The second argument ofBufferAttributeis the item size: how many numbers belong to one vertex. Three for positions and normals, two for UVs. - The normals all point along +Z, straight out of the square towards the camera.
vertexColors: truetells the material to use thecolorattribute. Each vertex has its own colour, and the GPU blends them smoothly across each triangle. The same blending (called interpolation) happens to every attribute, and we will rely on it for normals and UVs too.- The order of the vertices in each triangle matters. Seen from the front, both triangles go counter-clockwise, and that is how Three.js decides which side is the front. By default only the front side is drawn (this is called back-face culling), so I set
side: THREE.DoubleSideto see the quad from behind as well.
To show the two triangles, the demo draws the same geometry a second time on top, as a wireframe:
const wire = new THREE.Mesh(geometry, new THREE.MeshBasicMaterial({ color: 0xffffff, wireframe: true }));
quad.add(wire);
The wireframe is a child of the quad, so it follows the quad when it rotates. That is the scene graph from Part 1 at work.
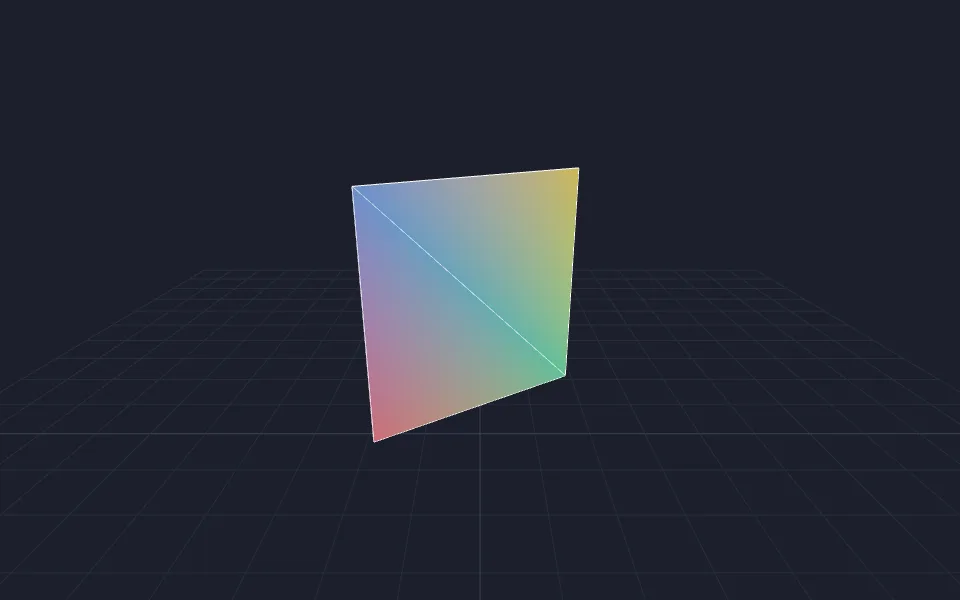
In real projects you rarely type vertices by hand. They come from built-in geometries or from model files (that is Part 3). But when something looks wrong, knowing that it is all "a few arrays and an index" makes debugging much easier.
Why a cube has 24 vertices, not 8
Try this in the console of any scene with our cube:
const box = new THREE.BoxGeometry(1.4, 1.4, 1.4);
console.log(box.attributes.position.count); // 24
console.log(box.index.count / 3);           // 12 triangles
A cube has 8 corners, so why 24 vertices? Because a vertex is not just a position. It is a position plus a normal plus a UV. Each corner of a cube touches three faces that point in three different directions, so it needs three normals, and therefore three separate vertices. Six faces with four vertices each gives 24.
This is the key to the next section.
Normals: flat and smooth
The lights from Part 1 work by comparing each surface's normal (the direction it faces) with the direction of the light. Facing the light: bright. Facing away: dark. Normals are what turn a silhouette into a shape.
There are two ways to give a curved object its normals:
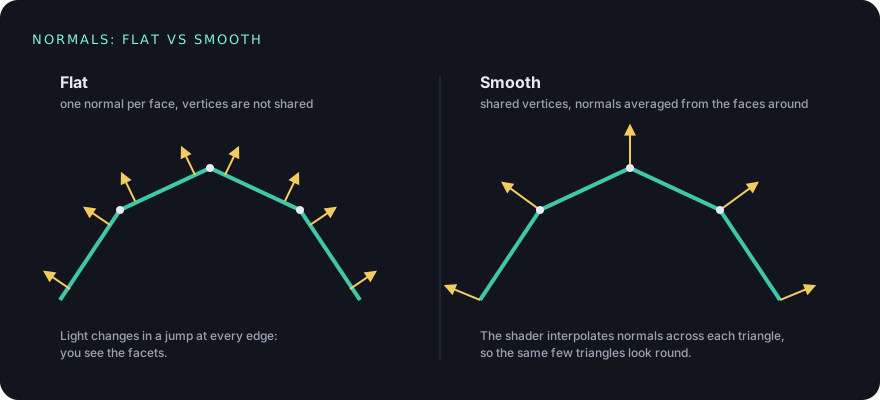
- Flat: every triangle has its own vertices, and all three get the triangle's normal. Light changes in a jump at every edge, and you see the facets. This is what the cube wants: its edges are supposed to be sharp.
- Smooth: neighbouring triangles share vertices, and each shared vertex gets the average of the normals around it. Because the GPU interpolates normals across every triangle, light changes gradually, and a sphere made of a few hundred triangles looks perfectly round.
Here is the same sphere with both kinds of normals. SphereGeometry comes with smooth normals. To get flat ones, I give every triangle its own copy of its vertices with toNonIndexed(), then let Three.js recompute the normals:
import { VertexNormalsHelper } from 'three/addons/helpers/VertexNormalsHelper.js';

const smoothGeometry = new THREE.SphereGeometry(0.9, 16, 10);

const flatGeometry = smoothGeometry.toNonIndexed();
flatGeometry.computeVertexNormals();

const flat = new THREE.Mesh(flatGeometry, material);
const smooth = new THREE.Mesh(smoothGeometry, material);

// Draw every normal as a short yellow line
scene.add(new VertexNormalsHelper(flat, 0.18, 0xf2cc60));
scene.add(new VertexNormalsHelper(smooth, 0.18, 0xf2cc60));
computeVertexNormals() averages the normals of the triangles that share each vertex. When no vertex is shared, there is nothing to average, so each vertex simply gets its own triangle's normal. That is all "flat" means. VertexNormalsHelper draws each normal as a line, which is a great debugging tool. If it moves with the mesh, call helper.update() every frame.
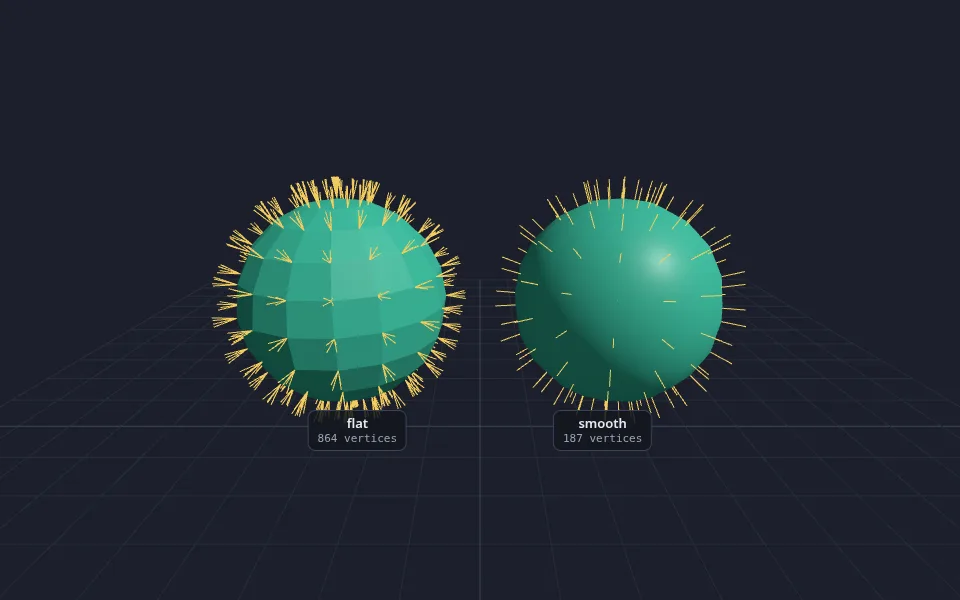
Note the vertex counts in the labels: 864 against 187, for exactly the same shape. Flat shading costs vertices. If you just want the faceted look and do not care about the data, there is a shortcut: new THREE.MeshStandardMaterial({ flatShading: true }) computes a flat normal per pixel in the shader and keeps the geometry as it is.
The built-in geometries
Three.js ships with a good set of shapes. The ones you will use most:
BoxGeometry(width, height, depth)SphereGeometry(radius, widthSegments, heightSegments)PlaneGeometry(width, height), a flat rectangle facing +Z. Rotate it by-Math.PI / 2around X to make a floor.CylinderGeometry,ConeGeometry,TorusGeometry,TorusKnotGeometry,CapsuleGeometry,IcosahedronGeometry.
Most take segment counts. More segments mean a smoother curve and more vertices. For a sphere that fills the screen, 64 × 32 is plenty; for a small one in the distance, 16 × 8 is often enough. Segments also matter on flat shapes when something moves the vertices later, like a waving flag or a terrain.
Materials: from Basic to Physical
Now the other half of the mesh. A material is, under the hood, a shader program plus the settings it reads. Three.js has a family of built-in materials, and each one does more work per pixel than the previous one:
| Material | Reacts to light | Good for |
|---|---|---|
MeshBasicMaterial |
No, flat colour | UI in 3D, debugging, unlit effects |
MeshLambertMaterial |
Diffuse only, no highlights | Matte surfaces, low-end devices |
MeshPhongMaterial |
Diffuse and a specular highlight | Shiny plastic look, cheaper than PBR |
MeshStandardMaterial |
Physically based (PBR) | The default for almost everything |
MeshPhysicalMaterial |
PBR plus clearcoat, transmission, sheen and more | Car paint, glass, fabric |
Here they all are with the same colour under the same two lights from Part 1:
const color = 0x3fc8a8;
const materials = [
  new THREE.MeshBasicMaterial({ color }),
  new THREE.MeshLambertMaterial({ color }),
  new THREE.MeshPhongMaterial({ color, shininess: 60 }),
  new THREE.MeshStandardMaterial({ color, roughness: 0.35 }),
  new THREE.MeshPhysicalMaterial({ color, roughness: 0.6, clearcoat: 1, clearcoatRoughness: 0.05 }),
];

const geometry = new THREE.SphereGeometry(0.6, 64, 32); // one geometry, shared by all five
materials.forEach((material, i) => {
  const mesh = new THREE.Mesh(geometry, material);
  mesh.position.x = (i - 2) * 1.55;
  scene.add(mesh);
});
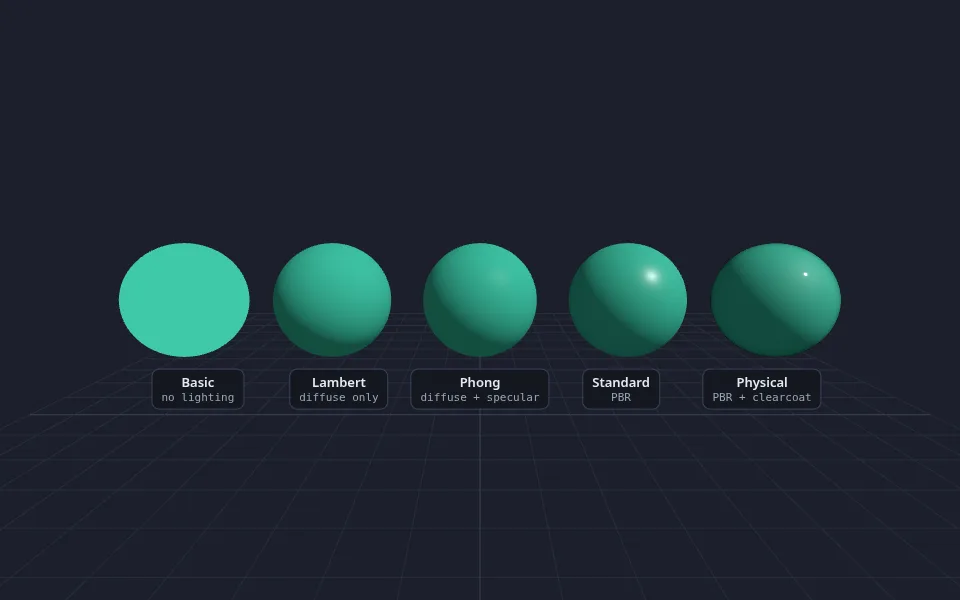
The Physical sphere is a nice example of what the extra features do. Its base is fairly rough (roughness: 0.6), but clearcoat adds a thin, glossy layer on top, like varnish on wood or lacquer on a car. That is where the small, sharp highlight comes from.
(The labels in these demos are plain HTML elements positioned in 3D with the CSS2DRenderer addon. It is a handy tool, but not the topic today, so I will not go into it.)
My advice: start with MeshStandardMaterial and only move away from it with a reason. It looks right under any lighting, its parameters mean the same thing as in Blender and other 3D tools, and models in glTF format use exactly this material model.
Roughness and metalness
MeshStandardMaterial has two main knobs besides colour:
- roughness from
0(a mirror-smooth surface, sharp reflections) to1(completely matte, light scatters in every direction). The default is1. - metalness, which should almost always be
0(plastic, wood, stone, skin) or1(metal). Values in between are mostly useful for transitions, like rust on steel. The default is0.
In Part 1 I hinted that a metallic surface with no environment looks very dark. Here is why. A metal has no diffuse colour at all: everything you see on it is a reflection. In a scene with only a directional light and an ambient light, there is almost nothing to reflect. The light itself is a single point of brightness, and AmbientLight does not show up in reflections at all.
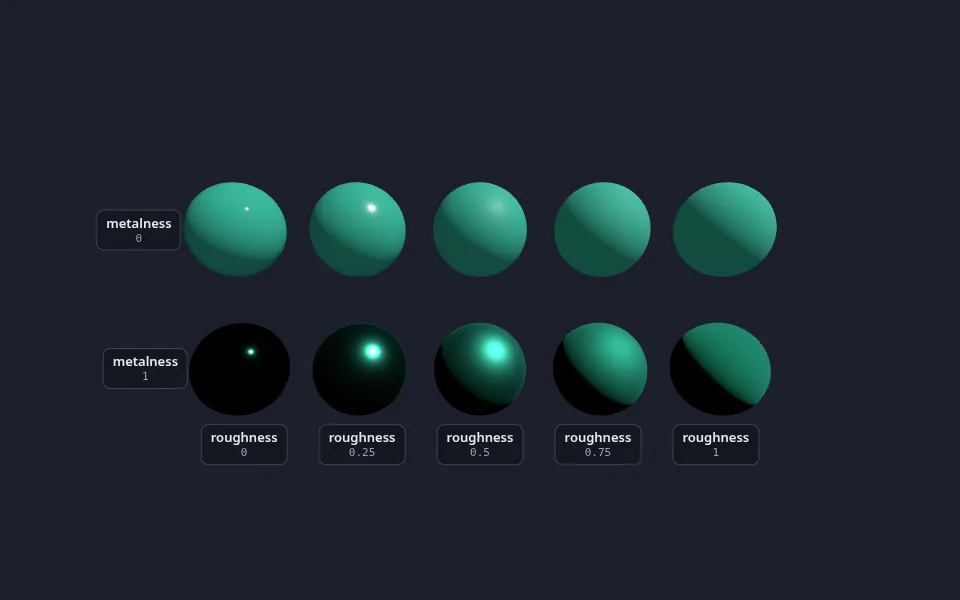
Metals need something around them to reflect. Proper environment lighting is a big part of Part 3, but here is a preview, because it only takes three lines. RoomEnvironment is a simple virtual room with a few bright panels, and PMREMGenerator turns it into a texture that materials can read reflections from, already blurred for every roughness level:
import { RoomEnvironment } from 'three/addons/environments/RoomEnvironment.js';

const pmrem = new THREE.PMREMGenerator(renderer);
scene.environment = pmrem.fromScene(new RoomEnvironment(), 0.04).texture;
scene.environmentIntensity = 0.3;
scene.environment lights every MeshStandardMaterial and MeshPhysicalMaterial in the scene. It also replaces the job of the AmbientLight, so I removed the ambient light in this version.
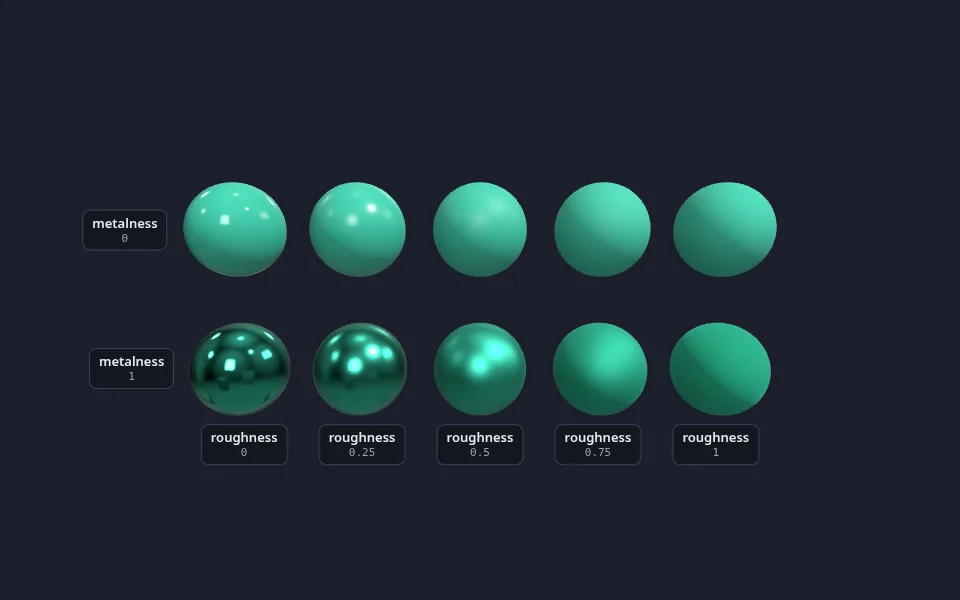
RoomEnvironment. Smooth metals now show sharp reflections; as roughness goes up, the reflections blur. (step-4.html)UV coordinates: where the texture goes
So far every surface has had one colour. To paint an image onto a surface, the GPU needs to know which pixel of the image belongs to each point of the mesh. That is what the uv attribute is for.
UV coordinates describe a point in a texture. u goes left to right, v goes bottom to top, and both run from 0 to 1 no matter how many pixels the image has. In Three.js, (0, 0) is the bottom-left corner of the image and (1, 1) the top-right. (Three.js flips images vertically on upload, because texture.flipY is true by default. That is why it is not the top-left corner, as in CSS.)
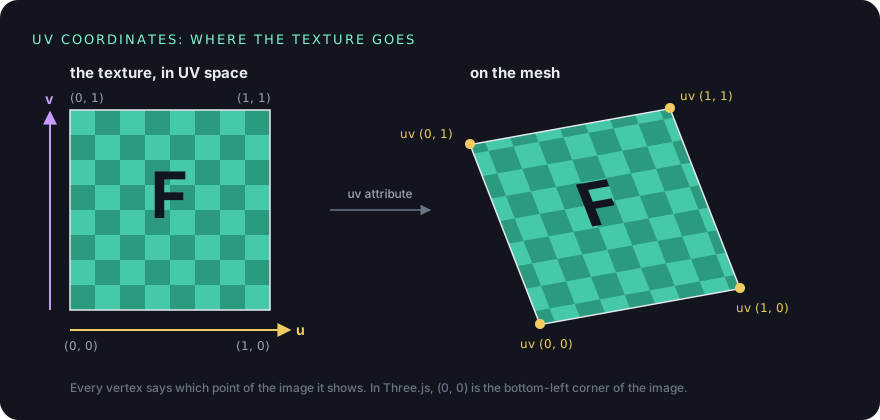
Look back at the UVs of our hand-made quad: 0 0, 1 0, 0 1, 1 1, one per corner. That maps the whole image onto the whole square. The built-in geometries come with sensible UVs: a plane gets the full image, every face of a box gets the full image, and a sphere wraps it around like a world map.
The best way to check UVs is a UV test texture: a grid where every cell is labelled, so you can see at a glance what is stretched, flipped or repeated. Here is one on a plane, a box and a sphere:
const loader = new THREE.TextureLoader();
const uvGrid = loader.load('textures/uv-grid.png');
uvGrid.colorSpace = THREE.SRGBColorSpace; // explained in the next section

const material = new THREE.MeshStandardMaterial({ map: uvGrid, roughness: 0.6 });

const plane = new THREE.Mesh(new THREE.PlaneGeometry(1.4, 1.4), material);
const box = new THREE.Mesh(new THREE.BoxGeometry(1.2, 1.2, 1.2), material);
const sphere = new THREE.Mesh(new THREE.SphereGeometry(0.75, 64, 32), material);
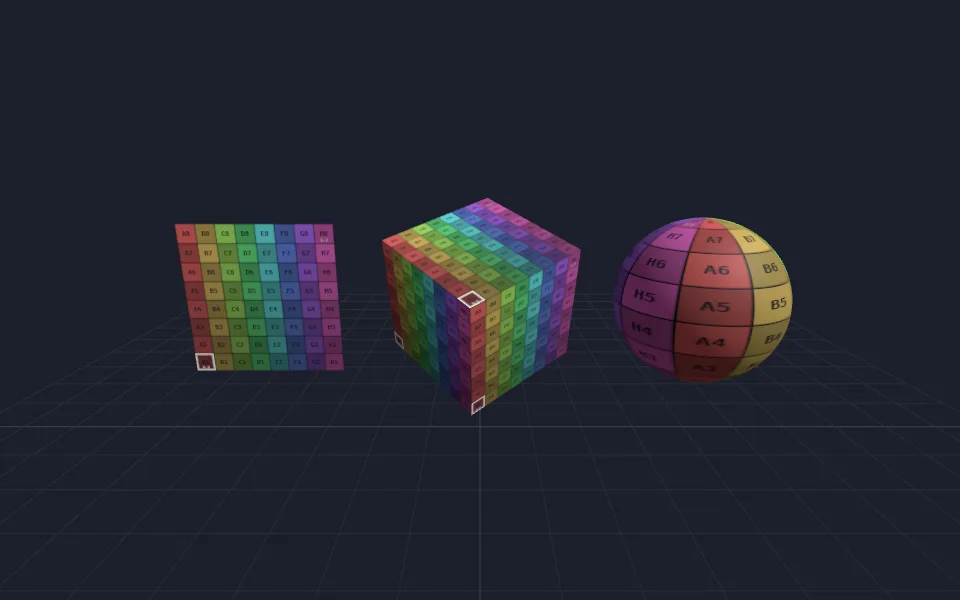
A few things about TextureLoader:
load()returns aTextureimmediately, while the image is still downloading. You can put it on a material straight away; Three.js uploads the image to the GPU when it arrives. Until then the surface is drawn black, usually for only a frame or two. If you need to wait, useawait loader.loadAsync(url).- The
mapproperty of a material is the colour texture (sometimes called albedo, diffuse or base colour map). The texture's colour is multiplied bymaterial.color, which is white by default. - Like geometries, one texture can be shared by any number of materials, and one material by any number of meshes. The step above has three meshes, one material and one texture.
There is one line in that code I have not explained yet, and it is the most important one in the article.
Colour spaces, or why your texture looks washed out
Here is the same tile texture on two cubes. The only difference is one line of code:
// Left: the colour texture with no colour space set (the default)
const wrong = loader.load('textures/tiles-color.jpg');

// Right: the same file, tagged as sRGB
const right = loader.load('textures/tiles-color.jpg');
right.colorSpace = THREE.SRGBColorSpace;
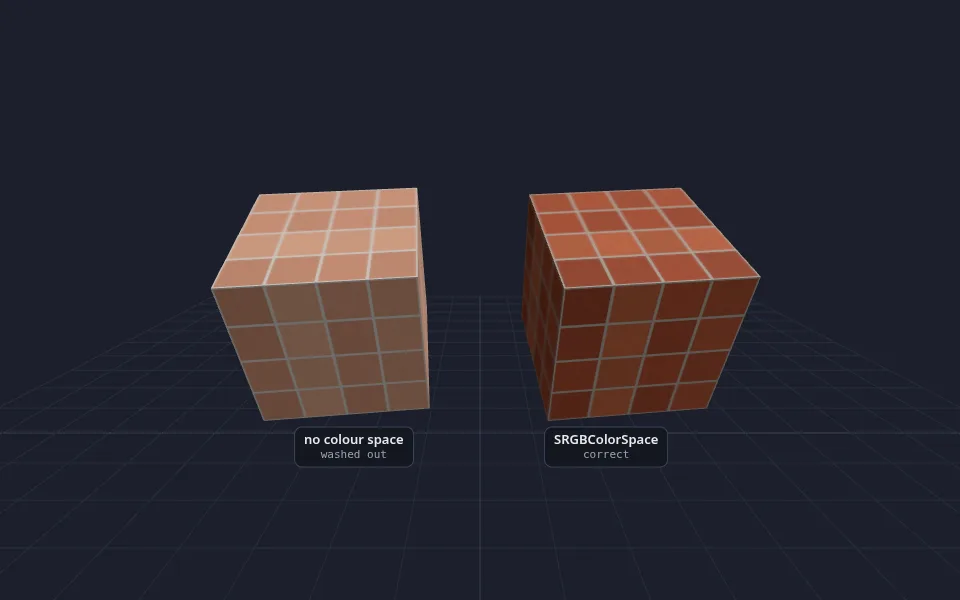
SRGBColorSpace (right). (step-6.html)The left one is what most people get the first time they load a texture, and it is the colour space story I promised at the end of Part 1.
Image files do not store brightness in a straight line. A pixel value of 128 is not half as bright as 255; it is about a fifth as bright. JPEGs, PNGs and your screen all use an encoding called sRGB, which spends more of the available values on dark tones, because our eyes are better at telling dark tones apart.
Lighting maths, on the other hand, only works on linear values, where twice the number means twice the light. "Add the light from the sun to the ambient light" and "multiply by the surface colour" are only correct in linear space.
So a correct renderer does two conversions, one on the way in and one on the way out:
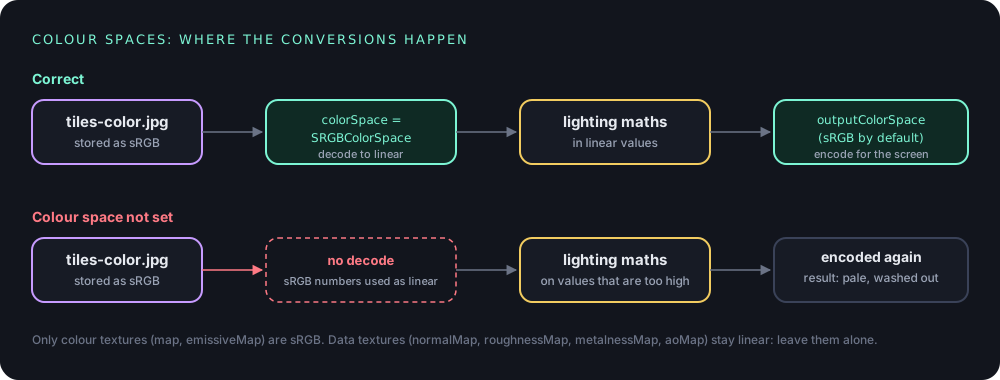
- On the way out,
renderer.outputColorSpaceisSRGBColorSpaceby default, so Three.js always encodes the final image for the screen. You do not need to touch it. - On the way in, Three.js has to know that a texture holds sRGB colours. It cannot guess this from the file, so a new texture has no colour space (
NoColorSpace) and is used as is. Settingtexture.colorSpace = THREE.SRGBColorSpacemakes the GPU decode it to linear before lighting.
Skip the input step, and sRGB values are treated as if they were linear. They are too high, especially in the dark tones, and then the output step brightens them a second time. That is the pale, low-contrast look on the left cube.
The rule to remember:
- Colour textures are sRGB:
map,emissiveMap, and the colour maps of the physical material (sheenColorMap,specularColorMap). SetcolorSpace = THREE.SRGBColorSpaceon them. - Data textures are linear:
normalMap,roughnessMap,metalnessMap,aoMap,bumpMap,displacementMap,alphaMap. Their pixels are not colours but numbers, so leave them alone.
What about color: 0x3fc8a8 in the material? Three.js handles that one for you. Colours you pass as hex numbers or CSS strings are treated as sRGB and converted automatically, so they match the colour picker in your design tool. The one exception is raw numbers in a color vertex attribute, like in our quad: those go straight to the GPU and count as linear.
If you read older tutorials you will see
texture.encoding = THREE.sRGBEncodingandrenderer.outputEncoding. Those are the old names for the same thing: they were deprecated in r152 and have since been removed. The modern versions aretexture.colorSpaceandrenderer.outputColorSpace.
Wrapping, repeat and filtering
A floor 10 metres wide with one tile image stretched over it would give us tiles the size of a car. We want the image to repeat.
texture.repeat scales the UV coordinates: with repeat.set(5, 5), UVs that used to run from 0 to 1 now run from 0 to 5. What happens outside the 0 to 1 range is decided by the wrap mode, set separately for each direction: wrapS for u and wrapT for v.
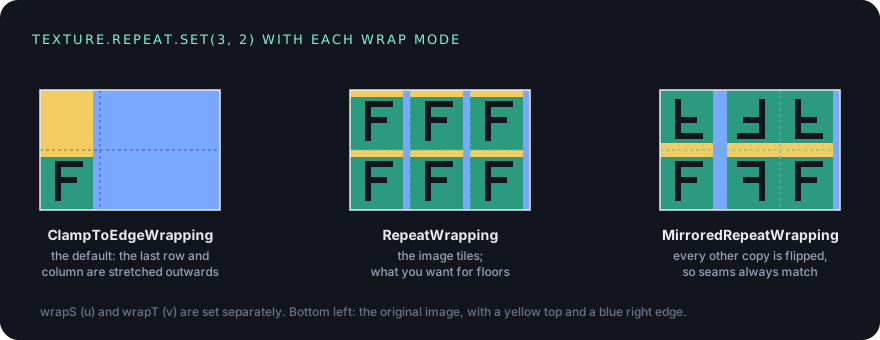
repeat.set(3, 2).The default, ClampToEdgeWrapping, is the reason "I set repeat and nothing happened" is such a common question: outside 0 to 1, it just smears the last row and column of pixels. For a tiling texture you want RepeatWrapping:
const floorTexture = loader.load('textures/tiles-color.jpg');
floorTexture.colorSpace = THREE.SRGBColorSpace;
floorTexture.wrapS = floorTexture.wrapT = THREE.RepeatWrapping;
floorTexture.repeat.set(5, 5);
Two more texture settings decide how sharp a texture looks on screen:
- Mipmaps and filtering. When a texture is far away, many of its pixels land on one screen pixel. To avoid shimmering, the GPU keeps smaller, pre-blurred copies of the texture (mipmaps) and picks the right one. Three.js generates mipmaps for you, and the default filters (
LinearMipmapLinearFilterfor minification,LinearFilterfor magnification) are good. For pixel art, setmagFiltertoTHREE.NearestFilter. - Anisotropic filtering. A floor seen at a low angle gets blurry in the distance, because mipmaps blur equally in both directions. Anisotropic filtering samples the texture more cleverly at grazing angles. Ask the renderer for its maximum and use it on textures you see at an angle:
floorTexture.anisotropy = renderer.capabilities.getMaxAnisotropy();
It costs a little GPU time, which is why it is not on by default. On a floor, the difference is obvious.
More maps: normal and roughness
A colour map changes the colour of a surface, but the lighting still treats it as perfectly flat. Real tiles have grooves between them, and the grout is matte while the glaze is shiny. Two more textures take care of that:
- A normal map stores a normal direction in every pixel, as RGB: red for x, green for y, blue for z. That is why normal maps look light blue: most pixels point straight out of the surface,
(0, 0, 1). The shader uses them to bend the interpolated vertex normal at every pixel, so light catches the bevelled edge of every tile, even though the cube is still 12 flat triangles. - A roughness map stores roughness per pixel: dark is smooth, light is rough. Three.js reads it from the green channel and multiplies it by
material.roughness, so setroughness: 1to use the map as it is. (A metalness map works the same way, from the blue channel.)
Both are data textures, so no colorSpace for them. All three maps for one mesh look like this:
const maxAnisotropy = renderer.capabilities.getMaxAnisotropy();

function loadTiles(repeat) {
  const map = loader.load('textures/tiles-color.jpg');
  map.colorSpace = THREE.SRGBColorSpace;        // colour data: sRGB
  const normalMap = loader.load('textures/tiles-normal.png');
  const roughnessMap = loader.load('textures/tiles-roughness.jpg');
  for (const t of [map, normalMap, roughnessMap]) {   // data maps stay linear
    t.wrapS = t.wrapT = THREE.RepeatWrapping;
    t.repeat.set(repeat, repeat);
    t.anisotropy = maxAnisotropy;
  }
  return { map, normalMap, roughnessMap };
}

const cubeMaterial = new THREE.MeshStandardMaterial({ ...loadTiles(1), roughness: 1 });
const floorMaterial = new THREE.MeshStandardMaterial({ ...loadTiles(5), roughness: 1 });
Why a function that loads the files again, instead of sharing one set of textures? Because repeat and the wrap mode are properties of the texture object, and the cube and the floor need different repeats. The browser caches the image files, so the second load does not download anything again.
Normal maps come in two conventions, often called OpenGL (green points up) and DirectX (green points down). Three.js expects OpenGL. If the bumps in a downloaded texture look lit from the wrong side, flip the green channel with material.normalScale.y = -1. normalScale is also how you make the effect stronger or weaker.
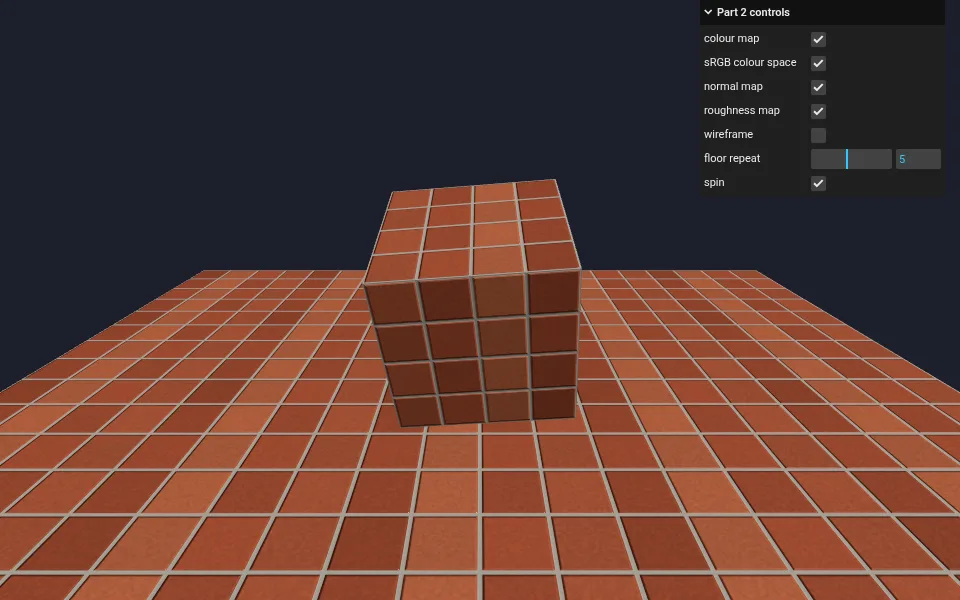
The panel is lil-gui, which ships with Three.js as an addon. Two details in its handlers are worth knowing:
- Changing a texture's
colorSpaceafter it has been uploaded needstexture.needsUpdate = true, so the texture is uploaded again. - Adding or removing a map on a material needs
material.needsUpdate = true, because Three.js compiles a different shader for "with a normal map" and "without".
Changing repeat, color or roughness needs neither: those are just values passed to the shader every frame.
One more change in the final demo: the cube's rotation now comes from a THREE.Timer. In Part 1 we computed the angle from the timestamp directly. That stops working once you can pause, because the cube would jump when you un-pause. Adding up the time between frames (timer.getDelta(), in seconds) keeps the motion frame-rate independent and lets the "spin" checkbox stop it cleanly.
Sharing and cleaning up
Geometries, materials and textures all hold GPU memory, and JavaScript's garbage collector cannot free it for you. Two habits keep this under control:
- Share. Five meshes with the same shape should use one geometry; a hundred trees can use one material. It saves memory and upload time, and the GPU has less state to switch between draw calls.
- Dispose. When you remove something from the scene for good, free its GPU resources explicitly:
scene.remove(mesh);
mesh.geometry.dispose();
mesh.material.dispose();
mesh.material.map?.dispose(); // and any other textures it uses
Only dispose things nothing else uses. renderer.info.memory tells you how many geometries and textures are currently on the GPU, which is a quick way to spot a leak.
The full code
Here is the final demo in one file. It is the same code as the live demo. This time it needs its textures: download the textures folder from the repo, put it next to index.html, and serve the folder as in Part 1 (npx serve . or python3 -m http.server).
<!doctype html>
<html lang="en">
<head>
  <meta charset="utf-8">
  <meta name="viewport" content="width=device-width, initial-scale=1">
  <title>Geometry, materials and textures · final demo</title>
  <style>
    html, body { margin: 0; height: 100%; background: #000; }
    canvas { display: block; }
  </style>
  <script type="importmap">
    {
      "imports": {
        "three": "https://cdn.jsdelivr.net/npm/three@0.186.1/build/three.module.js",
        "three/addons/": "https://cdn.jsdelivr.net/npm/three@0.186.1/examples/jsm/"
      }
    }
  </script>
</head>
<body>
  <script type="module">
    import * as THREE from 'three';
    import { OrbitControls } from 'three/addons/controls/OrbitControls.js';
    import GUI from 'three/addons/libs/lil-gui.module.min.js';

    // Scene and camera
    const scene = new THREE.Scene();
    scene.background = new THREE.Color(0x1b1f2a);

    const camera = new THREE.PerspectiveCamera(60, innerWidth / innerHeight, 0.1, 100);
    camera.position.set(0, 1.5, 4);

    // Renderer
    const renderer = new THREE.WebGLRenderer({ antialias: true });
    renderer.setPixelRatio(Math.min(devicePixelRatio, 2));
    renderer.setSize(innerWidth, innerHeight);
    document.body.appendChild(renderer.domElement);

    // Textures: one set of tile maps, loaded once per mesh that needs its own repeat
    const loader = new THREE.TextureLoader();
    const maxAnisotropy = renderer.capabilities.getMaxAnisotropy();

    function loadTiles(repeat) {
      const map = loader.load('textures/tiles-color.jpg');
      map.colorSpace = THREE.SRGBColorSpace;        // colour data: sRGB
      const normalMap = loader.load('textures/tiles-normal.png');
      const roughnessMap = loader.load('textures/tiles-roughness.jpg');
      for (const t of [map, normalMap, roughnessMap]) {   // data maps stay linear
        t.wrapS = t.wrapT = THREE.RepeatWrapping;
        t.repeat.set(repeat, repeat);
        t.anisotropy = maxAnisotropy;
      }
      return { map, normalMap, roughnessMap };
    }

    const cubeMaps = loadTiles(1);
    const floorMaps = loadTiles(5);

    // The cube from Part 1, now with a tiled surface
    const cubeMaterial = new THREE.MeshStandardMaterial({ ...cubeMaps, roughness: 1 });
    const cube = new THREE.Mesh(new THREE.BoxGeometry(1.4, 1.4, 1.4), cubeMaterial);
    scene.add(cube);

    // A floor made of the same tiles, repeated 5 times in each direction
    const floorMaterial = new THREE.MeshStandardMaterial({ ...floorMaps, roughness: 1 });
    const floor = new THREE.Mesh(new THREE.PlaneGeometry(10, 10), floorMaterial);
    floor.rotation.x = -Math.PI / 2;
    floor.position.y = -1.3;
    scene.add(floor);

    // Lights, same as Part 1
    scene.add(new THREE.AmbientLight(0xffffff, 0.4));
    const sun = new THREE.DirectionalLight(0xffffff, 2.5);
    sun.position.set(3, 4, 2);
    scene.add(sun);

    // Orbit controls: drag to rotate, scroll to zoom, right-drag to pan
    const controls = new OrbitControls(camera, renderer.domElement);
    controls.enableDamping = true;
    controls.maxPolarAngle = Math.PI * 0.48; // do not go under the floor

    // A small panel to switch things on and off
    const params = {
      colorMap: true,
      srgb: true,
      normalMap: true,
      roughnessMap: true,
      wireframe: false,
      floorRepeat: 5,
      spin: true,
    };
    const materials = [cubeMaterial, floorMaterial];
    const sets = [cubeMaps, floorMaps];

    function applyMaps() {
      materials.forEach((m, i) => {
        m.map = params.colorMap ? sets[i].map : null;
        m.normalMap = params.normalMap ? sets[i].normalMap : null;
        m.roughnessMap = params.roughnessMap ? sets[i].roughnessMap : null;
        m.roughness = params.roughnessMap ? 1 : 0.45;
        m.needsUpdate = true; // adding or removing a map changes the shader
      });
    }

    const gui = new GUI({ title: 'Part 2 controls' });
    gui.add(params, 'colorMap').name('colour map').onChange(applyMaps);
    gui.add(params, 'srgb').name('sRGB colour space').onChange((on) => {
      for (const s of sets) {
        s.map.colorSpace = on ? THREE.SRGBColorSpace : THREE.NoColorSpace;
        s.map.needsUpdate = true; // the texture must be uploaded again
      }
    });
    gui.add(params, 'normalMap').name('normal map').onChange(applyMaps);
    gui.add(params, 'roughnessMap').name('roughness map').onChange(applyMaps);
    gui.add(params, 'wireframe').onChange((on) => { cubeMaterial.wireframe = on; });
    gui.add(params, 'floorRepeat', 1, 10, 1).name('floor repeat').onChange((n) => {
      for (const t of Object.values(floorMaps)) t.repeat.set(n, n);
    });
    gui.add(params, 'spin');

    // Keep the canvas sharp and undistorted when the window changes size
    function onResize() {
      camera.aspect = innerWidth / innerHeight;
      camera.updateProjectionMatrix();
      renderer.setPixelRatio(Math.min(devicePixelRatio, 2));
      renderer.setSize(innerWidth, innerHeight);
    }
    addEventListener('resize', onResize);

    // Animation loop
    const timer = new THREE.Timer();
    let angle = 0;
    renderer.setAnimationLoop((time) => {
      timer.update(time);
      if (params.spin) angle += timer.getDelta();
      cube.rotation.x = 0.4 + angle * 0.4;
      cube.rotation.y = 0.7 + angle * 0.7;
      controls.update();
      renderer.render(scene, camera);
    });
  </script>
</body>
</html>
The step-by-step versions are in the repo too: step-1.html (the hand-made quad), step-2.html (normals), step-3.html (materials), step-4.html (roughness and metalness), step-5.html (UVs) and step-6.html (colour space).
A few things to try
- In step 1, change the index to
[0, 2, 1, 2, 3, 1]and removeside: THREE.DoubleSide. The quad disappears from the front and shows up from behind: you reversed the winding order. - In step 2, add
flatShading: trueto the material and compare it with the non-indexed sphere. - In the final demo, turn off the sRGB checkbox and watch the tiles fade. Then turn off the normal map and orbit close to the cube: the tile edges go flat.
- Set
floor repeatto 1 and zoom in. Then drop theanisotropyline, look at the floor at a low angle, and watch the far tiles blur. - Replace the tiles with textures from Poly Haven or ambientCG, both free (CC0). Their downloads include colour, normal (pick the GL version) and roughness maps.
Next time
We now know what a mesh is made of, and we can make a surface look like a material instead of a colour. But writing vertices by hand only goes so far, and our cube still does not cast a shadow on its own floor. In Part 3 we load real models made in Blender and other tools (glTF, the "JPEG of 3D"), turn on shadows, and light the whole scene with an environment map, the proper version of the RoomEnvironment trick from this article. See you there.