← Three.js from Scratch · all parts
Three.js from Scratch, Part 6: Post-Processing and Bloom
Everything we have drawn so far went straight to the screen: the renderer drew each mesh, pixel by pixel, into the canvas, and that was the frame. That is enough for a lot of things. But some looks cannot be made one mesh at a time. A neon tube that glows spills light onto the pixels around it, including pixels that belong to other objects. A camera lens darkens the corners of the whole picture, not of one object. Smoothing jagged edges, colour grading, depth of field, motion blur: all of these work on the finished image.
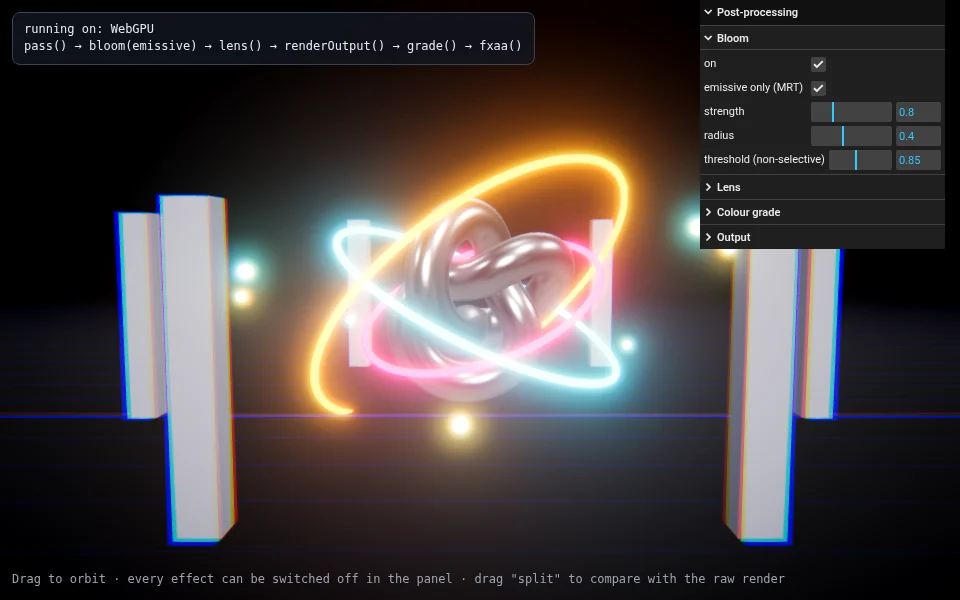
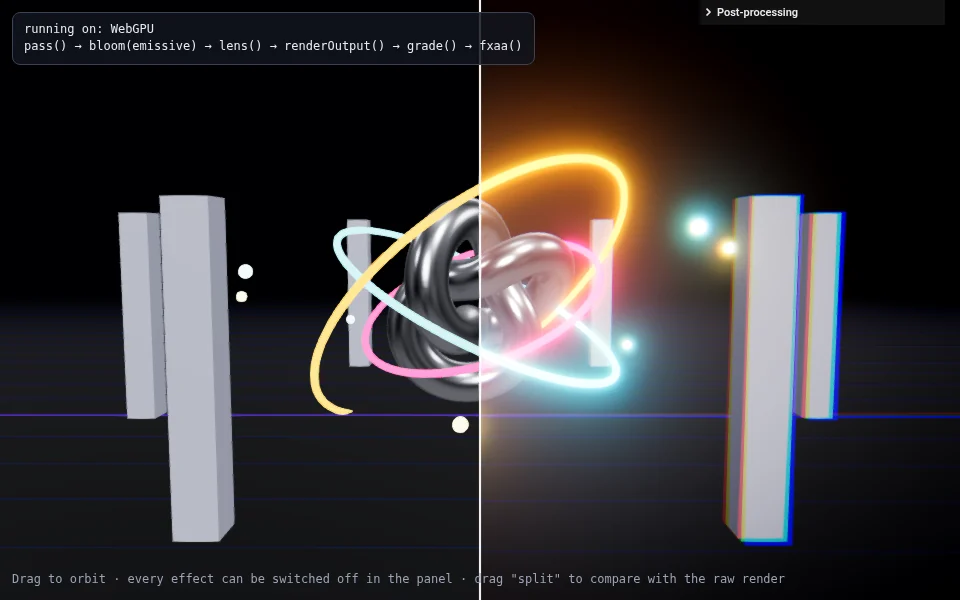
That is post-processing: render the scene into a texture first, then run one or more full-screen shaders over that texture before anything reaches the screen. In this part we build it up from the bottom. First by hand, with a render target and one quad. Then with Three.js's EffectComposer and its passes: bloom, a custom lens shader written in the GLSL of Part 4, the output pass and anti-aliasing. Then we rebuild the same chain on WebGPURenderer with TSL nodes from Part 5, and finish with a trick the node version makes easy: bloom on only what glows. Open the panel and switch the effects on and off, or drag split to compare with the raw render:
Open the demo full screen ↗ · Source on GitHub ↗
Everything uses Three.js r186 (npm version
0.186.1). Steps 1 to 4 use the classicWebGLRenderer, with the import map from Parts 1 to 4. Steps 5 and 6 and the final demo useWebGPURendererand the import map from Part 5, and fall back to WebGL 2 when the browser has no WebGPU: add?backend=webglto force it. One name changed recently: the class Part 5 called "node-based post-processing",PostProcessing, was renamedRenderPipelinein r183. The old name still works in r186 but is deprecated, so older tutorials and the new docs disagree. This article usesRenderPipeline.
The scene
All the demos in this part share one small scene, made to show off the effects: a chrome torus knot, three thin neon rings around it, eight small glowing sparks, six white pillars and a grid floor. Two things about it matter for later:
- The neon is brighter than white. The rings use a black base colour and an emissive colour with
emissiveIntensity: 3, the sparks 6. So their pixels come out of the lighting calculation with values like 3.0 or 6.0, not 1.0. On a screen both look like "fully on", but the difference is still in the numbers, and bloom will use it. - The pillars are white, but they do not glow. They are bright only because the sun hits them. In the last step we will teach the bloom to tell the two kinds of bright apart.
The thin lines of the grid are there on purpose too: they are where you will see jagged edges, and where anti-aliasing has to do its job.
Step 1: a render target, and one full-screen quad
Normally renderer.render(scene, camera) draws into the canvas. A render target is somewhere else to draw: an off-screen texture with the same kind of colour and depth buffers as the canvas. You point the renderer at it, render, and afterwards the picture is a texture you can use like any other, for example as a uniform in a shader.
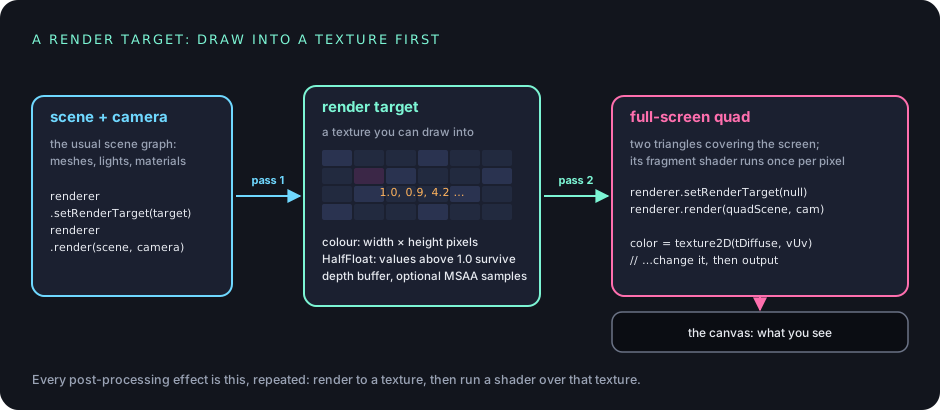
Creating one takes a size and a few options:
const size = renderer.getDrawingBufferSize(new THREE.Vector2());   // canvas size in device pixels
const target = new THREE.WebGLRenderTarget(size.x, size.y, {
  type: THREE.HalfFloatType,   // 16-bit floats: values above 1.0 survive
  samples: 4,                  // MSAA, so edges stay smooth
});
Two options are worth a closer look:
type: THREE.HalfFloatType. The default render target stores 8 bits per channel, 0 to 255, so everything above 1.0 is clipped, exactly like the screen. Half floats keep values like 3.0, so the neon stays "brighter than white" inside the texture. For post-processing that is almost always what you want.samples: 4. Theantialias: trueyou pass to the renderer only applies to the canvas. A render target has its own buffers, so if you want MSAA (multisample anti-aliasing) there, you ask for it here.
The second half is the full-screen quad: a PlaneGeometry(2, 2) whose corners are at -1 and +1, which is exactly the corners of the screen in clip space (the coordinate system gl_Position uses, from Part 4). So the vertex shader does not need a camera at all:
const effect = new THREE.ShaderMaterial({
  uniforms: {
    tDiffuse: { value: target.texture },   // the picture we just rendered
    mode: { value: 1 },
    cells: { value: 140 },
  },
  vertexShader: /* glsl */ `
    varying vec2 vUv;
    void main() {
      vUv = uv;
      gl_Position = vec4(position.xy, 0.0, 1.0);   // already in clip space
    }`,
  fragmentShader: /* glsl */ `
    uniform sampler2D tDiffuse;
    uniform int mode;
    uniform float cells;
    varying vec2 vUv;
    void main() {
      vec2 uv = vUv;
      if (mode == 2) uv = (floor(uv * cells) + 0.5) / cells;   // pixelate: sample the centre of each cell
      vec4 color = texture2D(tDiffuse, uv);
      if (mode == 1) color.rgb = vec3(dot(color.rgb, vec3(0.2126, 0.7152, 0.0722)));   // greyscale
      gl_FragColor = color;
      #include <tonemapping_fragment>
      #include <colorspace_fragment>
    }`,
  depthTest: false,
  depthWrite: false,
});
const quad = new THREE.Mesh(new THREE.PlaneGeometry(2, 2), effect);
quad.frustumCulled = false;
const quadScene = new THREE.Scene();
quadScene.add(quad);
const quadCamera = new THREE.OrthographicCamera(-1, 1, 1, -1, 0, 1);   // render() wants a camera
Each frame now has two passes:
renderer.setAnimationLoop((t) => {
  animate(t / 1000);
  renderer.setRenderTarget(target);      // pass 1: the scene, into the texture
  renderer.render(scene, camera);
  renderer.setRenderTarget(null);        // pass 2: the quad, onto the screen
  renderer.render(quadScene, quadCamera);
});
The fragment shader runs once for every pixel of the screen, and vUv tells it where it is. It is the same kind of shader as the gradient planes of Part 4. The only new thing is that it reads its colour from a texture of the rendered scene. Pixelating is one line: round the UV down to a grid of cells before you sample, and every pixel in a cell reads the same texel.
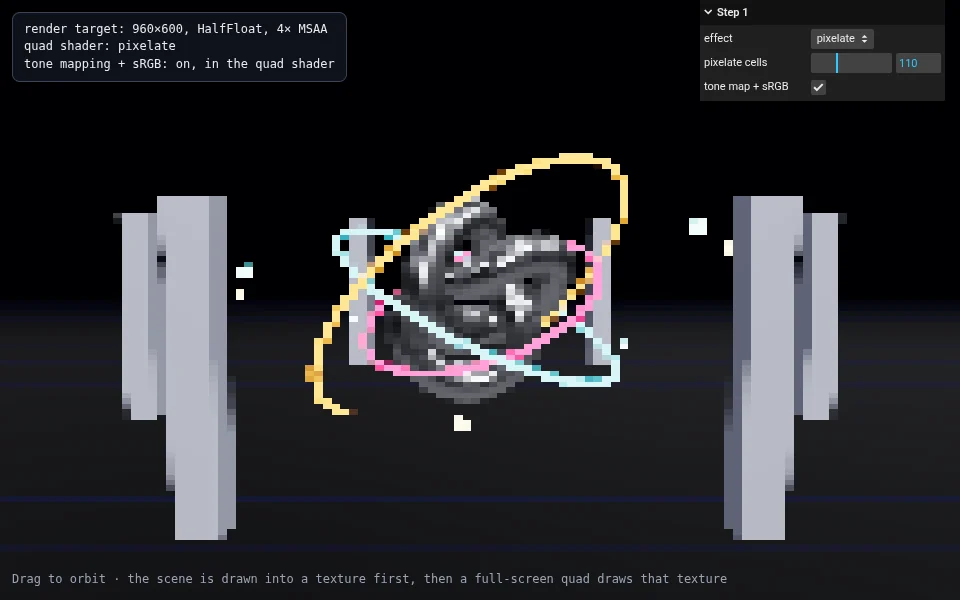
Why the two #include lines? When the renderer draws into a render target, Three.js leaves the values linear and does not tone map them: the built-in materials only apply tone mapping and the sRGB conversion from Parts 2 and 3 when they draw to the screen. That is deliberate, because the next shader wants the real HDR numbers, not display values. But it means the last shader in the chain has to do both steps, or the picture comes out harsh and wrong. In step 1 that last shader is ours, so it includes Three.js's own chunks, as the Part 4 shaders did. Untick tone map + sRGB in the panel to see the raw linear values on screen.
Remember that rule: tone mapping and the sRGB conversion happen once, at the very end. Most post-processing bugs are a break of it.
Step 2: EffectComposer and ping-pong
One effect is easy. With five, you need more textures: each effect reads the previous picture and writes a new one, and a shader cannot read and write the same texture at once. Three.js's EffectComposer organises this for you. You give it a list of passes, and it runs them in order:
import { EffectComposer } from 'three/addons/postprocessing/EffectComposer.js';
import { RenderPass } from 'three/addons/postprocessing/RenderPass.js';
import { ShaderPass } from 'three/addons/postprocessing/ShaderPass.js';
import { OutputPass } from 'three/addons/postprocessing/OutputPass.js';

const composer = new EffectComposer(renderer);   // makes two HalfFloat render targets for us
composer.addPass(new RenderPass(scene, camera)); // draw the scene
composer.addPass(new ShaderPass(LensShader));    // our effect (below)
composer.addPass(new OutputPass());              // tone mapping + sRGB, once, at the end

renderer.setAnimationLoop((t) => {
  animate(t / 1000);
  composer.render();   // instead of renderer.render(scene, camera)
});
Inside, the composer owns exactly two render targets, and the passes take turns with them. This is called ping-pong: one target is the readBuffer, the latest picture, and the other is the writeBuffer, where the next pass draws. A pass that reads one and writes the other sets needsSwap, and afterwards the composer swaps the two names, so the next pass again finds the newest picture in readBuffer. The last enabled pass gets renderToScreen = true and draws to the canvas instead.
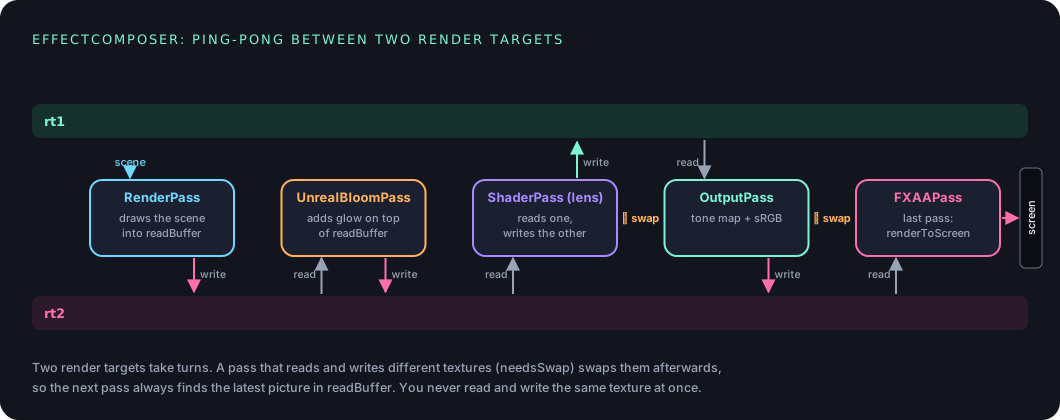
Not every pass swaps. RenderPass draws into the readBuffer directly, and UnrealBloomPass, which we add in step 3, blends its glow on top of the readBuffer and leaves it there. Neither needs a second texture for its output. The panel in step 2 traces the real buffers for the current frame, so you can watch it: turn a pass off and the chain on the left changes.
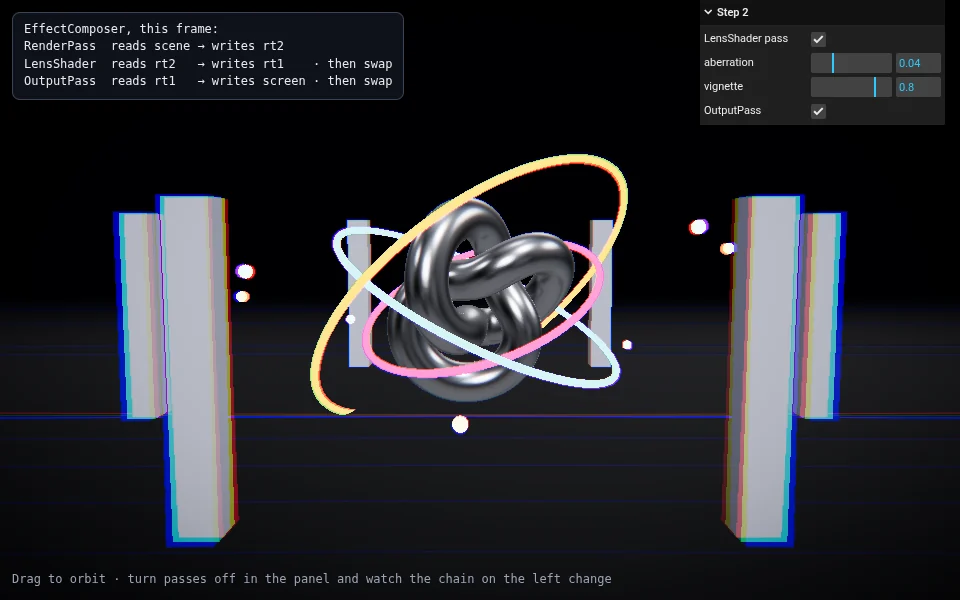
RenderPass → ShaderPass(LensShader) → OutputPass, with the composer's own record of which buffer each pass read and wrote. (step-2.html)A custom ShaderPass: the lens
ShaderPass turns any shader into a pass. It is the same full-screen quad as step 1, with one convention: the input picture arrives in a uniform called tDiffuse, and ShaderPass fills it in for you. Everything else is the Part 4 fragment shader you already know how to write. Ours imitates two faults of a cheap camera lens:
const LensShader = {
  name: 'LensShader',
  uniforms: {
    tDiffuse: { value: null },   // set by ShaderPass: the previous pass's picture
    aberration: { value: 0.04 },
    vignette: { value: 0.8 },
  },
  vertexShader: /* glsl */ `
    varying vec2 vUv;
    void main() {
      vUv = uv;
      gl_Position = projectionMatrix * modelViewMatrix * vec4(position, 1.0);
    }`,
  fragmentShader: /* glsl */ `
    uniform sampler2D tDiffuse;
    uniform float aberration;
    uniform float vignette;
    varying vec2 vUv;
    void main() {
      vec2 fromCentre = vUv - 0.5;
      float dist = length(fromCentre);
      vec2 offset = fromCentre * dist * aberration;   // zero in the middle, strongest in the corners

      // chromatic aberration: red, green and blue each sampled at a slightly different spot
      float r = texture2D(tDiffuse, vUv + offset).r;
      vec4 base = texture2D(tDiffuse, vUv);
      float b = texture2D(tDiffuse, vUv - offset).b;
      vec3 color = vec3(r, base.g, b);

      // vignette: darken towards the corners
      color *= mix(1.0, smoothstep(0.85, 0.25, dist), vignette);
      gl_FragColor = vec4(color, base.a);
    }`,
};
const lensPass = new ShaderPass(LensShader);
lensPass.uniforms.aberration.value = 0.06;   // ShaderPass clones the uniforms: change them here
Chromatic aberration is a lens bending red, green and blue light by slightly different amounts, so colours fringe near the edges of the frame. The shader fakes it by reading the red channel a little further out from the centre and the blue a little further in. Because offset grows with the distance from the centre, the middle of the picture stays sharp. The vignette is the smoothstep falloff from Part 4's glowing spot, turned inside out: full brightness up to a distance of 0.25 from the centre, fading towards 0.85. mix with the vignette uniform sets how strong it is.
This is also the first shader that reads the texture at other pixels than its own (vUv + offset). That is exactly what a single-pass material cannot do, and why post-processing exists: a mesh's fragment shader only knows about its own pixel, while a full-screen pass sees the finished picture.
OutputPass: tone mapping, once, at the end
OutputPass is the composer's version of the two #include lines from step 1. It applies the renderer's toneMapping and toneMappingExposure, then converts to the output colour space, sRGB. It reads those settings from the renderer, so the tone mapping you set up in Part 3 keeps working. Turn it off in the step 2 panel and you get the raw linear values on screen:
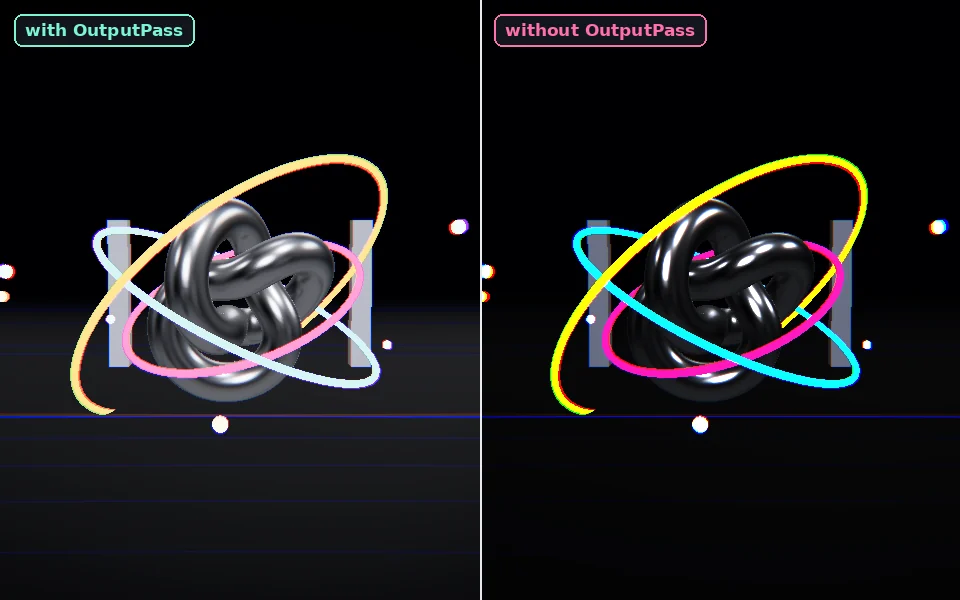
OutputPass. Right: without it, the linear HDR values go to the screen as they are. Bright areas clip to pure colours and the darks are too dark.In r186 you should always end a composer chain with OutputPass. Older tutorials end with a plain ShaderPass(GammaCorrectionShader) or set renderer.outputEncoding. Neither is right any more: the first ignores tone mapping, and the second no longer exists.
Step 3: bloom, and why the order matters
Bloom is the glow around bright light: in a real camera or eye, very bright light scatters and bleeds into the area around it. UnrealBloomPass, named after the Unreal Engine technique it copies, fakes it in four steps:
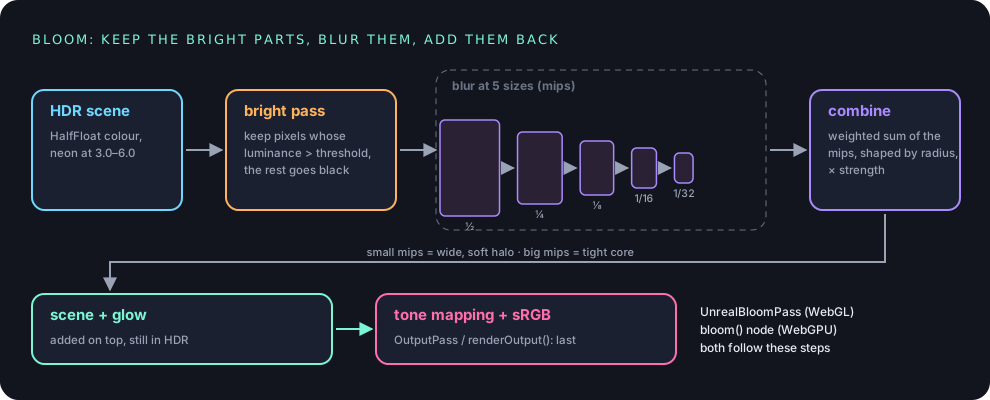
- Bright pass: keep only pixels brighter than
threshold, and make the rest black. - Blur that image at five sizes, each half the resolution of the one before. Blurring a small image and stretching it back up is a cheap way to get a very wide blur.
- Combine the five blurs.
radiusshifts the weight from the tight, sharp ones to the wide, soft ones, andstrengthscales the whole glow. - Add the glow on top of the picture.
In code it is one pass between the scene and the output:
import { UnrealBloomPass } from 'three/addons/postprocessing/UnrealBloomPass.js';

// resolution, strength, radius, threshold
const bloomPass = new UnrealBloomPass(new THREE.Vector2(innerWidth, innerHeight), 0.5, 0.2, 1);

composer.addPass(new RenderPass(scene, camera));
composer.addPass(bloomPass);
composer.addPass(new OutputPass());
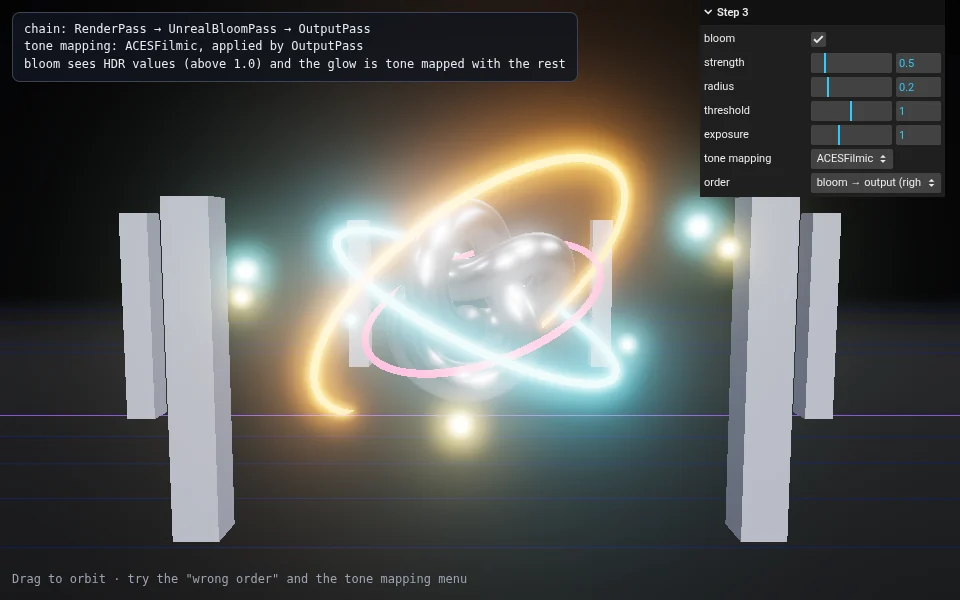
RenderPass → UnrealBloomPass → OutputPass. The threshold is 1.0, so only the emissive neon, with values of 3 and 6, makes it through the bright pass. (step-3.html)A threshold of 1.0 is the interesting number. In an HDR render target, 1.0 is "white", and only things that are brighter than white get past it: the neon. The lit white pillars and the chrome highlights stay just under it, so they do not glow. This only works because of the two rules from step 1: the composer's render targets are HalfFloat, so values above 1 are still there, and tone mapping comes after the bloom, so the bloom sees the real light values, not the 0-to-1 display values.
Now break the rule. Set order to "output → bloom" in the panel:
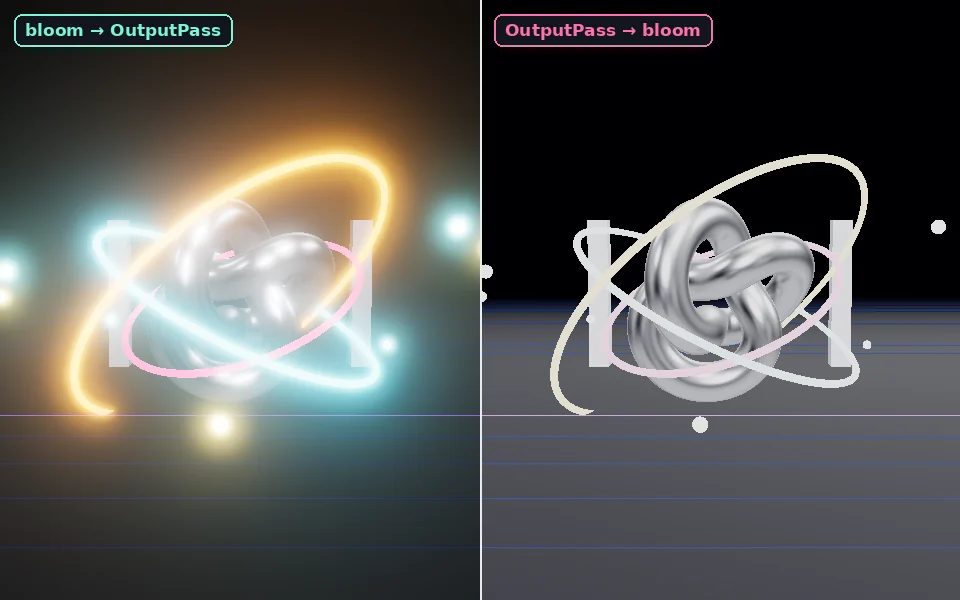
bloom → OutputPass, the right way. Right: OutputPass → bloom. No glow, and the picture is grey and washed out.Two things went wrong at once:
- No glow. After
OutputPass, every pixel is a display value between 0 and 1. The bright pass is looking for values above 1.0, and there are none left. You could lower the threshold until something glows, but then the white pillars glow too, because tone mapping has squashed the neon and the pillars into the same range. - A washed-out picture. As the last pass,
UnrealBloomPasscopies its result to the screen with a material that applies the renderer's tone mapping and sRGB conversion. The picture has now been tone mapped and converted twice. Every dark value is lifted, every colour bleached.
That is the general lesson, and it applies to almost every effect: effects that work on light (bloom, depth of field, motion blur, exposure) go before OutputPass, on linear HDR values. Effects that work on the final image (anti-aliasing, film grain, many colour grades) go after it, on display values.
Try the tone mapping menu too. With None (clips), everything above 1.0 is cut off flat, and the bloom's soft edge suddenly ends in a hard rim. ACES Filmic, AgX and Neutral each roll the highlights off differently, so the same glow changes colour and size between them. That is Part 3's tone mapping, now with a much more demanding input.
Step 4: anti-aliasing in a composer
Switch to a composer, look at the thin grid lines and the edges of the pillars, and you may notice that they have become jagged. That is not a bug in your passes. antialias: true on the renderer enables MSAA for the canvas only, and the composer no longer draws the scene to the canvas: it draws it into its own render targets, which by default have no MSAA. There are three ways to get the smooth edges back:
// 1. MSAA in the composer's render target: hand it one you made
const size = renderer.getDrawingBufferSize(new THREE.Vector2());
const target = new THREE.WebGLRenderTarget(size.x, size.y, { type: THREE.HalfFloatType, samples: 4 });
const composer = new EffectComposer(renderer, target);

// 2. FXAA or 3. SMAA: a pass at the end, after OutputPass
import { FXAAPass } from 'three/addons/postprocessing/FXAAPass.js';
import { SMAAPass } from 'three/addons/postprocessing/SMAAPass.js';
composer.addPass(new OutputPass());
composer.addPass(new FXAAPass());   // or new SMAAPass()
- MSAA (multisample anti-aliasing) runs while the scene is drawn: the GPU tests several points inside each pixel on triangle edges and averages them. It gives the best edges on geometry, but costs memory for every sample and does nothing for edges created by a shader.
- FXAA (fast approximate anti-aliasing) is a post-processing pass. It looks for sharp contrast steps in the finished image and blurs along them. It is cheap and catches every edge, including shader edges, but can soften fine detail and text.
- SMAA (subpixel morphological anti-aliasing) is a smarter post pass: it recognises edge shapes and blends them more precisely, with three internal passes. Sharper than FXAA, a bit more expensive.
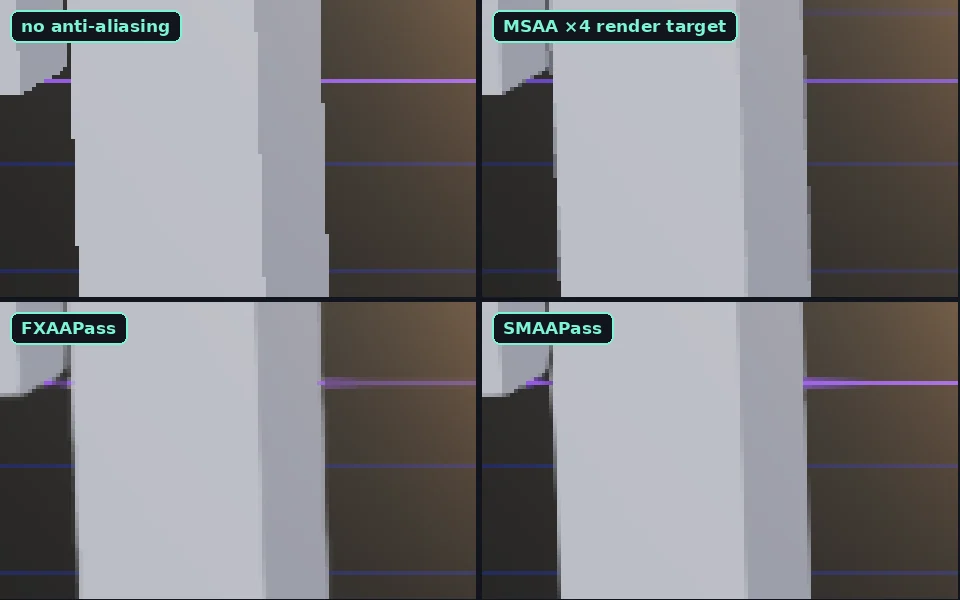
?aa=none, msaa, fxaa or smaa, plus &zoom for the magnifier. (step-4.html)FXAA and SMAA have to go after OutputPass. They decide what an edge is by comparing brightness, and they were designed for display values in sRGB, not for linear HDR values where a neon tube is 6.0 and its neighbour 0.01. Put them earlier and they miss edges in the darks and over-blur the highlights.
Step 5: the same chain on WebGPU, with TSL
Now the WebGPU version. EffectComposer and its passes are GLSL and do not run on WebGPURenderer, just as ShaderMaterial did not in Part 5. The replacement is the same idea as Part 5's node materials: instead of a list of passes, you build one node graph for the whole screen, and the renderer turns it into shaders and render targets.
The four pieces map one to one:
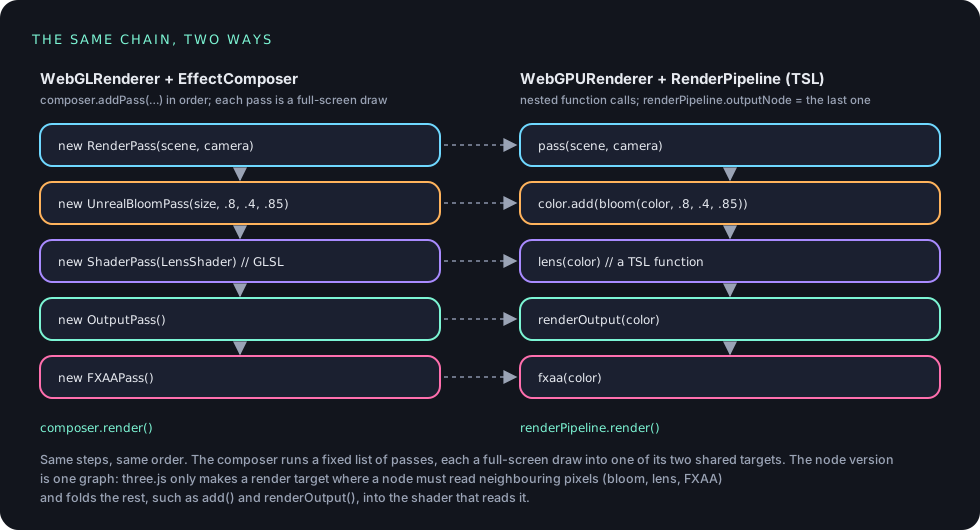
import * as THREE from 'three/webgpu';
import { pass, renderOutput } from 'three/tsl';
import { bloom } from 'three/addons/tsl/display/BloomNode.js';
import { fxaa } from 'three/addons/tsl/display/FXAANode.js';

// RenderPass → pass(): the scene into a HalfFloat render target, as a texture node
const scenePass = pass(scene, camera);
const sceneColor = scenePass.getTextureNode('output');

// UnrealBloomPass → bloom(): strength, radius, threshold
const bloomPass = bloom(sceneColor, 0.8, 0.4, 0.85);

const renderPipeline = new THREE.RenderPipeline(renderer);   // called PostProcessing before r183
renderPipeline.outputColorTransform = false;   // we call renderOutput() ourselves, see below

let color = sceneColor.add(bloomPass);   // add the glow on top: still HDR
color = lens(color);                     // our lens effect, below
color = renderOutput(color);             // OutputPass → renderOutput(): tone mapping + sRGB
color = fxaa(color);                     // FXAAPass → fxaa(): after the output transform
renderPipeline.outputNode = color;

renderer.setAnimationLoop((t) => {
  animate(t / 1000);
  renderPipeline.render();   // instead of renderer.render(scene, camera)
});
Read it from the top, and it is the composer chain, written as maths on images:
pass(scene, camera)renders the scene into its own render target, HalfFloat by default, and with MSAA when the renderer was created withantialias: true. So the jagged-edge problem of step 4 does not happen here.getTextureNode('output')gives you that texture as a node.bloom(node, strength, radius, threshold)is the same five-level bloom asUnrealBloomPass, as a node. It returns only the glow, so you add it to the scene yourself with.add(). That makes the "which picture does it glow on top of" choice yours, which we use in step 6. Its parameters are uniforms: change them withbloomPass.strength.value = 1.2, no rebuild needed.renderOutput(node)isOutputPass: the renderer's tone mapping and output colour space. You can also pass a tone mapping and colour space to it directly,renderOutput(color, THREE.AgXToneMapping), which overrides the renderer's.fxaa(node)andsmaa(node)are the anti-aliasing passes. Like their WebGL versions, they want sRGB input.
What is outputColorTransform? By default, RenderPipeline applies renderOutput() for you, at the very end of the graph. That is convenient, and step 6 uses it. But it would put tone mapping after FXAA, which is the wrong order. Setting outputColorTransform = false turns the automatic version off, so you can place renderOutput() yourself, with FXAA after it. Forget either half and you get tone mapping twice, or none at all.
The node graph is built once. When you change its structure, for example to switch an effect off, rebuild the chain, assign the new outputNode, and set renderPipeline.needsUpdate = true so it compiles new shaders. Changing a uniform needs neither.
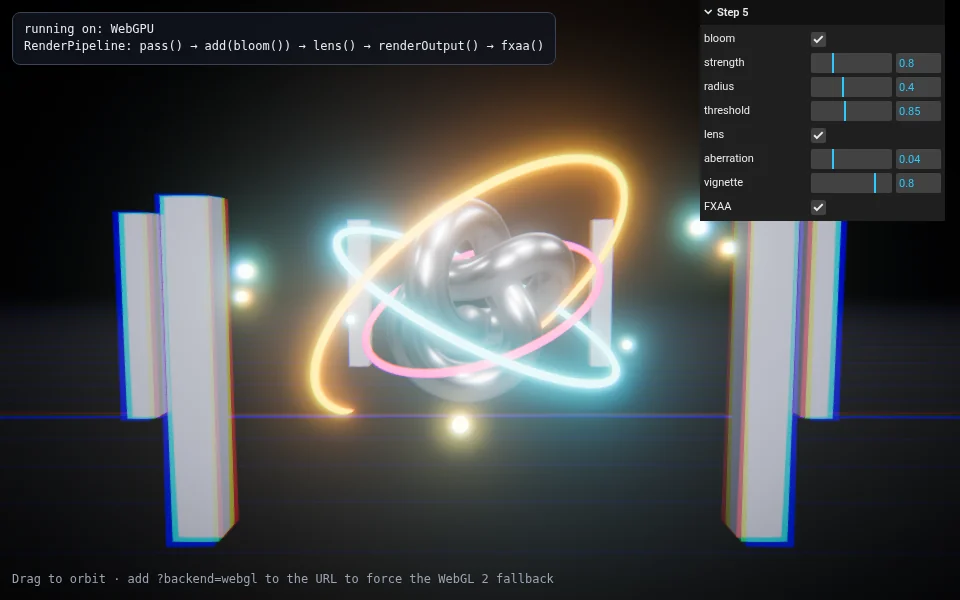
WebGPURenderer. This screenshot was taken on WebGPU. (step-5.html)The lens shader, in TSL
Here is the LensShader from step 2, ported the same way Part 5 ported the waves. Put the two side by side and they match line for line:
import { uniform, uv, vec3, vec4, length, mix, smoothstep, convertToTexture } from 'three/tsl';

const aberration = uniform(0.04);
const vignette = uniform(0.8);

function lens(input) {
  const tex = convertToTexture(input);   // a texture we can sample at other pixels
  const fromCentre = uv().sub(0.5);
  const dist = length(fromCentre);
  const offset = fromCentre.mul(dist).mul(aberration);
  const r = tex.sample(uv().add(offset)).r;
  const base = tex.sample(uv());
  const b = tex.sample(uv().sub(offset)).b;
  const shade = mix(1, smoothstep(0.85, 0.25, dist), vignette);
  return vec4(vec3(r, base.g, b).mul(shade), base.a);
}
tDiffusebecomestex, andtexture2D(tDiffuse, uv)becomestex.sample(uv).- The operators become methods, as always in TSL:
fromCentre * dist * aberrationisfromCentre.mul(dist).mul(aberration). convertToTextureis the one new line. In the node graph,inputis not necessarily a texture: here it is "the scene texture plus the bloom", an expression. You can compute that for the current pixel for free, but chromatic aberration needs the colour at other pixels.convertToTexturemakes sure there is a real texture to sample: if the input already is a pass texture it uses it, otherwise it renders the expression into a new render target first. That is the node version of a composer swap, and it only happens where it is needed.
That last point is the real difference between the two APIs. The composer always does one full-screen draw per pass. The node graph only splits into separate render passes where a node must read neighbouring pixels: the bloom, lens() and FXAA. Cheap per-pixel steps, such as .add(), renderOutput() and the colour grade below, are folded into the shader of the next pass. Fewer full-screen passes means less memory traffic, and on a phone, memory traffic is most of the cost of post-processing.
Step 6: selective bloom with MRT
Back to the white pillars. With a single threshold, bloom has a dilemma: set it low enough to make the neon glow at a dimmer setting, and the lit pillars and chrome highlights start glowing too. What we really want is "glow only what is emissive", whatever its brightness. The node version can do that cleanly, with MRT, multiple render targets: one scene pass that writes two pictures at once.
import { pass, mrt, output, emissive } from 'three/tsl';

const scenePass = pass(scene, camera);
scenePass.setMRT(mrt({ output, emissive }));   // two outputs from the same draw calls
const sceneColor = scenePass.getTextureNode('output');      // the normal lit picture
const emissiveColor = scenePass.getTextureNode('emissive'); // only what materials emit

const glow = bloom(emissiveColor, 0.5, 0.4, 0);   // no threshold needed: only emitters are in it
renderPipeline.outputNode = sceneColor.add(glow);
output and emissive are built-in TSL nodes: the final colour of each material, and its emissive term. mrt() tells the scene pass to write both, into two textures of one render target, with no second render of the scene. The bloom now reads the emissive texture, where the pillars and the knot are black, so they can never glow, whatever the threshold.
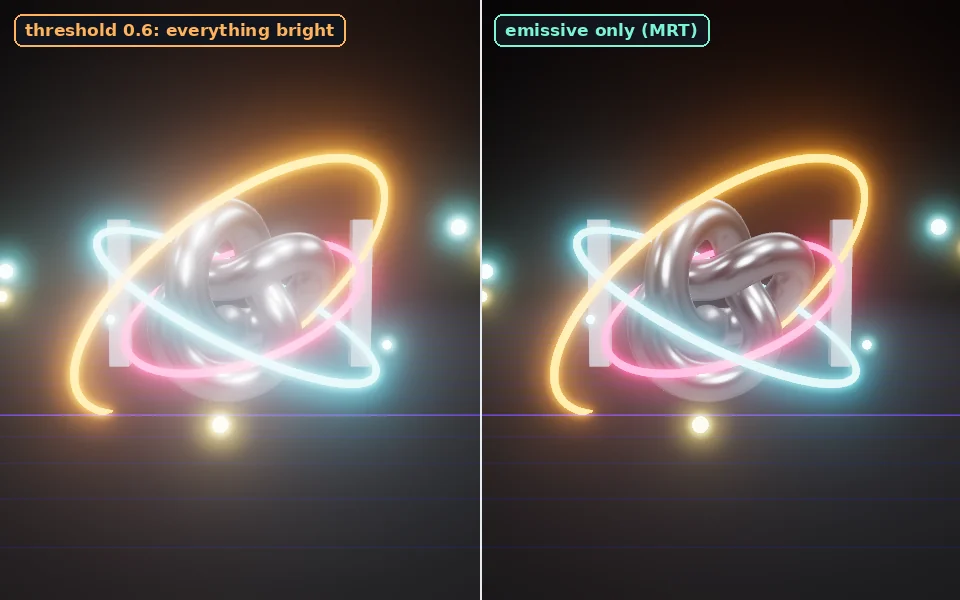
Step 6 does not set outputColorTransform = false, so the pipeline adds renderOutput() at the end for us. With no FXAA after it, that default is exactly right.
In WebGL this is harder. The common recipe with EffectComposer is two composers: render the scene once with every non-glowing material swapped for black, bloom that, then render it again normally and combine the two. It works, but it costs a second render of the whole scene.
The final demo
The demo at the top of the article combines everything:
- One scene pass with MRT (step 6), and a choice between selective bloom on the emissive output and plain threshold bloom on everything.
- The lens from step 5.
renderOutput()with a tone mapping menu, passed straight torenderOutput(color, toneMapping), and an exposure slider on the renderer.- A small colour grade after
renderOutput(), on display values: saturation, contrast around mid-grey, and a warmth control that adds a little red and takes away a little blue. It is a TSL function likelens(), but per-pixel, so it costs no extra pass. - FXAA or SMAA at the end.
- A split slider. Left of the line, the graph shows
renderOutput(sceneColor), the scene with no effects; right of it, the full chain. Both are in the same graph, andmix(after, before, step(screenUV.x, split))picks one per pixel.
function grade(input) {
  let color = saturation(input.rgb, sat);
  color = color.sub(0.5).mul(contrast).add(0.5);   // contrast around mid-grey
  color = color.mul(vec3(warmth.mul(0.12).add(1), 1, warmth.mul(-0.12).add(1)));
  return vec4(color.clamp(0, 1), input.a);
}

let color = sceneColor.add(selective ? bloomEmissive : bloomAll);
color = lens(color);
color = renderOutput(color, toneMapping);
color = grade(color);
color = fxaa(color);
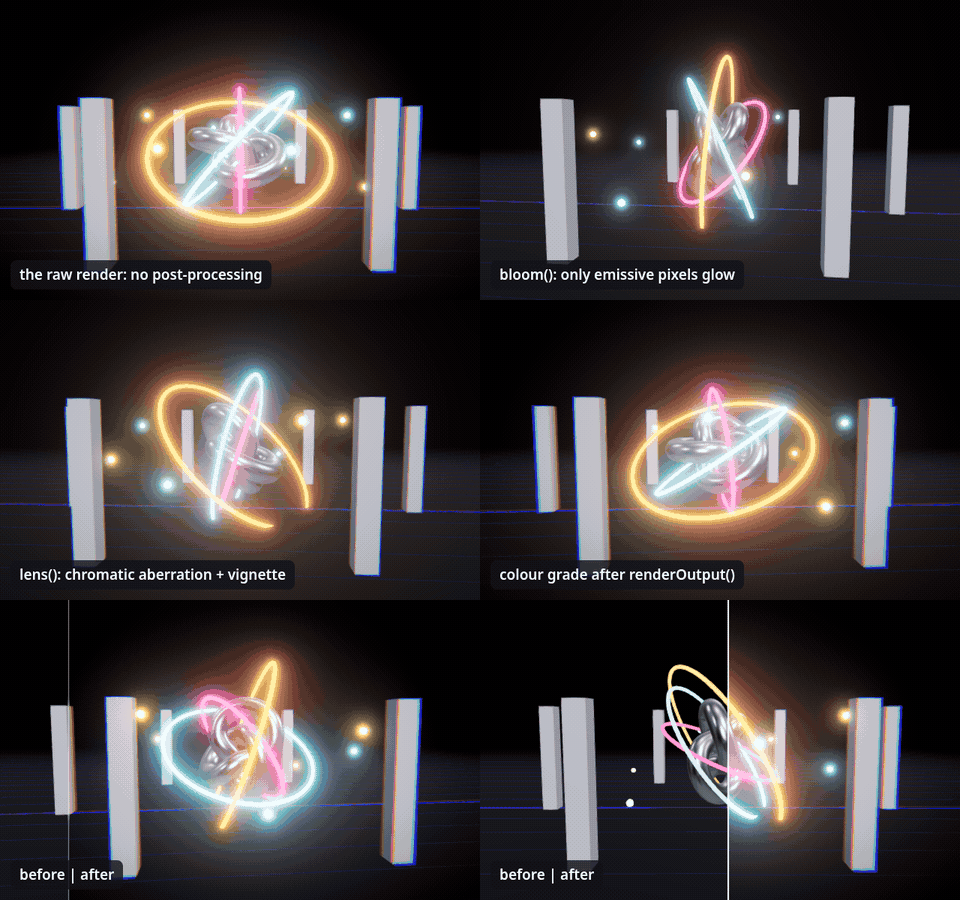
The same graph runs on both backends: open the demo with ?backend=webgl, and the bloom, MRT and lens nodes compile to GLSL instead of WGSL, and the picture stays the same.
When it goes wrong: common pitfalls
Colour and tone mapping
- The picture is washed out and grey. Tone mapping or the sRGB conversion ran twice. In a composer, check for two output steps: an
OutputPassplus a pass that converts again, such as a finalUnrealBloomPass(step 3). In aRenderPipeline, check that you did not callrenderOutput()whileoutputColorTransformis stilltrue. - The picture is too dark and oversaturated, with harsh highlights. No tone mapping or sRGB conversion at all: you forgot
OutputPass, or setoutputColorTransform = falsewithout callingrenderOutput(). With a hand-made render target and quad (step 1), your own last shader needs the two#includelines. - Bloom does nothing, or everything blooms. Check the order (bloom before the output transform) and the render target type: an 8-bit target clips at 1.0, and then the threshold has nothing to separate. The composer and
pass()use HalfFloat by default; a render target you make yourself does not. - Textures used as post-processing inputs look too bright or too dark. A colour texture you load and feed into a shader, such as a LUT or a dirt mask, needs
texture.colorSpace = THREE.SRGBColorSpace, as in Part 2. Data textures (noise, normals) stay linear.
Size and pixel ratio
- The effect is blurry, or offset, after resizing the window. The render targets did not follow the canvas. With a composer, call
composer.setSize(width, height)next torenderer.setSize. It resizes both targets and every pass, and uses the renderer's pixel ratio. A render target you made yourself (step 1) must be resized in device pixels:renderer.getDrawingBufferSize(v), thentarget.setSize(v.x, v.y).pass(),bloom()andfxaa()follow the renderer's size by themselves. - Everything is sharp except after the composer, on a phone or Retina screen. You called
composer.setPixelRatio()with a different value from the renderer, or created your own target in CSS pixels. Keep one pixel ratio, ideallyMath.min(devicePixelRatio, 2), for the canvas and every target. - Jagged edges as soon as a composer is involved. The canvas's
antialias: truedoes not apply to the composer's targets. Use a target withsamples: 4, orFXAAPass/SMAAPassat the end (step 4). - FXAA blurs everything or misses edges. It is not last, or not after the output transform. FXAA and SMAA belong at the very end, on sRGB values.
Performance
- Every pass is a full-screen draw. A 2560 × 1440 window at a pixel ratio of 2 is 5120 × 2880 pixels, almost 15 million, for every pass. A bloom alone is a bright pass, ten blur passes on smaller targets and a combine. Cap the pixel ratio (
Math.min(devicePixelRatio, 2), or lower on phones), and switch off the effects you cannot see. - Merge cheap effects. Two
ShaderPasses that only change each pixel (a grade, a vignette) can be one shader. The TSL graph does that for you; in a composer, you write the combined shader yourself. - Each composer owns GPU memory. Two HalfFloat targets at full size, plus everything inside each pass. When you remove a composer, call
composer.dispose(), and dispose its passes too: the composer only frees its own render targets and copy pass. - Do not rebuild the node graph every frame. Change uniforms with
.value. SettingrenderPipeline.needsUpdate = truerecompiles shaders, which is fine for a menu, not for an animation.
API changes
RenderPipeline is not a constructor, or a deprecation warning aboutPostProcessing. In r183PostProcessingwas renamedRenderPipeline. Before r183 only the old name exists; in r186 the old name still works, with a warning. Older WebGPU examples use it.ShaderPassorEffectComposerthrow onWebGPURenderer. They are GLSL and WebGL only. On WebGPU, useRenderPipelineand the TSL nodes inthree/addons/tsl/display/.
The full code
Here is the final demo in one file. It loads Three.js from the CDN, so you can save it and open it straight from disk.
<!doctype html>
<html lang="en">
<head>
  <meta charset="utf-8">
  <meta name="viewport" content="width=device-width, initial-scale=1">
  <title>Part 6 · Post-processing playground</title>
  <style>
    html, body { margin: 0; height: 100%; background: #000; overflow: hidden; }
    canvas { display: block; }
    .panel { position: absolute; left: 12px; top: 12px; max-width: calc(100% - 48px); font: 400 12px/1.45 ui-monospace, Menlo, Consolas, monospace; color: #e7eaf0; background: rgba(18, 21, 29, .85); border: 1px solid #3a4258; border-radius: 8px; padding: 8px 11px; white-space: pre; overflow: hidden; }
    .hint { position: absolute; left: 12px; bottom: 12px; font: 400 12px/1.45 ui-monospace, Menlo, Consolas, monospace; color: #9aa3b5; pointer-events: none; }
  </style>
  <script type="importmap">
    {
      "imports": {
        "three": "https://cdn.jsdelivr.net/npm/three@0.186.1/build/three.webgpu.js",
        "three/webgpu": "https://cdn.jsdelivr.net/npm/three@0.186.1/build/three.webgpu.js",
        "three/tsl": "https://cdn.jsdelivr.net/npm/three@0.186.1/build/three.tsl.js",
        "three/addons/": "https://cdn.jsdelivr.net/npm/three@0.186.1/examples/jsm/"
      }
    }
  </script>
</head>
<body>
  <div id="status" class="panel">Starting WebGPURenderer…</div>
  <div class="hint">Drag to orbit · every effect can be switched off in the panel · drag "split" to compare with the raw render</div>
  <script type="module">
    import * as THREE from 'three/webgpu';
    import { pass, mrt, output, emissive, renderOutput, uniform, uv, screenUV, vec3, vec4, length, mix, smoothstep, step, abs, saturation, convertToTexture } from 'three/tsl';
    import { bloom } from 'three/addons/tsl/display/BloomNode.js';
    import { fxaa } from 'three/addons/tsl/display/FXAANode.js';
    import { smaa } from 'three/addons/tsl/display/SMAANode.js';
    import { OrbitControls } from 'three/addons/controls/OrbitControls.js';
    import { RoomEnvironment } from 'three/addons/environments/RoomEnvironment.js';
    import { GUI } from 'three/addons/libs/lil-gui.module.min.js';

    // WebGPU if the browser has it, WebGL 2 if not. ?backend=webgl forces the fallback.
    const params = new URLSearchParams(location.search);
    const status = document.getElementById('status');

    const renderer = new THREE.WebGPURenderer({ antialias: true, forceWebGL: params.get('backend') === 'webgl' });
    renderer.setPixelRatio(Math.min(devicePixelRatio, 2));
    renderer.setSize(innerWidth, innerHeight);
    renderer.toneMapping = THREE.ACESFilmicToneMapping;
    document.body.appendChild(renderer.domElement);

    try {
      await renderer.init();   // async: asks the browser for a GPU device, or falls back
    } catch (error) {
      status.textContent = 'Sorry: this browser has neither WebGPU nor WebGL 2.\n' + error.message;
      throw error;
    }
    const backendName = renderer.backend.isWebGPUBackend ? 'WebGPU' : 'WebGL 2 fallback';
    // ---------- The scene: a chrome knot inside three neon rings ----------
    const scene = new THREE.Scene();
    scene.background = new THREE.Color(0x05060c);
    scene.fog = new THREE.Fog(0x05060c, 12, 30);
    const pmrem = new THREE.PMREMGenerator(renderer);
    scene.environment = pmrem.fromScene(new RoomEnvironment(), 0.04).texture;
    scene.environmentIntensity = 0.3;

    const camera = new THREE.PerspectiveCamera(45, innerWidth / innerHeight, 0.1, 100);
    camera.position.set(0, 2.3, 9.2);
    const controls = new OrbitControls(camera, renderer.domElement);
    controls.target.set(0, 1.5, 0);
    controls.enableDamping = true;
    controls.maxPolarAngle = Math.PI * 0.48;
    controls.update();

    const floor = new THREE.Mesh(new THREE.PlaneGeometry(60, 60), new THREE.MeshStandardMaterial({ color: 0x0a0c14, roughness: 0.7, metalness: 0.2 }));
    floor.rotation.x = -Math.PI / 2;
    scene.add(floor);
    const grid = new THREE.GridHelper(60, 60, 0x7a4cff, 0x262d5c);   // thin lines: good for spotting aliasing
    grid.position.y = 0.003;
    scene.add(grid);

    const knot = new THREE.Mesh(new THREE.TorusKnotGeometry(0.75, 0.26, 240, 32), new THREE.MeshStandardMaterial({ color: 0xc9ccd6, metalness: 1, roughness: 0.22 }));
    knot.position.y = 1.5;
    scene.add(knot);

    // Neon: a black base colour and a strong emissive. emissiveIntensity above 1 pushes
    // these pixels well past 1.0, and bright pixels are what bloom looks for.
    const rings = [0xff2e88, 0x22e4ff, 0xffa31a].map((color, i) => {
      const ring = new THREE.Mesh(new THREE.TorusGeometry(1.55 + i * 0.38, 0.045, 12, 200),
        new THREE.MeshStandardMaterial({ color: 0x000000, emissive: color, emissiveIntensity: 3 }));
      ring.position.y = 1.5;
      scene.add(ring);
      return ring;
    });

    // White pillars: bright only because a light hits them. No emissive.
    const pillarMaterial = new THREE.MeshStandardMaterial({ color: 0xb4b8c4, roughness: 0.6 });
    for (let i = 0; i < 6; i++) {
      const a = (i / 6) * Math.PI * 2;   // none of them straight in front of the camera
      const pillar = new THREE.Mesh(new THREE.BoxGeometry(0.35, 2.6, 0.35), pillarMaterial);
      pillar.position.set(Math.cos(a) * 4.3, 1.3, Math.sin(a) * 4.3);
      scene.add(pillar);
    }

    const sparks = [];
    for (let i = 0; i < 8; i++) {
      const spark = new THREE.Mesh(new THREE.SphereGeometry(0.07, 16, 12),
        new THREE.MeshStandardMaterial({ color: 0x000000, emissive: i % 2 ? 0xffe27a : 0x7af7ff, emissiveIntensity: 6 }));
      scene.add(spark);
      sparks.push(spark);
    }

    scene.add(new THREE.HemisphereLight(0x8090ff, 0x100818, 0.4));
    const sun = new THREE.DirectionalLight(0xffffff, 1.8);
    sun.position.set(3, 6, 4);
    scene.add(sun);

    function animate(seconds) {
      knot.rotation.set(seconds * 0.3, seconds * 0.45, 0);
      rings.forEach((ring, i) => {
        ring.rotation.x = Math.PI / 2 + Math.sin(seconds * 0.6 + i * 2.1) * 0.6;
        ring.rotation.y = seconds * (0.25 + i * 0.12) * (i % 2 ? -1 : 1);
      });
      sparks.forEach((spark, i) => {
        const a = seconds * 0.7 + (i / sparks.length) * Math.PI * 2;
        spark.position.set(Math.cos(a) * 3.1, 1.5 + Math.sin(a * 2 + i) * 0.9, Math.sin(a) * 3.1);
      });
    }
    // ---------- end of the scene ----------
    // ---------- 1. One scene pass, two outputs (MRT) ----------
    const scenePass = pass(scene, camera);
    scenePass.setMRT(mrt({ output, emissive }));
    const sceneColor = scenePass.getTextureNode('output');
    const emissiveColor = scenePass.getTextureNode('emissive');

    // ---------- 2. Bloom: everything bright, or only what glows ----------
    const bloomAll = bloom(sceneColor, 0.8, 0.4, 0.85);
    const bloomEmissive = bloom(emissiveColor, 0.8, 0.4, 0);

    // ---------- 3. The lens effect from step 5 (Part 4's GLSL, as TSL) ----------
    const aberration = uniform(0.03);
    const vignette = uniform(0.7);
    function lens(input) {
      const tex = convertToTexture(input);
      const fromCentre = uv().sub(0.5);
      const dist = length(fromCentre);
      const offset = fromCentre.mul(dist).mul(aberration);
      const base = tex.sample(uv());
      const color = vec3(tex.sample(uv().add(offset)).r, base.g, tex.sample(uv().sub(offset)).b);
      return vec4(color.mul(mix(1, smoothstep(0.85, 0.25, dist), vignette)), base.a);
    }

    // ---------- 4. A small colour grade, on display values after tone mapping ----------
    const sat = uniform(1.15);
    const contrast = uniform(1.1);
    const warmth = uniform(0.15);
    function grade(input) {
      let color = saturation(input.rgb, sat);
      color = color.sub(0.5).mul(contrast).add(0.5);                          // contrast around mid-grey
      color = color.mul(vec3(warmth.mul(0.12).add(1), 1, warmth.mul(-0.12).add(1)));   // warmer = more red, less blue
      return vec4(color.clamp(0, 1), input.a);
    }

    // ---------- 5. Put the chain together ----------
    const split = uniform(0);   // 0 = all "after"; 0.5 = left half shows the raw render
    const settings = {
      bloom: true, selective: true, strength: 0.8, radius: 0.4, threshold: 0.85,
      lens: true,
      grade: true, exposure: 1,
      toneMapping: THREE.ACESFilmicToneMapping, antialiasing: 'fxaa',
    };
    const toneMappings = { ACESFilmic: THREE.ACESFilmicToneMapping, AgX: THREE.AgXToneMapping, Neutral: THREE.NeutralToneMapping, 'None (clips)': THREE.NoToneMapping };

    const renderPipeline = new THREE.RenderPipeline(renderer);
    renderPipeline.outputColorTransform = false;   // renderOutput() is called below, by hand

    function build() {
      const chain = ['pass()'];
      let color = sceneColor;
      if (settings.bloom) {
        color = color.add(settings.selective ? bloomEmissive : bloomAll);
        chain.push(settings.selective ? 'bloom(emissive)' : 'bloom(threshold)');
      }
      if (settings.lens) { color = lens(color); chain.push('lens()'); }
      color = renderOutput(color, settings.toneMapping);
      chain.push('renderOutput()');
      if (settings.grade) { color = grade(color); chain.push('grade()'); }

      // before/after: left of the split line shows the plain render, with no effects
      const before = renderOutput(sceneColor, settings.toneMapping);
      const line = step(abs(screenUV.x.sub(split)), 0.0012).mul(step(0.001, split));
      color = mix(color, before, step(screenUV.x, split));
      color = mix(color, vec4(1), line);

      if (settings.antialiasing === 'fxaa') { color = fxaa(color); chain.push('fxaa()'); }
      if (settings.antialiasing === 'smaa') { color = smaa(color); chain.push('smaa()'); }

      renderPipeline.outputNode = color;
      renderPipeline.needsUpdate = true;
      status.textContent = `running on: ${backendName}\n${chain.join(' → ')}`;
    }

    function syncBloom() {
      for (const node of [bloomAll, bloomEmissive]) {
        node.strength.value = settings.strength;
        node.radius.value = settings.radius;
      }
      bloomAll.threshold.value = settings.threshold;
    }

    // ---------- 6. The panel ----------
    const gui = new GUI({ title: 'Post-processing' });
    const fBloom = gui.addFolder('Bloom');
    fBloom.add(settings, 'bloom').name('on').onChange(build);
    fBloom.add(settings, 'selective').name('emissive only (MRT)').onChange(build);
    fBloom.add(settings, 'strength', 0, 3, 0.05).onChange(syncBloom);
    fBloom.add(settings, 'radius', 0, 1, 0.01).onChange(syncBloom);
    fBloom.add(settings, 'threshold', 0, 2, 0.01).name('threshold (non-selective)').onChange(syncBloom);
    const fLens = gui.addFolder('Lens');
    fLens.add(settings, 'lens').name('on').onChange(build);
    fLens.add(aberration, 'value', 0, 0.15, 0.005).name('aberration');
    fLens.add(vignette, 'value', 0, 1, 0.05).name('vignette');
    const fGrade = gui.addFolder('Colour grade');
    fGrade.add(settings, 'grade').name('on').onChange(build);
    fGrade.add(settings, 'exposure', 0.2, 2.5, 0.05).onChange((v) => { renderer.toneMappingExposure = v; });
    fGrade.add(sat, 'value', 0, 2, 0.05).name('saturation');
    fGrade.add(contrast, 'value', 0.5, 1.8, 0.05).name('contrast');
    fGrade.add(warmth, 'value', -1, 1, 0.05).name('warmth');
    const fOut = gui.addFolder('Output');
    fOut.add(settings, 'toneMapping', toneMappings).name('tone mapping').onChange(build);
    fOut.add(settings, 'antialiasing', { none: 'none', FXAA: 'fxaa', SMAA: 'smaa' }).onChange(build);
    fOut.add(split, 'value', 0, 1, 0.01).name('split (before | after)');
    if (innerWidth < 700) gui.close();

    syncBloom();
    build();

    // used by the screenshots and the GIF in the article
    const api = { settings, split, build, syncBloom, aberration, vignette };

    addEventListener('resize', () => {
      camera.aspect = innerWidth / innerHeight;
      camera.updateProjectionMatrix();
      renderer.setSize(innerWidth, innerHeight);   // pass(), bloom() and fxaa() follow the renderer size
    });

    renderer.setAnimationLoop((t) => {
      controls.update();
      animate(t / 1000);
      renderPipeline.render();
    });
  </script>
</body>
</html>
The step-by-step versions are in the repo too: step-1.html (a render target and a full-screen quad), step-2.html (EffectComposer, ping-pong, the lens ShaderPass and OutputPass), step-3.html (UnrealBloomPass, tone mapping and pass order), step-4.html (MSAA, FXAA and SMAA), step-5.html (the same chain as a TSL RenderPipeline) and step-6.html (selective bloom with MRT).
A few things to try
- In step 1, add a fifth mode to the quad shader: scanlines,
color.rgb *= 0.8 + 0.2 * sin(vUv.y * 800.0). Then make 800.0 a uniform tied to the canvas height, so the lines stay one pixel apart when you resize. - In step 2, add a second
ShaderPasswith three.js's ownRGBShiftShaderorDotScreenShaderfromthree/addons/shaders/, before and after the lens, and watch the buffer trace change. - In step 3, set the threshold to 0 and the strength to 0.3. Everything glows a little: that is the dreamy "soft focus" look of many music videos.
- In step 4, compare the frame rate of MSAA and SMAA at full screen with your browser's performance tools.
- In step 5, make the vignette pulse:
smoothstep(0.85, 0.25, dist.mul(sin(time.mul(2)).mul(0.05).add(1))), withtimefromthree/tsl. - In step 6, give the white pillars an emissive colour,
emissive: 0x334455, and see them join the glow. - In the final demo, add film grain after
grade():vec4(color.rgb.add(rand(screenUV.add(fract(time))).sub(0.5).mul(0.05)), color.a), withrand,fractandtimefromthree/tsl. - Look in
three/addons/tsl/display/for more nodes ready to plug into the chain:DepthOfFieldNode,GTAONode(ambient occlusion),FilmNode,OutlineNode, a ready-madeChromaticAberrationNodeto compare with our lens, and more.
Next time
We can now change the whole picture after it is drawn: render targets, chains of passes, bloom, a custom lens and anti-aliasing, on both renderers. Each of those effects costs real GPU time, and so does every object in the scene. In Part 7 we look at performance: what a draw call is and why the count matters, drawing thousands of objects at once with InstancedMesh and BatchedMesh, levels of detail with LOD, and how to measure where a frame's time actually goes before you start optimising. Read Part 7: Faster Frames →