← Three.js from Scratch · all parts
Three.js from Scratch, Part 3: Models, Light and Shadows
In Part 2 we opened up a mesh and looked at what it is made of: vertices, normals and UVs, materials, and textures in the right colour space. Everything in that scene was built by hand in code. Real projects do not work like that. Characters, products and buildings come from Blender, Maya or a 3D scanner, they arrive as files, and they are usually animated.
In this article we load one of those files: a small low-poly fox, with a skeleton and three animations. We fit it into our scene, make it walk, light it with a photo of a real sky instead of hand-placed lights, and give it a proper shadow on the ground. Shadows are where most people get stuck, so they get the most space here, including the two classic artefacts (stripes and floating objects) and how to tune them away. The panel in the corner switches the environment, the tone mapping and the shadows, so you can see what each one adds:
Open the demo full screen ↗ · Source on GitHub ↗
As in Parts 1 and 2, everything here uses Three.js r186 (npm version
0.186.1) through the same import map. Every step below is a single HTML file you can open from the repo. This time the steps also load files (a model and an HDR image), so they have to be served over HTTP; opening them withfile://will not work. More on that in the full code section at the end.
glTF: the JPEG of 3D
There are many 3D file formats (OBJ, FBX, Collada, USD, STL...), and Three.js has loaders for most of them. For the web, though, the answer is almost always glTF (GL Transmission Format), an open standard from the Khronos Group, the same people behind OpenGL and WebGL. It is often called "the JPEG of 3D": it is meant for delivering finished assets to a renderer, not for editing them.
A glTF file can hold:
- a scene graph: nodes with position, rotation and scale, parented to each other, exactly like
Object3Din Three.js; - meshes: geometry as typed arrays, ready to go to the GPU almost as they are (the same
position,normalanduvattributes from Part 2); - materials in the metallic-roughness PBR model, which is what
MeshStandardMaterialimplements, so they map across one to one; - textures, skins (skeletons for characters), animations, cameras and, through extensions, lights and more advanced materials.
It comes in two flavours. A .gltf file is JSON that points at separate .bin (geometry) and image files. A .glb is the same thing packed into one binary file. For the web, .glb is usually simpler: one request, nothing to lose on the way.
Our model is the Fox from the Khronos glTF Sample Assets repository: one skinned mesh, 24 bones, one texture and three animation clips, in a 160 KB .glb. It is freely licensed (credits are at the end of this article and in the repo).
Loading a model with GLTFLoader
GLTFLoader is an addon, so it comes from three/addons/, like OrbitControls:
import { GLTFLoader } from 'three/addons/loaders/GLTFLoader.js';

const loader = new GLTFLoader();
const gltf = await loader.loadAsync('models/Fox.glb');
scene.add(gltf.scene);
loadAsync returns a promise, so we can await it. A module script (<script type="module">) allows await at the top level, so there is no need to wrap everything in an async function. Older examples use loader.load(url, onLoad, onProgress, onError) with callbacks; it does the same thing, but the promise version is much easier to read once you load more than one file.
Loading can fail: a typo in the path, a server that returns an HTML 404 page instead of the file, a missing decoder. If you do nothing, you get an empty scene and an error in the console that nobody sees. So wrap it, and tell the user:
let gltf;
try {
  gltf = await loader.loadAsync('models/Fox.glb', (event) => {
    // Called while the file downloads. total is 0 if the server does not send a size.
    if (event.total) status.textContent = `Loading Fox.glb… ${Math.round(event.loaded / event.total * 100)}%`;
  });
} catch (error) {
  status.className = 'panel error';
  status.textContent = `Could not load models/Fox.glb: ${error.message}`;
  throw error;   // stop here: nothing below makes sense without the model
}
The second argument of loadAsync is a progress callback. It is worth wiring up for large files, because a blank screen for five seconds looks exactly like a broken page.
What comes back is not a mesh but an object describing the whole file:
gltf.scene: aGroupwith the default scene of the file. This is what you add to your own scene.gltf.scenes: all scenes, if the file has more than one (rare).gltf.animations: an array ofAnimationClips. They are not attached to anything yet; we will play them in a moment.gltf.cameras: cameras defined in the file, if any.gltf.asset: metadata, such as which tool exported it.
When you need several files, start them all at once instead of one after another. The final demo loads the model and the HDR in parallel:
const [gltf, hdrTexture] = await Promise.all([
  new GLTFLoader().loadAsync('models/Fox.glb'),
  new HDRLoader().loadAsync('textures/rosendal_plains_2_1k.hdr'),
]);
Compressed models: Draco, KTX2 and meshopt
The fox is tiny, but real models are often tens of megabytes. glTF has extensions for compressing them, and you will meet them sooner or later, usually as a console error like "No DRACOLoader instance provided" or "setMeshoptDecoder must be called before loading compressed files". Each one needs a decoder that you hand to the loader once:
import { DRACOLoader } from 'three/addons/loaders/DRACOLoader.js';
import { KTX2Loader } from 'three/addons/loaders/KTX2Loader.js';
import { MeshoptDecoder } from 'three/addons/libs/meshopt_decoder.module.js';

const CDN = 'https://cdn.jsdelivr.net/npm/three@0.186.1/examples/jsm/libs/';

// Draco: compressed geometry (KHR_draco_mesh_compression). Decoded in a Web Worker with WASM.
const draco = new DRACOLoader().setDecoderPath(`${CDN}draco/gltf/`);

// KTX2 / Basis Universal: textures that stay compressed on the GPU (KHR_texture_basisu).
// detectSupport asks the renderer which GPU formats this device understands.
const ktx2 = new KTX2Loader().setTranscoderPath(`${CDN}basis/`).detectSupport(renderer);

const loader = new GLTFLoader()
  .setDRACOLoader(draco)
  .setKTX2Loader(ktx2)
  .setMeshoptDecoder(MeshoptDecoder);   // meshopt: geometry and animation (EXT_meshopt_compression)
In short: Draco makes geometry downloads much smaller, but decoding costs CPU time. Meshopt compresses a little less but decodes very fast, and it also handles animation data. KTX2 is about textures: a JPEG or PNG is small to download but gets unpacked to full size in GPU memory, while a KTX2 texture stays compressed there too. You do not create these files by hand. A command-line tool such as glTF Transform converts an ordinary .glb:
npx @gltf-transform/cli optimize model.glb model-small.glb --compress meshopt --texture-compress ktx2
You can keep the decoder setup in your project even for files that do not need it. The loader only fetches a decoder when a file actually uses that extension.
Walking the scene graph
A loaded model is an ordinary Three.js scene graph, so everything from Part 1 applies. Let's print it. This little recursive function logs every node with its type and name, indented by depth:
function printTree(object, depth = 0) {
  console.log(`${'  '.repeat(depth)}${object.type} "${object.name}"`);
  for (const child of object.children) printTree(child, depth + 1);
}
printTree(gltf.scene);
For the fox, it prints this (shortened):
Group ""
  Object3D "root"
    Bone "_rootJoint"
      Bone "b_Root_00"
        Bone "b_Hip_01"
          Bone "b_Spine01_02"
            Bone "b_Spine02_03"
              Bone "b_Neck_04"
                Bone "b_Head_05"
          Bone "b_Tail01_012"
          ...
  SkinnedMesh "fox"
So the "model" is a group with a tree of Bones (the skeleton) and one SkinnedMesh, a mesh whose vertices follow those bones. The names come from the file, which is why it is worth asking whoever made the model to name things sensibly.
Most of the time you do not want to print the tree, you want to change something on every mesh in it. traverse visits the object and all its descendants, depth first:
let meshes = 0;
let bones = 0;
model.traverse((child) => {
  if (child.isMesh) meshes++;     // true for Mesh and SkinnedMesh
  if (child.isBone) bones++;
});
Every Three.js class sets a flag like this (isMesh, isSkinnedMesh, isBone, isLight...), and checking the flag is the usual way to filter during a traversal. We will use exactly this pattern to switch on shadows later. To grab one node by name, there is model.getObjectByName('b_Head_05'), which is handy when you want to attach a hat to a head bone.
One detail you can see in the screenshots: the fox looks faceted. That is on purpose. The file has no
normalattribute, and the glTF spec says a mesh without normals should be drawn with flat normals, soGLTFLoadersetsflatShading: trueon its material. You metflatShadingin Part 2.
A giant or tiny model: fitting it with Box3
Here is the first surprise. Add the fox to the scene from Part 1 as it is, and this is what you see:
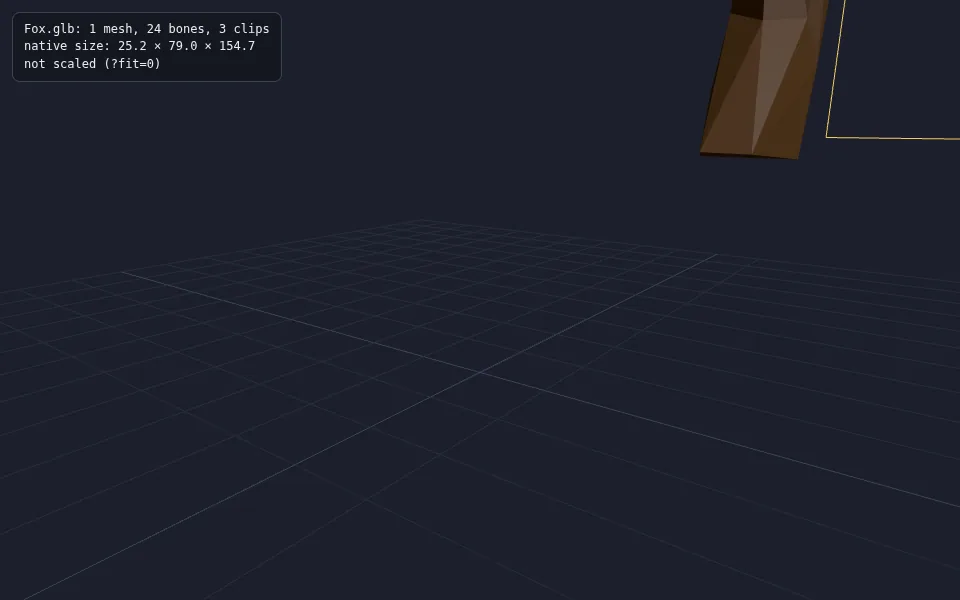
?fit=0: the fox at its native size. The camera is standing next to one of its legs. (step-1.html?fit=0)glTF uses metres, and this fox is about 155 units long: a fox longer than a football pitch. Models come from many tools and many people, and their scale and origin are a lottery. One is in centimetres, another was modelled 300 units away from the origin, a third stands with its feet at y = 0 and a fourth is centred on its belly. So the first thing to do with any model you did not make yourself is measure it.
Box3 is an axis-aligned bounding box: the smallest box, lined up with the x, y and z axes, that contains an object. setFromObject computes it for an object and all its children, in world units:
const box = new THREE.Box3().setFromObject(model);
const size = box.getSize(new THREE.Vector3());   // 25.2 × 79.0 × 154.7 for the fox
With the size, we can scale the model so its longest side has a length we choose, then move it so it is centred on the origin and stands on the floor:
function fitToSize(object, size) {
  // 1. scale so the longest side is `size` units
  const box = new THREE.Box3().setFromObject(object);
  const dimensions = box.getSize(new THREE.Vector3());
  object.scale.setScalar(size / Math.max(dimensions.x, dimensions.y, dimensions.z));

  // 2. measure again (the box changed), then move the centre to x = 0, z = 0 and the bottom to y = 0
  box.setFromObject(object);
  const center = box.getCenter(new THREE.Vector3());
  object.position.x -= center.x;
  object.position.z -= center.z;
  object.position.y -= box.min.y;
}

fitToSize(model, 2);
The order matters. Scaling happens around the model's own origin, which can be anywhere, so the box has to be measured again after scaling, before we move the model. And we move it by the difference (-=), not by setting the position, so that any offset the model already had is kept.
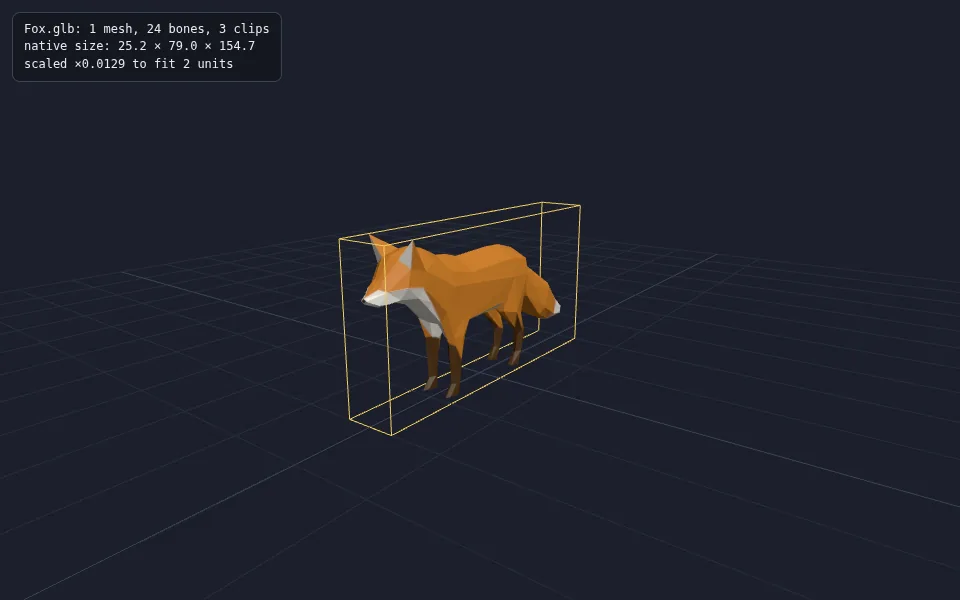
Box3Helper shows the bounding box. (step-1.html)Two units is not magic; it is just the size our camera from Part 1 frames nicely. In a real project you pick the scale once (for example, "one unit is one metre") and make all your models agree with it, either in the exporting tool or with code like this.
setFromObjectmeasures the model in its current pose. For a skinned character, measure before you start an animation, or the box will change from frame to frame. By default it also uses each mesh's precomputed bounding box, which is fast but can be a little loose on rotated parts; passtrueas a second argument (setFromObject(model, true)) for an exact box, at the cost of visiting every vertex.
Making it move: AnimationMixer, clips and actions
The fox file contains three animations: Survey (looking around), Walk and Run. They arrive in gltf.animations as AnimationClip objects. A clip is pure data: a list of keyframe tracks, each one saying "this property of this bone has these values at these times", for example the rotation of b_Head_05 over two seconds. A clip does not know which model it belongs to and does not play by itself.
Three pieces play it:
- an
AnimationMixeris the player for one model. It knows the model and finds the bones that the tracks name; - an
AnimationActionis one clip scheduled on that mixer, with its own state: playing or not, weight, speed, looping; - every frame,
mixer.update(delta)moves time forward bydeltaseconds and writes the new bone transforms.
const mixer = new THREE.AnimationMixer(model);
const actions = {};
for (const clip of gltf.animations) actions[clip.name] = mixer.clipAction(clip);

let current = actions.Walk;
current.play();
Switching clips by just stopping one and playing another makes the fox snap from one pose to the next. Real games blend between them. An action can fade into another over some time:
function play(name) {
  const next = actions[name];
  if (next === current) return;
  next.reset().play();               // start the new clip from frame 0...
  current.crossFadeTo(next, 0.4);    // ...and blend into it over 0.4 seconds
  current = next;
}
mixer.timeScale speeds up or slows down everything on the mixer (0 freezes it), and each action also has its own timeScale, weight and loop (THREE.LoopRepeat by default, or LoopOnce with clampWhenFinished = true for something like a jump that should stop on its last frame).
To see what the animation is actually moving, add a SkeletonHelper. It draws each bone as a line:
const skeleton = new THREE.SkeletonHelper(model);
scene.add(skeleton);
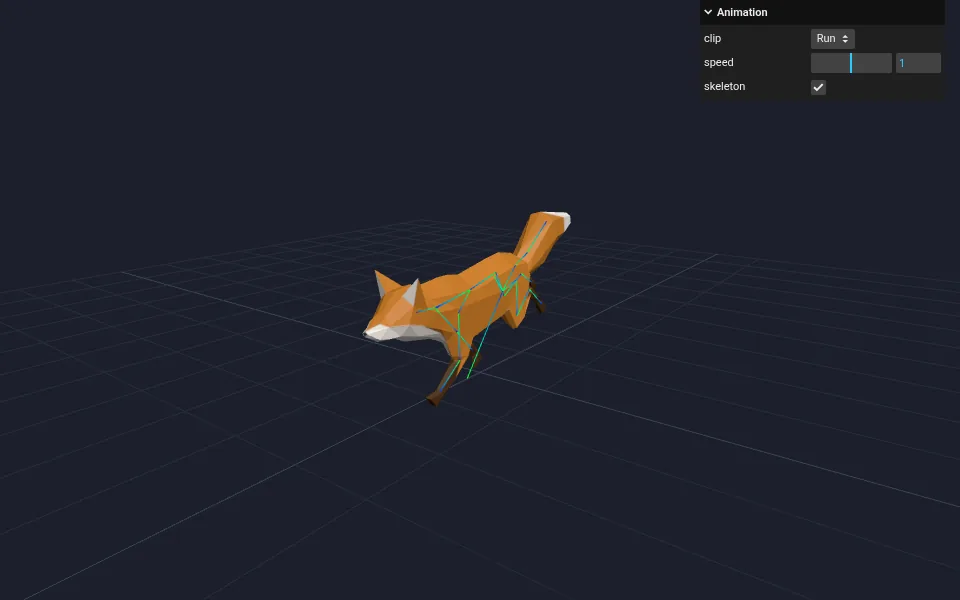
SkeletonHelper drawing its 24 bones. Switch clips in the panel to see the cross-fade. (step-2.html)Where delta comes from: Clock vs Timer
mixer.update needs the time since the last frame, in seconds. Not a fixed 1 / 60: screens run at 60, 120 or 144 Hz, and frames get dropped, so an animation driven by a frame counter plays at different speeds on different machines.
Almost every older tutorial uses THREE.Clock for this:
// The old way. Clock is deprecated since r183 and logs a warning in r186.
const clock = new THREE.Clock();
renderer.setAnimationLoop(() => {
  mixer.update(clock.getDelta());
  renderer.render(scene, camera);
});
Clock has a well-known trap: getDelta() measures "time since the last call to getDelta()", and getElapsedTime() secretly calls it too. Use both in the same frame and one of them gets a delta of almost zero. The replacement, THREE.Timer, separates "advance the clock" from "read the clock". You call update() once at the start of each frame, and after that getDelta() and getElapsed() return the same values no matter how often or in what order you call them:
const timer = new THREE.Timer();

renderer.setAnimationLoop((time) => {
  timer.update(time);              // once per frame, with the timestamp setAnimationLoop gives us
  mixer.update(timer.getDelta());  // seconds since the previous frame
  controls.update();
  renderer.render(scene, camera);
});
This is what all the demos in this series use. Timer can also ignore the time a tab spends in the background: call timer.connect(document), and when you come back after ten minutes the fox does not try to catch up on ten minutes of walking in one frame.
Lighting from the world: environment maps
Our fox is lit by the two lights from Part 1: an AmbientLight and a DirectionalLight. That works, but it looks like a fox in a dark studio. Real objects are lit by everything around them: the sky, the ground, the walls. Physically based materials are built to use that kind of light, and without it they fall apart. Here is step 3 with no lights and no environment at all:
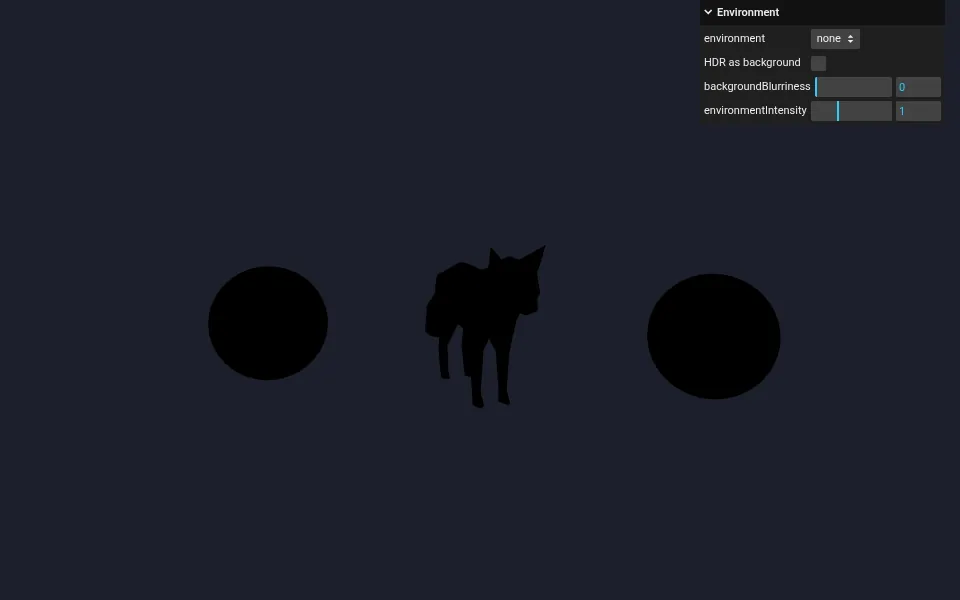
Image-based lighting (IBL) solves this by using an image of the surroundings as a light source. Every direction around the object gets the colour and brightness of the image in that direction. A shiny surface reflects one sharp direction; a rough surface averages a wide cone of directions. Computing that cone for every pixel would be far too slow, so Three.js prepares the image once with PMREMGenerator (pre-filtered, mipmapped radiance environment map): it stores the environment several times, blurred more and more, and a material picks the level that matches its roughness.
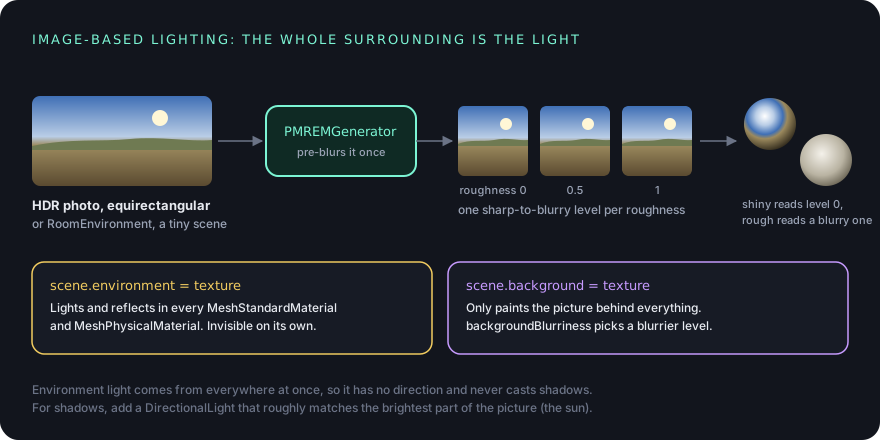
PMREMGenerator, gives every roughness the reflection it needs. Lighting and background are two separate switches.RoomEnvironment: a studio in three lines
You saw this in Part 2. RoomEnvironment is a small virtual room with a few bright panels, built from boxes in code, so there is nothing to download. PMREMGenerator renders it and pre-filters it:
import { RoomEnvironment } from 'three/addons/environments/RoomEnvironment.js';

const pmrem = new THREE.PMREMGenerator(renderer);
scene.environment = pmrem.fromScene(new RoomEnvironment(), 0.04).texture;
The second argument of fromScene (0.04) blurs the room slightly, so the panels have no hard edges. scene.environment is the important line: every MeshStandardMaterial and MeshPhysicalMaterial in the scene now uses this texture for its ambient light and reflections. (You can override it per material with material.envMap.)
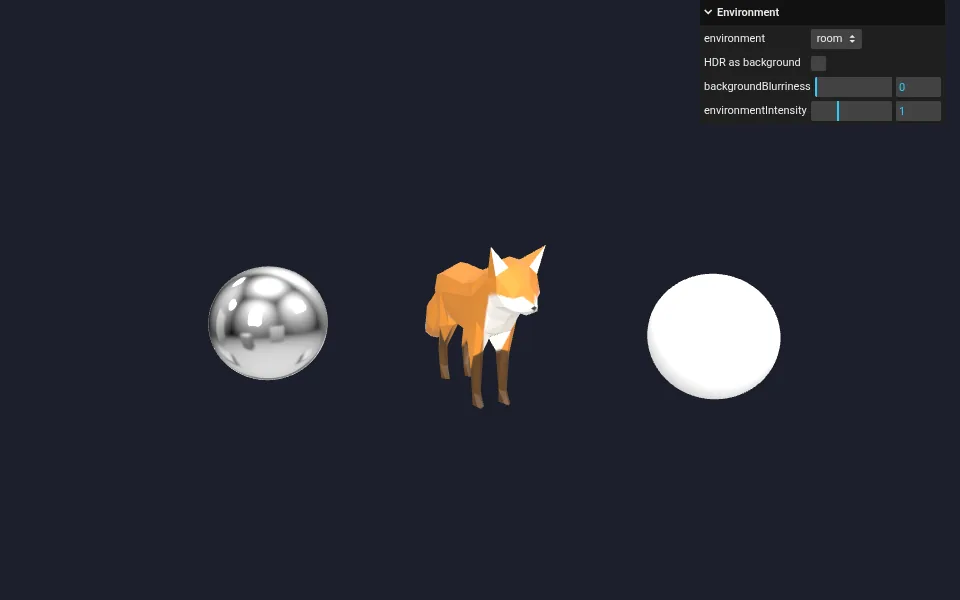
RoomEnvironment: no lights in the scene, yet everything is lit. The white ball is clipping to pure white; we fix that with tone mapping below. (step-3.html?env=room)A real sky: loading an HDR with HDRLoader
A room is neutral and predictable, which is great for product shots. For an outdoor look, use a photo of a real place. Not a JPEG, though: a JPEG stores each channel as 0 to 255, so the sun and a white cloud end up with the same value. Lighting needs the real difference, and the sun can be thousands of times brighter. HDR (high dynamic range) images store floating-point values that can go far above 1. The classic format is Radiance .hdr; the newer .exr works too (with EXRLoader).
We use Rosendal Plains 2 from Poly Haven, a free (CC0) panorama of grassland under a cloudy sky. HDR panoramas are equirectangular: the full sphere around the camera unwrapped into a 2:1 rectangle, like a world map. Three.js needs to be told that:
import { HDRLoader } from 'three/addons/loaders/HDRLoader.js';

const hdrTexture = await new HDRLoader().loadAsync('textures/rosendal_plains_2_1k.hdr');
hdrTexture.mapping = THREE.EquirectangularReflectionMapping;

scene.environment = hdrTexture;   // light the materials with it
scene.background = hdrTexture;    // and show it behind everything
There is no PMREMGenerator call here. When you assign an equirectangular texture to scene.environment, the renderer runs it through PMREM for you, once, and caches the result.
In older code this loader is called
RGBELoader. It was renamed toHDRLoader(same file format, same usage), and the old name is deprecated.
For lighting, a 1k HDR (1024 × 512, about 1.6 MB here) is plenty, because PMREM blurs it anyway. A 4k or 8k version only matters when you show it sharp as a background, and it costs a much bigger download and more GPU memory.
environment vs background
These two properties are completely independent, and mixing them up is a common source of confusion:
| Property | What it does | Visible? |
|---|---|---|
scene.environment |
Lights and reflects in PBR materials | No, only through its effect on materials |
scene.background |
Paints the screen behind everything (a Color, a texture or an HDR) |
Yes, but lights nothing |
scene.backgroundBlurriness |
0 to 1: how blurred an HDR background is | |
scene.environmentIntensity, scene.backgroundIntensity |
Brightness multipliers for each | |
scene.environmentRotation, scene.backgroundRotation |
Turn the environment (an Euler), for example to move the sun |
You can light with an HDR and keep a plain colour background, which is very common for product viewers, or show an HDR behind a scene that is lit some other way.
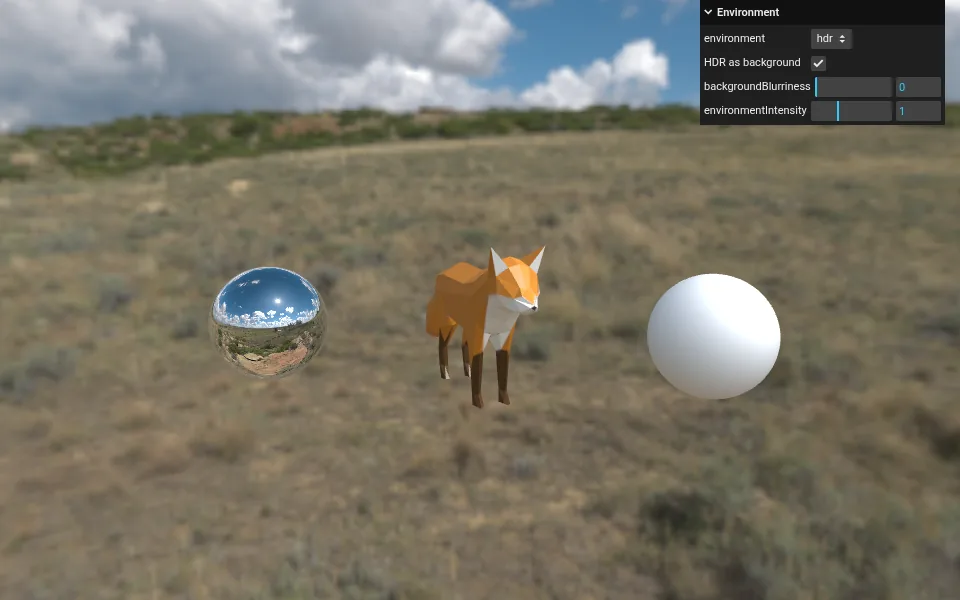
A sharp photo behind a low-poly fox looks a little like a sticker on a postcard: the eye notices that the photo has far more detail than the model. Blurring the background fixes that, and it also hides the low resolution of a 1k HDR:
scene.backgroundBlurriness = 0.3;
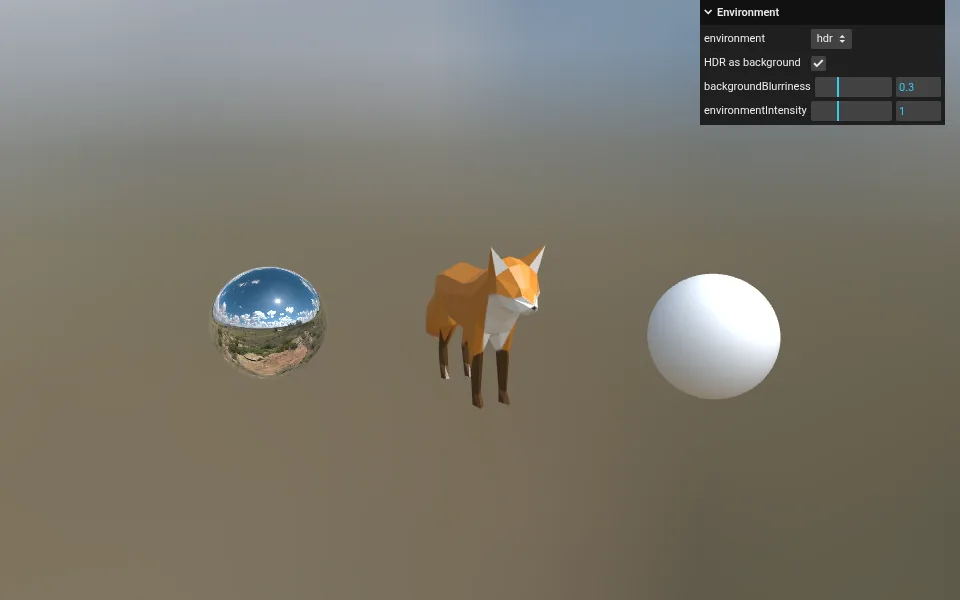
backgroundBlurriness at 0.3. Only the background changed; the lighting is identical. (step-3.html?env=hdr&bg=1&blur=0.3)When you are done with a PMREMGenerator, call pmrem.dispose() to free its internal buffers. The textures it already produced keep working. And if you swap environments at runtime, call .dispose() on the old texture too, or it stays in GPU memory.
Tone mapping and exposure
Remember the white ball that turned into a flat disc? With HDR lighting, the light hitting a surface can easily add up to more than 1.0. A screen cannot show more than 1.0, so everything above it is cut off (clipped) to the same white, and all the shading in the bright parts is lost. Saturated colours suffer too: an orange that is too bright in the red channel turns yellow, then white.
Tone mapping solves this the way a camera does: it squeezes a wide range of brightness into the 0 to 1 the screen can show, with a curve that keeps detail in the highlights instead of cutting it off. Three.js applies it at the very end of each material's shader, and it is off by default:
renderer.toneMapping = THREE.ACESFilmicToneMapping;
renderer.toneMappingExposure = 1;
Step 4 renders the same view four times, one tone mapper in each quarter of the canvas (with setViewport and setScissor), so you can compare them directly:
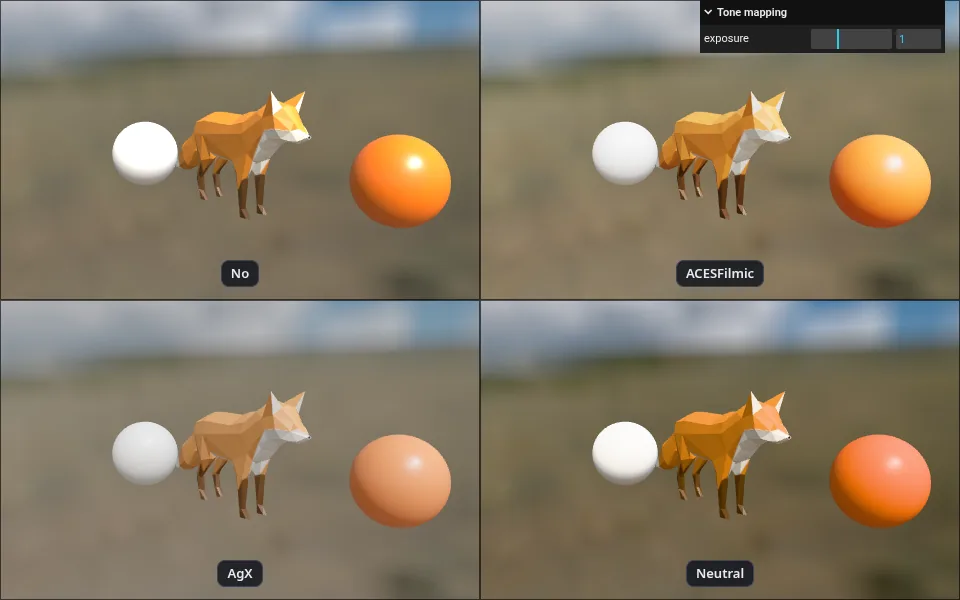
The options worth knowing:
NoToneMapping(the default): values above 1 clip. Fine for flat, unlit or UI-like scenes; wrong for HDR lighting.ACESFilmicToneMapping: the film-industry curve, and the one most tutorials use. Punchy contrast and rich colours. It does shift very bright saturated colours (bright orange drifts towards yellow).AgXToneMapping: newer, and Blender's default since version 4. It keeps hues more stable in very bright light, at the cost of a flatter, more "photographic" look. A good default if your scene has strong coloured lights.NeutralToneMapping(Khronos PBR Neutral): designed for product visualisation. Colours in the normal range stay almost exactly as the artist set them; only the highlights get compressed. Pick this when the red of a sneaker must match the brand red.
toneMappingExposure works like the exposure on a camera: it multiplies the light before the curve. If a scene looks too dark with tone mapping on (it often looks a little darker than without), raise exposure rather than making every light brighter.
Tone mapping applies when you render to the screen, and only to materials with
toneMapped: true(the default). SettoneMapped: falseon things that should keep their exact colour, such as a UI overlay drawn in 3D. When you add post-processing later, tone mapping moves to an output pass at the end of the chain; we will get there in a later part.
Shadows
Environment light has no direction, so it cannot cast a shadow, and the fox floats. In Three.js, only three lights can cast shadows: DirectionalLight, SpotLight and PointLight. They all use the same technique, the shadow map.
How a shadow map works
A GPU draws triangles; it has no idea whether a point is hidden from a light. So the shadow is computed with two passes:
- From the light. Before the normal render, the scene is rendered from the light's point of view, by a camera attached to the light (the shadow camera). This pass does not store colours, only depth: for each texel, how far from the light the first surface is. The result is the shadow map, a depth texture.
- From the camera. During the normal render, for each pixel, the shader works out where that point would be in the shadow map and how far it is from the light. If it is farther than the depth stored there, something else was in front of it: the point is in shadow.
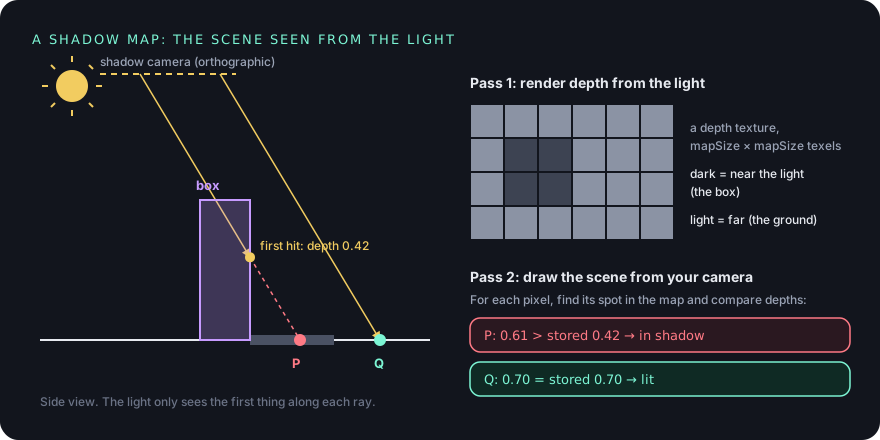
Everything else in this section follows from these two passes: the shadow camera decides what can have a shadow, the texture size decides how sharp it is, and comparing two depths that are almost equal is where the artefacts come from.
Turning shadows on: four switches
Shadows are off by default, because the extra pass costs time. You need all four of these, and forgetting one of them is the number one reason a shadow does not appear:
// 1. the renderer must allow shadows
renderer.shadowMap.enabled = true;

// 2. the light must cast them
sun.castShadow = true;

// 3. objects that block light cast...
model.traverse((child) => {
  if (child.isMesh) child.castShadow = true;   // on the meshes, not on the Group!
});

// 4. ...and surfaces that show the shadow receive
floor.receiveShadow = true;
Point 3 deserves a second look. castShadow and receiveShadow exist on every Object3D, so gltf.scene.castShadow = true runs without an error. It just does nothing, because only meshes are drawn. The flags are not inherited by children, so you have to traverse. An object can do both: set receiveShadow on the fox too, and its ears can shadow its back.
There are three shadow map types, set with renderer.shadowMap.type:
PCFShadowMap(the default): samples the shadow map several times around each point (percentage-closer filtering) and averages, which gives smooth edges.light.shadow.radiuscontrols how soft they are.BasicShadowMap: one sample, hard and pixelated edges. The fastest.VSMShadowMap: variance shadow maps. Can blur into very soft shadows (shadow.radiusandshadow.blurSamples), but can show "light bleeding" where shadows overlap.
Many tutorials use
PCFSoftShadowMap. It has been removed; in r186 asking for it logs a warning and gives youPCFShadowMap. UsePCFShadowMapwith ashadow.radiusof 2 to 4 instead.
Fitting the shadow camera
For a DirectionalLight, the shadow camera is an OrthographicCamera: a box. It starts at the light's position and looks at light.target (the origin by default). Only things inside that box can cast or receive shadows. By default the box is 10 × 10 units wide (from −5 to 5) and goes from 0.5 to 500 units deep, and the shadow map is 512 × 512 texels.
The trouble is that those 512 texels are spread across the whole box. If the box is 10 units wide and your character is 2, the character only covers a fifth of the shadow map: about 100 texels from nose to tail. That is why default shadows look blurry and blocky. The fix is to make the box as small as you can while still covering everything that needs a shadow:
const sun = new THREE.DirectionalLight(0xffffff, 2.2);
sun.position.set(3, 5, 2);
sun.castShadow = true;

// The box, in the light's own space: x and y across, near and far along its direction
sun.shadow.camera.left = -1.6;
sun.shadow.camera.right = 1.6;
sun.shadow.camera.top = 1.6;
sun.shadow.camera.bottom = -1.6;
sun.shadow.camera.near = 3;
sun.shadow.camera.far = 9;

sun.shadow.mapSize.set(1024, 1024);   // the shadow texture, in texels
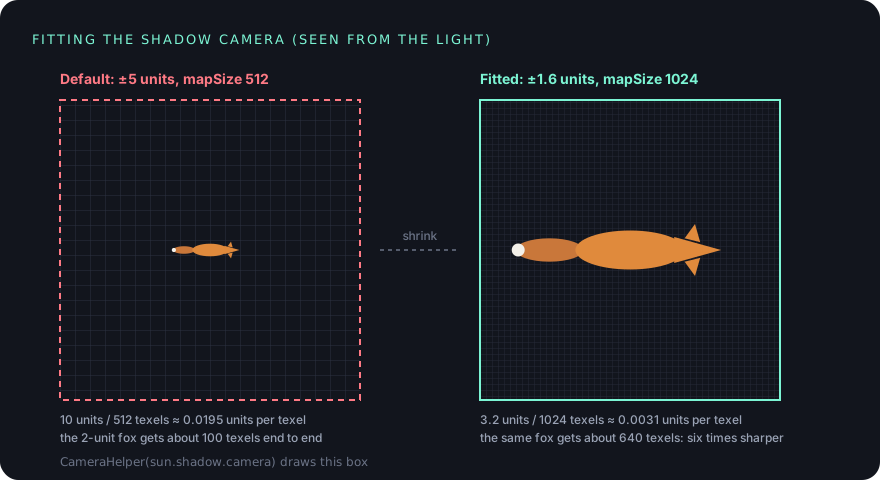
mapSize.Guessing those six numbers is hard, so draw the box. CameraHelper works with any camera, including a shadow camera:
const helper = new THREE.CameraHelper(sun.shadow.camera);
scene.add(helper);
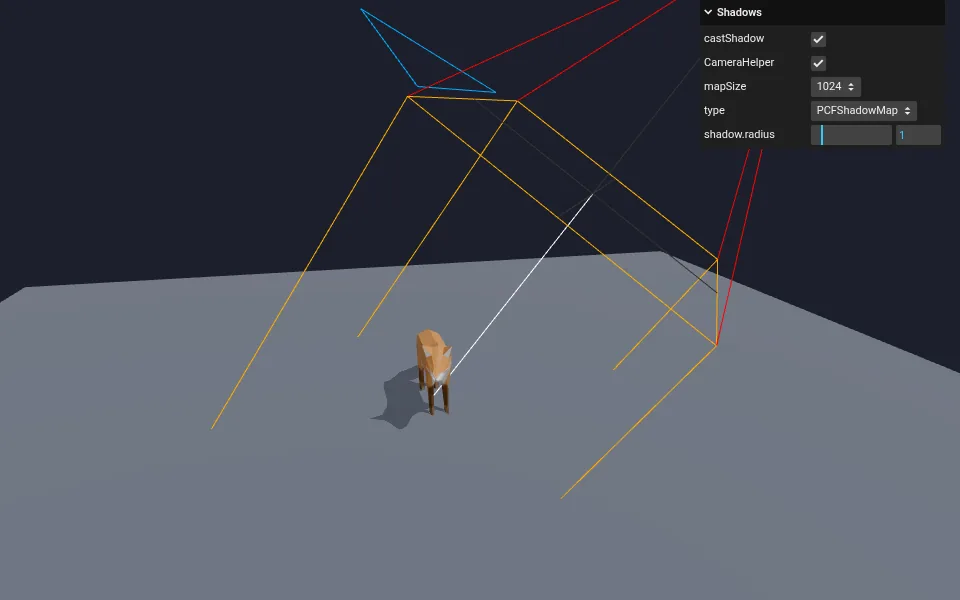
CameraHelper draws the shadow camera's box. Everything that should cast or catch a shadow must be inside it. (step-5.html)Here is the difference up close. Same scene, same light; only the box and the map size changed:
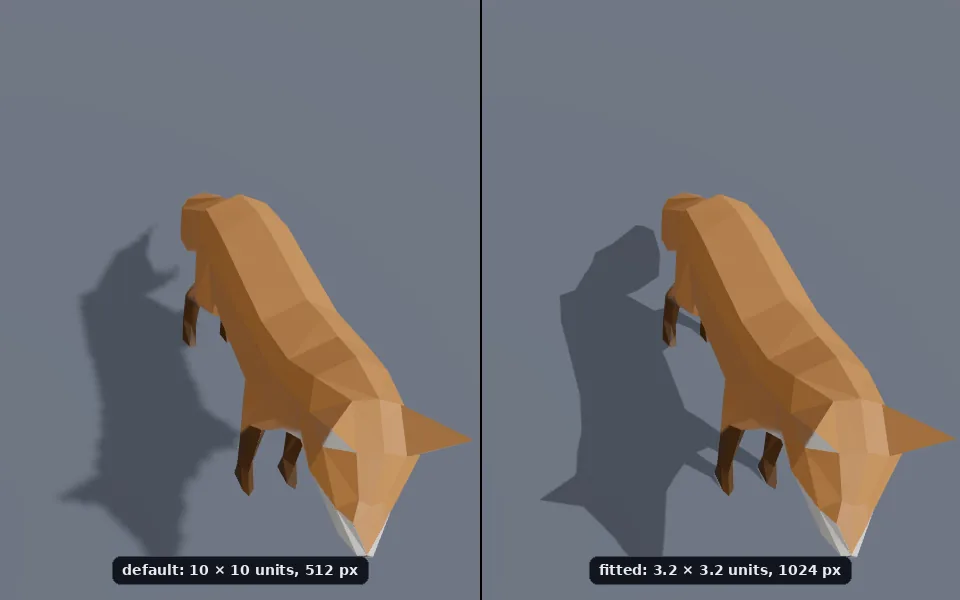
A few practical notes:
- Near and far are distances from the light's position, along its direction. Our sun is at (3, 5, 2), about 6.2 units from the fox, so 3 to 9 covers the fox with room to spare. Keeping this range tight also helps with bias, as we will see.
- The light's position only sets the direction and the start of the box, not the brightness: a directional light is equally bright everywhere. If the thing you want to shadow moves, move
sun.targetwith it (and addsun.targetto the scene so its matrix updates), and the box follows. mapSizeshould be a power of two: 512, 1024, 2048, 4096. Each doubling is four times the texels to render every frame. 2048 is a good ceiling for most scenes; on mobile, stay at 1024 if you can.- If you change
mapSizeafter the first frame, the old texture keeps its old size. Throw it away and Three.js creates a new one:sun.shadow.map?.dispose(); sun.shadow.map = null; - For a scene where nothing moves, render the shadow once and keep it:
renderer.shadowMap.autoUpdate = false, then setrenderer.shadowMap.needsUpdate = truewhenever something changes.
SpotLight uses a perspective shadow camera, set by the light's angle and distance. PointLight needs six of them (one per side of a cube), so its shadows cost six extra passes: use them sparingly.
Shadow acne and peter-panning: bias and normalBias
Turn on shadows in a scene with a low sun and you may see this:
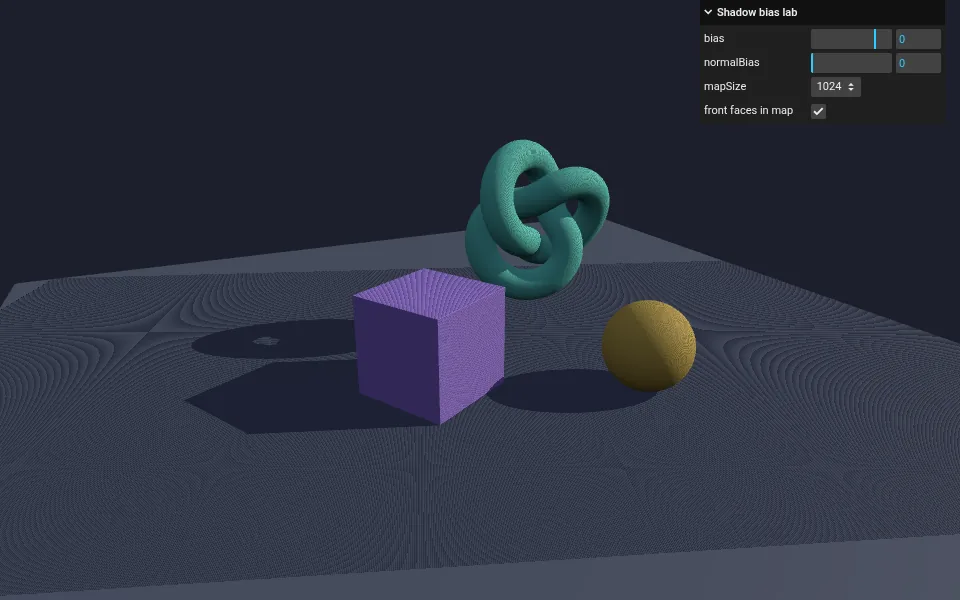
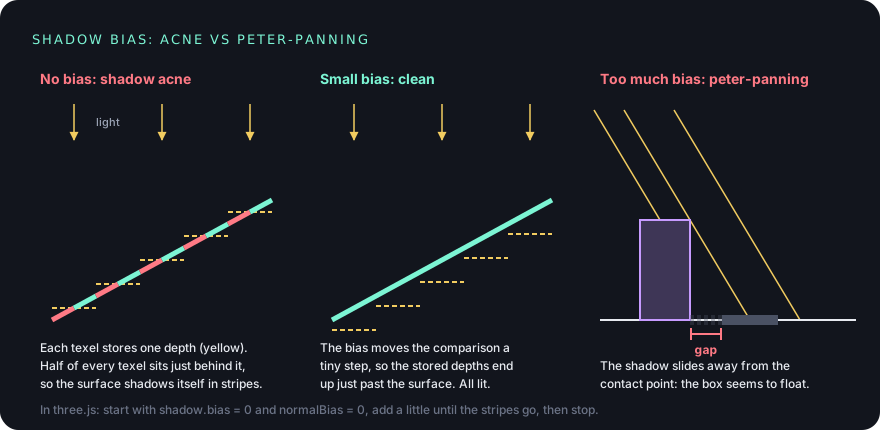
bias and normalBias at 0: shadow acne. The stripes are surfaces shadowing themselves. (step-6.html?bias=0&normalBias=0)That is shadow acne, and it comes straight from pass 2. A texel of the shadow map covers a small patch of the floor, but it stores only one depth: the depth at its centre. Where the light hits the floor at an angle, half of the patch is a little closer to the light than that stored value and half is a little farther. The farther half fails the "am I behind the stored depth?" test against its own surface and shadows itself. Repeat that for every texel, and you get stripes.
The fix is to cheat a little in the comparison:
shadow.biasshifts the depth used in the comparison. A small negative value moves the surface slightly towards the light, so it no longer loses against itself. It is measured in shadow-map depth, from 0 atnearto 1 atfar, so the same value means more world distance when the near-far range is large. Typical values:-0.0001to-0.001.shadow.normalBiasmoves the point where the shadow map is read along the surface's normal, in world units. This helps most on surfaces the light grazes at a steep angle, which is exactly where plain bias struggles. Typical values:0.01to0.05for a scene measured in metres, scaled with your scene size.
Push either one too far and you get the opposite artefact. The shadow slides away from the object that casts it, and the object seems to float above the ground. This is called peter-panning, after the boy whose shadow came loose.
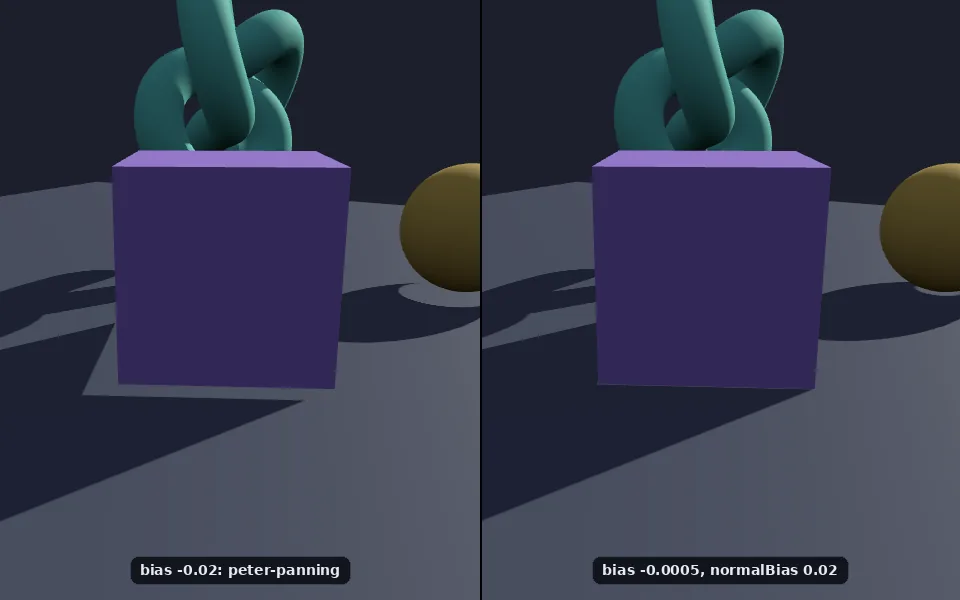
normalBias, clean and attached. (step-6.html)The recipe that works almost every time:
- Fit the shadow camera first, including near and far. A tighter box means smaller texels, and smaller texels need less bias.
- Start with
bias = 0andnormalBias = 0. RaisenormalBiasin small steps until the stripes on sloped surfaces go. - If some acne is left on surfaces facing the light, add a tiny negative
bias. Then stop, and check the contact points (feet, the bottom of boxes) for gaps.
Why does step 6 look worse than most scenes? For a normal (
FrontSide) material, Three.js draws the back faces into the shadow map. On a closed mesh like a cube, the stored depth is then the far side of the object, nowhere near the lit surface, so acne mostly happens on the dark side, where it is hidden. Step 6 setsshadowSide: THREE.FrontSideon purpose to make the problem easy to see. You get the same thing for real with double-sided materials (side: THREE.DoubleSide), which many glTF models use for leaves, hair and cloth. Try?side=backto see the default.
A ground that only shows shadows: ShadowMaterial
In the final demo, the fox walks over the HDR background with no visible floor, only a shadow. That is ShadowMaterial: a material that is fully transparent except where a shadow falls on it.
const ground = new THREE.Mesh(
  new THREE.PlaneGeometry(12, 12),
  new THREE.ShadowMaterial({ color: 0x000000, opacity: 0.4 })
);
ground.rotation.x = -Math.PI / 2;   // PlaneGeometry stands up; lay it flat
ground.receiveShadow = true;
scene.add(ground);
opacity sets how dark the shadow is. This is the standard trick for product viewers and for putting 3D on top of a web page: the object looks grounded without a visible floor.
The final demo also uses one more idea: the environment provides soft light from all around, and a single DirectionalLight provides the sun and its shadow. If the HDR has a visible sun, place the light so it comes from the same direction; the eye notices when the shadow and the bright side of the sky disagree.
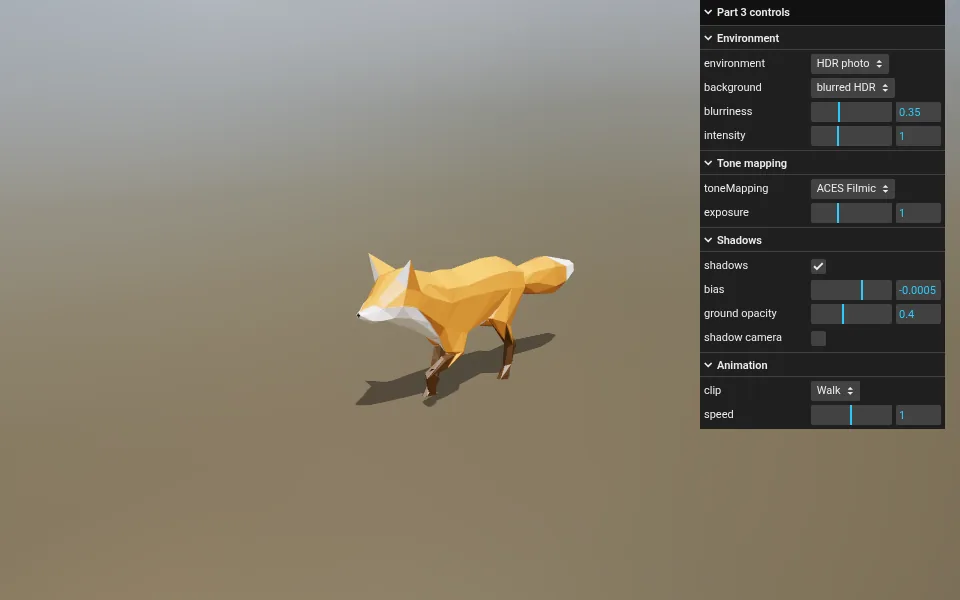
ShadowMaterial ground. (demos/part-3/)The panel's shadow checkbox toggles
sun.castShadow, notrenderer.shadowMap.enabled. TurningshadowMap.enabledon or off after the first frame does not rebuild materials that have already been compiled, so they keep their old shader. If you really need to switch it, also setmaterial.needsUpdate = trueon every material.
When it goes wrong: common pitfalls
Almost every "my model does not work" question is one of these.
The model is black.
- There is no light and no environment. PBR materials reflect light; with none, they are black (step 3 above).
- The material is fully metallic (
metalness: 1) and there is noscene.environment. Metals have no diffuse colour; they only reflect their surroundings, so with nothing to reflect they are black even under strong lights. Add an environment. - A texture failed to load. Check the console and the Network tab for 404s: a
.gltffile points at its.binand images by relative path, and those files have to be next to it on the server. - You are opening the page from
file://. The browser blocks loading files that way. Serve the folder over HTTP.
The model is invisible, giant or tiny.
- Measure it with
Box3and print the size. Expect anything from 0.001 to 10,000. - If it is huge, the camera may be inside it, and since triangles are only drawn from the front, you see nothing at all.
- If it is far from the origin, it may be beyond the camera's
farplane. Centre it as shown above, or checkbox.getCenter().
There are no shadows.
- Check the four switches:
renderer.shadowMap.enabled,light.castShadow,castShadowon the meshes (not the group),receiveShadowon the floor. - The light cannot cast:
AmbientLight,HemisphereLightandscene.environmentnever cast shadows. - The objects are outside the shadow camera's box, or the box is so big that the shadow is a faint smudge. Add a
CameraHelperand look. A shadow that ends in a straight line is cut off by the edge of the box. - The floor uses
MeshBasicMaterial, which ignores lights and therefore shadows. Use a lit material orShadowMaterial.
Shadow acne: stripes, moiré, a dirty-looking surface.
- Tighten the shadow camera (all six values), then add a little
normalBias, then a tiny negativebias. RaisingmapSizehelps a little; fitting helps more. - If the shadow floats away from the object, you overdid the bias: that is peter-panning.
The full code
Here is the final demo in one file. Next to it you need two folders from the repo: models/ with Fox.glb and textures/ with the HDR. Because the page loads files, serve the folder over HTTP: npx serve . or python3 -m http.server in the folder, then open the address it prints.
<!doctype html>
<html lang="en">
<head>
  <meta charset="utf-8">
  <meta name="viewport" content="width=device-width, initial-scale=1">
  <title>Models, light and shadows · final demo</title>
  <style>
    html, body { margin: 0; height: 100%; background: #000; }
    canvas { display: block; }
    #status { position: absolute; left: 12px; top: 12px; font: 400 12px/1.45 ui-monospace, Menlo, Consolas, monospace; color: #e7eaf0; background: rgba(18, 21, 29, .85); border: 1px solid #3a4258; border-radius: 8px; padding: 8px 11px; }
    #status.error { color: #ff7a85; border-color: #ff7a85; }
  </style>
  <script type="importmap">
    {
      "imports": {
        "three": "https://cdn.jsdelivr.net/npm/three@0.186.1/build/three.module.js",
        "three/addons/": "https://cdn.jsdelivr.net/npm/three@0.186.1/examples/jsm/"
      }
    }
  </script>
</head>
<body>
  <div id="status">Loading…</div>
  <script type="module">
    import * as THREE from 'three';
    import { OrbitControls } from 'three/addons/controls/OrbitControls.js';
    import { GLTFLoader } from 'three/addons/loaders/GLTFLoader.js';
    import { HDRLoader } from 'three/addons/loaders/HDRLoader.js';
    import { RoomEnvironment } from 'three/addons/environments/RoomEnvironment.js';
    import GUI from 'three/addons/libs/lil-gui.module.min.js';

    const status = document.getElementById('status');

    // Scene and camera
    const scene = new THREE.Scene();
    const backgroundColor = new THREE.Color(0x1b1f2a);

    const camera = new THREE.PerspectiveCamera(45, innerWidth / innerHeight, 0.1, 100);
    camera.position.set(2.8, 1.5, 3.6);

    // Renderer: tone mapping for the HDR light, shadows switched on
    const renderer = new THREE.WebGLRenderer({ antialias: true });
    renderer.setPixelRatio(Math.min(devicePixelRatio, 2));
    renderer.setSize(innerWidth, innerHeight);
    renderer.toneMapping = THREE.ACESFilmicToneMapping;
    renderer.toneMappingExposure = 1;
    renderer.shadowMap.enabled = true;
    document.body.appendChild(renderer.domElement);

    const controls = new OrbitControls(camera, renderer.domElement);
    controls.target.set(0, 0.55, 0);
    controls.enableDamping = true;
    controls.maxPolarAngle = Math.PI / 2 - 0.05;   // stay above the ground
    controls.minDistance = 1.5;
    controls.maxDistance = 10;

    // Load the model and the HDR at the same time, and say so if either fails
    let gltf, hdrTexture;
    try {
      [gltf, hdrTexture] = await Promise.all([
        new GLTFLoader().loadAsync('models/Fox.glb'),
        new HDRLoader().loadAsync('textures/rosendal_plains_2_1k.hdr'),
      ]);
    } catch (error) {
      status.className = 'error';
      status.textContent = `Loading failed: ${error.message}`;
      throw error;
    }
    status.remove();

    // Environments: the HDR photo, or the procedural room
    hdrTexture.mapping = THREE.EquirectangularReflectionMapping;
    const pmrem = new THREE.PMREMGenerator(renderer);
    const roomTexture = pmrem.fromScene(new RoomEnvironment(), 0.04).texture;
    pmrem.dispose();

    // The fox: fit to 2 units, stand it on the ground, let every mesh cast a shadow
    const model = gltf.scene;
    const box = new THREE.Box3().setFromObject(model);
    const size = box.getSize(new THREE.Vector3());
    model.scale.setScalar(2 / Math.max(size.x, size.y, size.z));
    box.setFromObject(model);
    const center = box.getCenter(new THREE.Vector3());
    model.position.set(-center.x, -box.min.y, -center.z);
    model.traverse((child) => {
      if (child.isMesh) child.castShadow = true;
    });
    scene.add(model);

    // Animation
    const mixer = new THREE.AnimationMixer(model);
    const actions = {};
    for (const clip of gltf.animations) actions[clip.name] = mixer.clipAction(clip);
    let current = actions.Walk;
    current.play();

    // A ground that is invisible except for the shadows that land on it
    const ground = new THREE.Mesh(
      new THREE.PlaneGeometry(12, 12),
      new THREE.ShadowMaterial({ color: 0x000000, opacity: 0.4 })
    );
    ground.rotation.x = -Math.PI / 2;
    ground.receiveShadow = true;
    scene.add(ground);

    // The one light that casts shadows, with its shadow camera fitted around the fox
    const sun = new THREE.DirectionalLight(0xffffff, 2);
    sun.position.set(2.5, 5, 2);
    sun.castShadow = true;
    sun.shadow.mapSize.set(2048, 2048);
    Object.assign(sun.shadow.camera, { left: -2, right: 2, top: 2, bottom: -2, near: 2, far: 10 });
    sun.shadow.bias = -0.0005;
    sun.shadow.normalBias = 0.02;
    sun.shadow.radius = 3;
    scene.add(sun);

    const helper = new THREE.CameraHelper(sun.shadow.camera);
    helper.visible = false;
    scene.add(helper);

    // Everything the panel can change
    const settings = {
      environment: 'HDR photo',
      background: 'blurred HDR',
      blurriness: 0.35,
      environmentIntensity: 1,
      toneMapping: 'ACES Filmic',
      exposure: 1,
      shadows: true,
      bias: sun.shadow.bias,
      shadowOpacity: 0.4,
      helper: false,
      clip: 'Walk',
      speed: 1,
    };

    const toneMappings = {
      'ACES Filmic': THREE.ACESFilmicToneMapping,
      AgX: THREE.AgXToneMapping,
      Neutral: THREE.NeutralToneMapping,
      None: THREE.NoToneMapping,
    };

    function applyEnvironment() {
      scene.environment = { 'HDR photo': hdrTexture, RoomEnvironment: roomTexture, none: null }[settings.environment];
      scene.environmentIntensity = settings.environmentIntensity;
      const hdrBackground = settings.background !== 'flat colour' && settings.environment === 'HDR photo';
      scene.background = hdrBackground ? hdrTexture : backgroundColor;
      scene.backgroundBlurriness = settings.background === 'blurred HDR' ? settings.blurriness : 0;
    }
    applyEnvironment();

    const gui = new GUI({ title: 'Part 3 controls' });

    const envFolder = gui.addFolder('Environment');
    envFolder.add(settings, 'environment', ['HDR photo', 'RoomEnvironment', 'none']).onChange(applyEnvironment);
    envFolder.add(settings, 'background', ['blurred HDR', 'sharp HDR', 'flat colour']).onChange(applyEnvironment);
    envFolder.add(settings, 'blurriness', 0, 1, 0.01).onChange(applyEnvironment);
    envFolder.add(settings, 'environmentIntensity', 0, 3, 0.05).name('intensity').onChange(applyEnvironment);

    const toneFolder = gui.addFolder('Tone mapping');
    toneFolder.add(settings, 'toneMapping', Object.keys(toneMappings)).onChange((v) => { renderer.toneMapping = toneMappings[v]; });
    toneFolder.add(settings, 'exposure', 0, 3, 0.05).onChange((v) => { renderer.toneMappingExposure = v; });

    const shadowFolder = gui.addFolder('Shadows');
    shadowFolder.add(settings, 'shadows').onChange((v) => { sun.castShadow = v; });
    shadowFolder.add(settings, 'bias', -0.01, 0.005, 0.0001).onChange((v) => { sun.shadow.bias = v; });
    shadowFolder.add(settings, 'shadowOpacity', 0, 1, 0.01).name('ground opacity').onChange((v) => { ground.material.opacity = v; });
    shadowFolder.add(settings, 'helper').name('shadow camera').onChange((v) => { helper.visible = v; });

    const animFolder = gui.addFolder('Animation');
    animFolder.add(settings, 'clip', Object.keys(actions)).onChange((name) => {
      const next = actions[name];
      if (next === current) return;
      next.reset().play();
      current.crossFadeTo(next, 0.4);
      current = next;
    });
    animFolder.add(settings, 'speed', 0, 2, 0.05).onChange((v) => { mixer.timeScale = v; });

    if (innerWidth < 700) gui.close();

    function onResize() {
      camera.aspect = innerWidth / innerHeight;
      camera.updateProjectionMatrix();
      renderer.setPixelRatio(Math.min(devicePixelRatio, 2));
      renderer.setSize(innerWidth, innerHeight);
    }
    addEventListener('resize', onResize);

    const timer = new THREE.Timer();

    renderer.setAnimationLoop((time) => {
      timer.update(time);
      mixer.update(timer.getDelta());
      controls.update();
      renderer.render(scene, camera);
    });
  </script>
</body>
</html>
Credits. The Fox model comes from the Khronos glTF Sample Assets: model by PixelMannen (CC0 1.0), rigging and animation by tomkranis (CC BY 4.0), conversion to glTF by @AsoboStudio and @scurest (CC BY 4.0). The HDR is Rosendal Plains 2 from Poly Haven (CC0 1.0). Licence details are in demos/part-3/CREDITS.md.
The step-by-step versions are in the repo too: step-1.html (loading and fitting), step-2.html (animation and skeleton), step-3.html (environments), step-4.html (tone mapping), step-5.html (shadow camera) and step-6.html (the bias lab).
A few things to try
- In the final demo, switch tone mapping to
Noneand push exposure up and down. Then do the same withAgX. Watch the fox's orange in the brightest parts. - Tick "shadow camera" and drag the bias slider to its most negative value. Watch the shadow come loose from the feet. Then drag it to positive values and look for stripes on the fox.
- In step 5, set
mapSizeto 256 andtypetoBasicShadowMapto see raw shadow texels, then go back toPCFShadowMapand raiseshadow.radius. - Rotate the environment:
scene.environmentRotation.y = Math.PI / 2(and the same forbackgroundRotation). Then move the sun so the shadow agrees with the sky. - Load your own model. Poly Pizza and Sketchfab have many free downloadable glTF models (check each licence). Print its tree, fit it with
Box3, and playgltf.animations[0]if it has any. Different HDRs are on Poly Haven.
Next time
We can now load what artists make, animate it, light it like a photo and ground it with a shadow. Everything so far, though, has used materials that Three.js wrote for us. In Part 4 we write our own: ShaderMaterial, the basics of GLSL, what a vertex shader and a fragment shader actually do, and how the uniforms, attributes and varyings from all those materials fit together. After shaders comes WebGPU: WebGPURenderer and TSL, the new node-based shading language. A reader asked for that chapter, so it is coming soon, right after shaders. See you there.