← Three.js from Scratch · all parts
Three.js from Scratch, Part 4: Your First Shaders
In Part 3 we loaded a model, lit it with an HDR sky and gave it a proper shadow. Every surface in that scene was drawn by a material Three.js wrote for us: MeshStandardMaterial worked out the light, the reflections and the shadow, and we only set a few numbers. That gets you a long way. But sooner or later you want something no built-in material does: water that moves, a surface that glows at the edges, a shape that bends, a colour that follows the mouse. For that you write a shader: a small program that runs on the GPU, once for every vertex and once for every pixel.
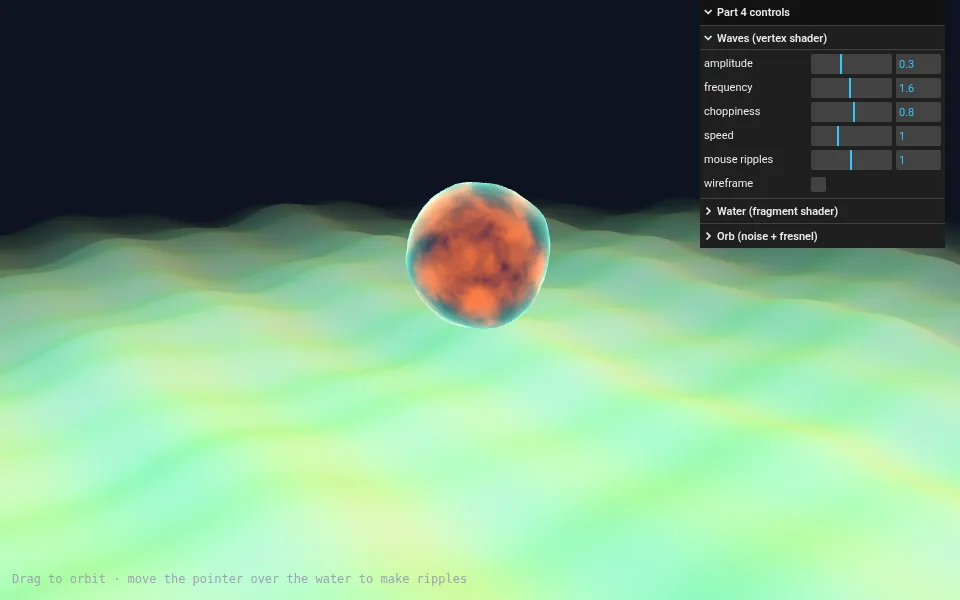
Shaders have a reputation for being hard, mostly because the first contact is a wall of strange code. They are much less scary once you know the handful of rules they follow. In this article we write our first ones from zero, with ShaderMaterial and GLSL. We start with a single flat colour and end with the scene below: an ocean whose waves are computed entirely on the GPU, ripples that follow your pointer, and a glowing noise orb. Every slider in the panel changes one number inside a shader:
Open the demo full screen ↗ · Source on GitHub ↗
As in the earlier parts, everything here uses Three.js r186 (npm version
0.186.1) through the same import map. Every step below is a single HTML file you can open from the repo. Unlike Part 3, nothing loads from disk: all the "art" is code, so the files also work straight fromfile://. The last step is the exception that previews Part 5: it usesWebGPURenderer, which needs thethree/webgpubuild.
What a shader is
Your GPU has thousands of small cores. They are not clever, but they are many, and they all run the same program at the same time on different data. A shader is that program. When Three.js draws a mesh, it does not hand the GPU "a sphere". It hands over a list of vertices, two shaders, and a few values to go with them, and says: draw.
What happens next is called the pipeline:
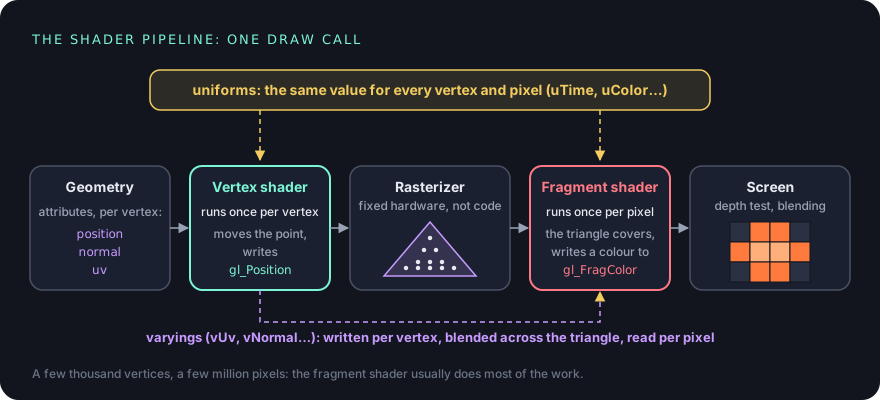
- The vertex shader runs once for every vertex. It gets that vertex's data (its position, normal, UV: the attributes from Part 2) and has one job: say where the vertex ends up on screen, by writing
gl_Position. It may also move the vertex anywhere it likes. That is how we will make waves. - The rasterizer is not code you write. It takes each triangle of three transformed vertices and works out which pixels it covers. Each of those candidate pixels is called a fragment.
- The fragment shader runs once for every fragment and decides its colour, by writing
gl_FragColor. Lighting, textures, fog, everything you see as "the material" happens here.
Two kinds of data flow into this:
- Uniforms come from JavaScript and have the same value for every vertex and every pixel of a draw call: the time, the mouse position, a colour, the camera matrices.
- Varyings are how the vertex shader talks to the fragment shader. The vertex shader writes a value at each corner; the rasterizer blends the three corner values across the triangle; each fragment reads its own blended value.
That is the whole model. Every built-in material in Three.js, including the MeshStandardMaterial from Part 3, is a vertex shader and a fragment shader built from exactly these parts. Three.js just writes them for you.
The language is GLSL (OpenGL Shading Language), more precisely GLSL ES 3.0, the version WebGL 2 uses. It looks like C: typed variables, functions, if and for. What makes it pleasant for graphics is its vector types (vec2, vec3, vec4, mat3, mat4) and a big library of maths functions that work on whole vectors at once.
ShaderMaterial: your first shader
ShaderMaterial is a material whose shaders you write yourself. Here is the smallest useful one:
const material = new THREE.ShaderMaterial({
  vertexShader: /* glsl */ `
    varying vec2 vUv;

    void main() {
      vUv = uv;
      gl_Position = projectionMatrix * modelViewMatrix * vec4(position, 1.0);
    }
  `,
  fragmentShader: /* glsl */ `
    varying vec2 vUv;

    void main() {
      gl_FragColor = vec4(1.0, 0.5, 0.2, 1.0);   // red, green, blue, alpha: orange
    }
  `,
});

const mesh = new THREE.Mesh(new THREE.SphereGeometry(1, 64, 32), material);
The shaders are plain strings. The /* glsl */ comment does nothing at runtime; editor extensions such as Comment tagged templates or glsl-literal in VS Code use it to highlight the string as GLSL, which helps a lot.
Read the vertex shader from the inside out. position is the vertex in the model's own space, the same numbers you saw in geometry.attributes.position in Part 2. vec4(position, 1.0) adds a fourth component, w, which is 1.0 for points (it is what lets a 4×4 matrix move a point as well as rotate and scale it). modelViewMatrix moves the point into the camera's space, and projectionMatrix flattens it onto the screen. The result goes into gl_Position, and the GPU takes it from there. This one line is what every Three.js material does to every vertex; the rest is extras.
Where do position, uv, modelViewMatrix and projectionMatrix come from? We never declared them. ShaderMaterial adds a block of declarations to the top of your code before compiling it. The ones you will use most:
| Name | Kind | Stage | What it is |
|---|---|---|---|
position, normal, uv |
attribute | vertex | the geometry's data for this vertex |
modelMatrix |
uniform | vertex | object space → world space |
viewMatrix |
uniform | both | world space → camera space |
modelViewMatrix |
uniform | vertex | viewMatrix * modelMatrix, precomputed |
projectionMatrix |
uniform | vertex | camera space → clip space |
normalMatrix |
uniform | vertex | turns normals into camera space |
cameraPosition |
uniform | both | the camera, in world space |
If you want none of that help, there is RawShaderMaterial: it compiles your strings exactly as they are, so you declare every attribute and uniform yourself, plus precision and the GLSL version. It is useful when porting shaders from elsewhere, or to see what is really going on. For everyday work ShaderMaterial is the right tool.
A note on versions: WebGL 2 speaks GLSL ES 3.0, where varying is spelled out and in, and gl_FragColor was replaced by an output you declare yourself. Three.js adds #defines that translate the older names, so the classic varying and gl_FragColor you will find in most tutorials work as they are. That is what we use here.
GLSL in five minutes
If you know JavaScript, the surprises in GLSL are few but sharp:
- Types are strict.
float x = 1;is a compile error:1is anint, and GLSL does not convert for you. Write1.0. This is the error everybody hits first. - Vectors and swizzles.
vec3 c = vec3(1.0, 0.5, 0.2);thenc.r,c.xy,c.zyx, evenc.rrrall work..xyzw,.rgbaand.stpqare the same components with different names. - Maths works on whole vectors.
a + b,a * 2.0,sin(v)apply to every component.mat4 * vec4is a real matrix multiplication. - The built-in functions are your toolbox:
mix(a, b, t)blends,clamp(x, lo, hi)limits,step(edge, x)is 0 or 1,smoothstep(e0, e1, x)is a soft step,fract(x)keeps what is after the decimal point,length,distance,dot,cross,normalize,pow,sin,cos. - No
console.log. A shader cannot print. You debug by turning a value into a colour and looking at it, which we will do all the time.
UVs: an address for every point
The orange sphere is not very exciting, so let us use the varying. In the vertex shader we copied each vertex's uv attribute into vUv. In the fragment shader we can now show it:
varying vec2 vUv;

void main() {
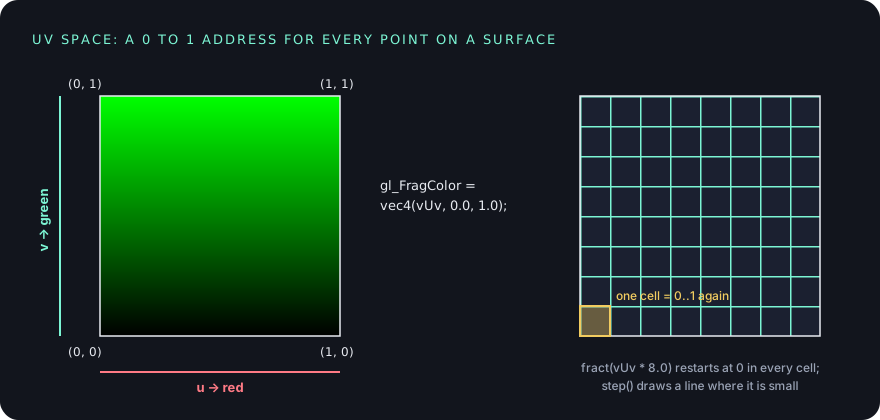
  gl_FragColor = vec4(vUv, 0.0, 1.0);   // u -> red, v -> green
}
Remember UVs from Part 2: every vertex carries a 2D coordinate that says which point of a texture belongs to it, from (0, 0) at the bottom left to (1, 1) at the top right. Output them as a colour and you see that address directly: black where both are 0, red where u is 1, green where v is 1, yellow where both are.
Here it is on three geometries with one material. The plane shows the square exactly. The sphere wraps it around like a world map, u around the equator and v from pole to pole. The torus knot runs u along the tube and v around it:
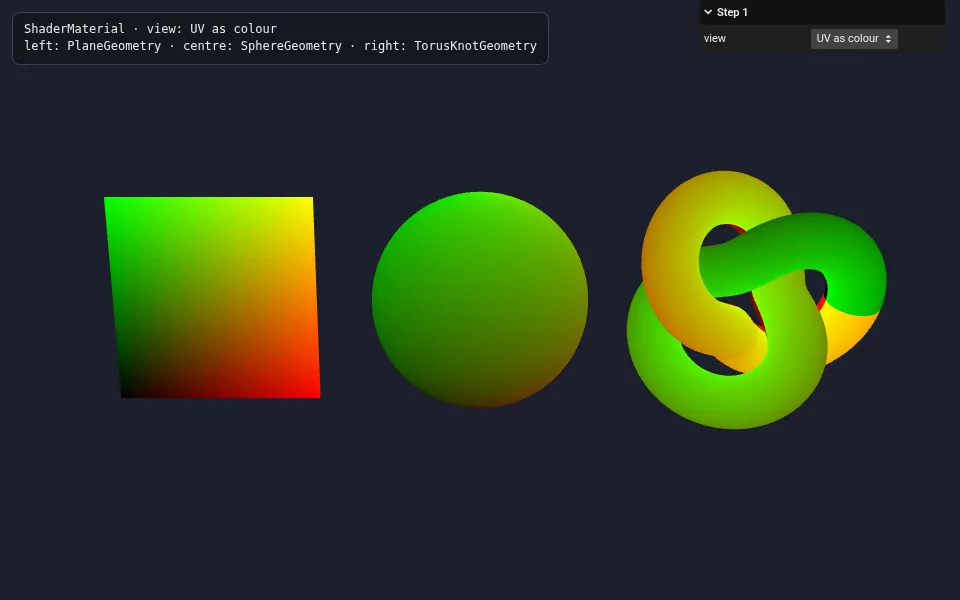
ShaderMaterial, three geometries, UVs as colour. (step-1.html)Now the first real pattern. Multiply the UVs by 8 and keep only the fractional part: fract(vUv * 8.0) goes 0 → 1 eight times across the surface, so every cell gets its own little 0..1 square. Where that local value is small we are near a cell edge, and step turns that into a hard 1 or 0:
vec2 cell = fract(vUv * 8.0);                        // 8 x 8 cells
float line = step(cell.x, 0.06) + step(cell.y, 0.06);  // 1 near a cell edge
vec3 color = mix(vec3(vUv, 0.0) * 0.8, vec3(1.0), min(line, 1.0));
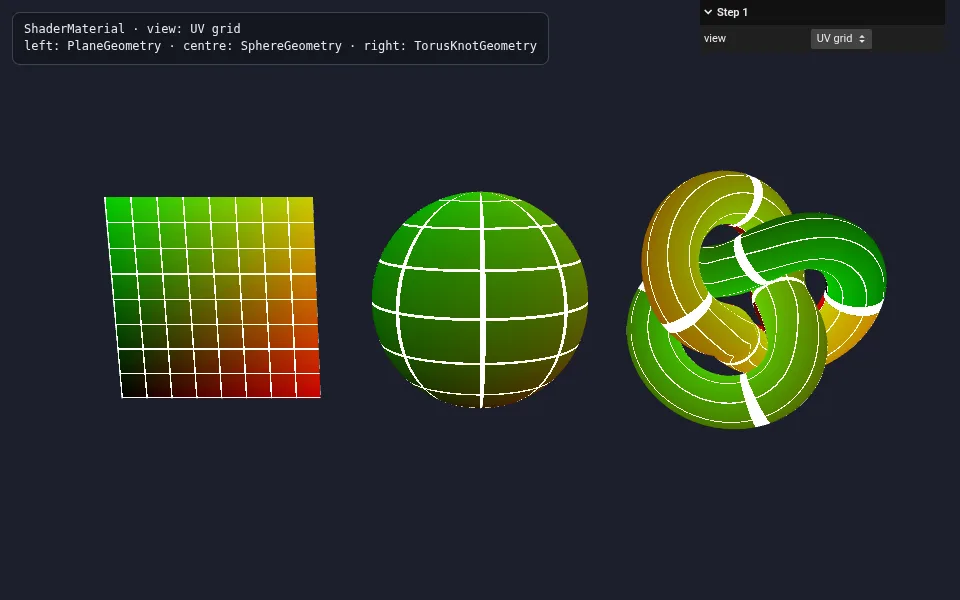
?view=grid: a UV grid from fract and step. It is also the best way to see how a model's UVs are laid out. (step-1.html?view=grid)This is the core trick of procedural patterns: compute something from coordinates, then shape it with fract, step, smoothstep and mix. No texture, no image files: the pattern is maths, so it is perfectly sharp at any zoom. The grid view is also a debugging tool. Bunched-up cells at the sphere's poles, or stretched cells on a model, show exactly where a texture would distort.
Uniforms: time, mouse and colour
A shader that never changes is a picture. To animate it, we pass values in from JavaScript with uniforms. You declare them in GLSL with the uniform keyword, and give them a starting value in the material's uniforms object, keyed by the same name:
const uniforms = {
  uTime: { value: 0 },
  uColorA: { value: new THREE.Color('#ff3d7f') },
  uColorB: { value: new THREE.Color('#3d7bff') },
  uMouse: { value: new THREE.Vector2(0.5, 0.5) },
  uGlow: { value: 0.35 },
  uAspect: { value: 3.2 / 2 },   // width / height of the plane
};

const material = new THREE.ShaderMaterial({ uniforms, vertexShader, fragmentShader });
uniform float uTime;
uniform vec3 uColorA;
uniform vec3 uColorB;
uniform vec2 uMouse;
uniform float uGlow;
uniform float uAspect;
varying vec2 vUv;

void main() {
  // A gradient from bottom to top, with a slow wave running along it
  float wave = 0.08 * sin(vUv.x * 6.2831 * 1.5 + uTime * 2.0);
  float t = smoothstep(0.0, 1.0, vUv.y + wave);
  vec3 color = mix(uColorA, uColorB, t);

  // A soft spot of light around the mouse, measured in UV space
  float d = length((vUv - uMouse) * vec2(uAspect, 1.0));
  color += vec3(1.0) * uGlow * smoothstep(0.35, 0.0, d);

  gl_FragColor = vec4(color, 1.0);
  #include <colorspace_fragment>
}
Three.js maps JavaScript types to GLSL types for you: a number becomes a float (or int, if the GLSL says so), Vector2/3/4 become vec2/3/4, Color becomes vec3, Matrix4 becomes mat4, and a Texture becomes a sampler2D. The { value: ... } wrapper is not decoration. The renderer keeps a reference to that object and reads .value every frame, so changing a uniform is just an assignment, with no recompiling:
const timer = new THREE.Timer();

renderer.setAnimationLoop((time) => {
  timer.update(time);
  uniforms.uTime.value += timer.getDelta();   // seconds, so speed is the same on every screen
  renderer.render(scene, camera);
});
Adding the delta instead of using the absolute time makes it easy to add a speed slider later: multiply the delta. (Timer is the replacement for Clock we met in Part 2.)
For the mouse, we want to know which point of the surface the pointer is over, not which pixel of the screen. Three.js's Raycaster gives us that for free. It shoots a ray from the camera through the pointer and reports what it hits, and each hit has a uv field, the interpolated UV at the exact point it touched.
renderer.domElement.addEventListener('pointermove', (event) => {
  pointer.set(event.clientX / innerWidth * 2 - 1, -(event.clientY / innerHeight) * 2 + 1);
  raycaster.setFromCamera(pointer, camera);
  const hit = raycaster.intersectObject(plane)[0];
  if (hit) uniforms.uMouse.value.copy(hit.uv);
});
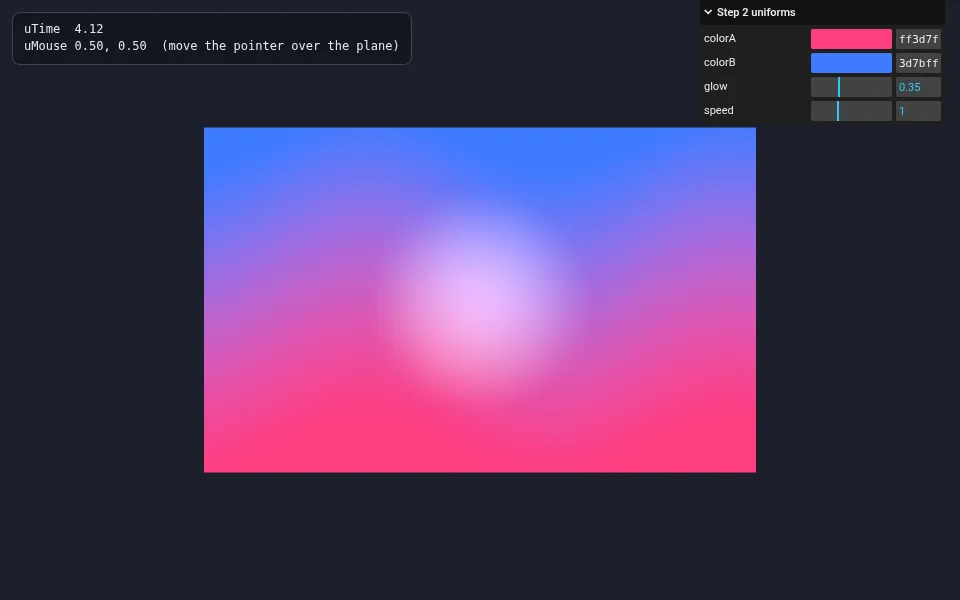
uTime moves the wave, uMouse places the glow, and the two colours come from the panel. (step-2.html)Two details in that shader are worth a closer look.
Why uAspect? UVs always run from 0 to 1, but this plane is 3.2 wide and 2 tall. One unit of u is longer on screen than one unit of v, so a circle measured in UV space comes out as a wide ellipse. Multiplying the x difference by the aspect ratio before taking the length puts both axes back in the same units. You will meet this in every full-screen effect: screen coordinates have the same problem.
Why #include <colorspace_fragment>? Part 2 explained that Three.js works in linear colour internally and converts to sRGB at the end. A THREE.Color('#ff3d7f') is converted to linear when you create it, and the built-in materials convert their result back to sRGB in their last line. Our own shader has to do that too, or every colour comes out darker and more saturated than the hex code you picked. #include <colorspace_fragment> is Three.js's own snippet for that last step, and it pastes in the right conversion for the renderer's output colour space. Put it after you write gl_FragColor. Its sibling, #include <tonemapping_fragment>, applies the renderer's tone mapping from Part 3 if one is set; the final demo uses both.
#include <name> is not standard GLSL. It is Three.js's own mechanism: before compiling, it replaces every #include with a chunk from THREE.ShaderChunk. Every built-in material is assembled this way, from a few hundred small chunks. Keep that in mind; we will use it to modify a built-in material later.
Varyings: from vertices to pixels
We have already used one varying, vUv, without thinking much about it. It is worth stopping on, because varyings are where most of the magic between the two shaders happens.
The vertex shader runs only at the corners of each triangle. The fragment shader runs for every pixel in between. So what value does a pixel in the middle of a triangle get? The rasterizer interpolates: each fragment receives a weighted mix of the three corner values, weighted by how close it is to each corner.
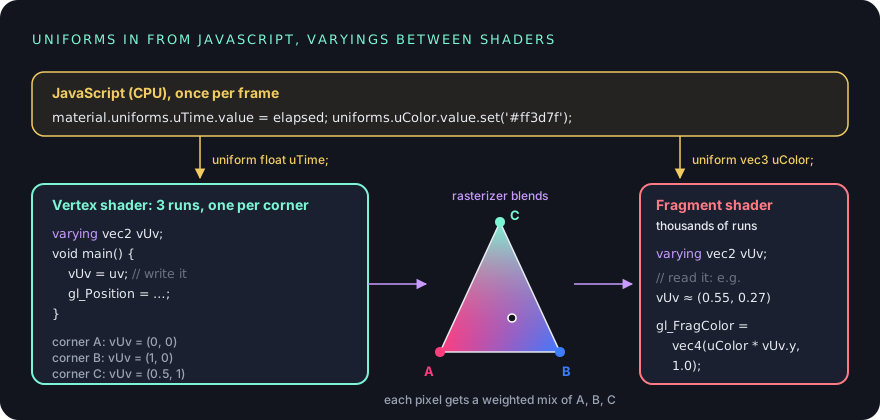
That is why UV colours came out as smooth gradients even though each triangle only has three UV values. Any value can travel this way: a position, a normal, a height, a random number per vertex. The rules:
- Declare it with the same type and name in both shaders.
- Write it in the vertex shader, read it in the fragment shader. The fragment shader cannot write it back.
- The blend is linear. That is perfect for colours and positions, but a blend of two unit-length normals is shorter than 1. Always
normalizea normal or direction you read from a varying. Lighting with an un-normalized normal shows up as faint dark bands across each triangle.
A naming convention you will see everywhere, and in this article: u for uniforms (uTime), v for varyings (vUv), a for custom attributes (aRandom).
Vertex displacement: making waves
So far the vertex shader has only passed things along. Now let us make it move the vertices. The idea: start with a flat plane with many vertices, and push each one up by a height computed from its position and the time.
uniform float uTime;
uniform float uAmplitude;
uniform float uFrequency;
varying float vElevation;

// Two sine waves crossing each other. p is a point on the flat plane.
float elevation(vec2 p) {
  return (
    sin(p.x * uFrequency + uTime) * 0.5 +
    sin(p.y * uFrequency * 0.8 + uTime * 1.3) * 0.5
  ) * uAmplitude;
}

void main() {
  vec3 p = position;          // the plane lies in x/y: z is "up" here
  p.z += elevation(p.xy);
  vElevation = p.z;           // hand the height to the fragment shader
  gl_Position = projectionMatrix * modelViewMatrix * vec4(p, 1.0);
}
uniform float uAmplitude;
uniform vec3 uDeep;
uniform vec3 uCrest;
varying float vElevation;

void main() {
  float h = smoothstep(-uAmplitude, uAmplitude, vElevation);   // -amplitude..amplitude -> 0..1
  gl_FragColor = vec4(mix(uDeep, uCrest, h), 1.0);
  #include <colorspace_fragment>
}
sin(x * frequency + time) is a wave that slides along x as time grows. Frequency squeezes it, amplitude makes it taller. Adding two waves in different directions and at different speeds gives the crossing pattern you see. The height goes on to the fragment shader as vElevation, so the valleys can be deep blue and the crests cyan. The mesh is a PlaneGeometry, rotated to lie flat on the ground with water.rotation.x = -Math.PI / 2.
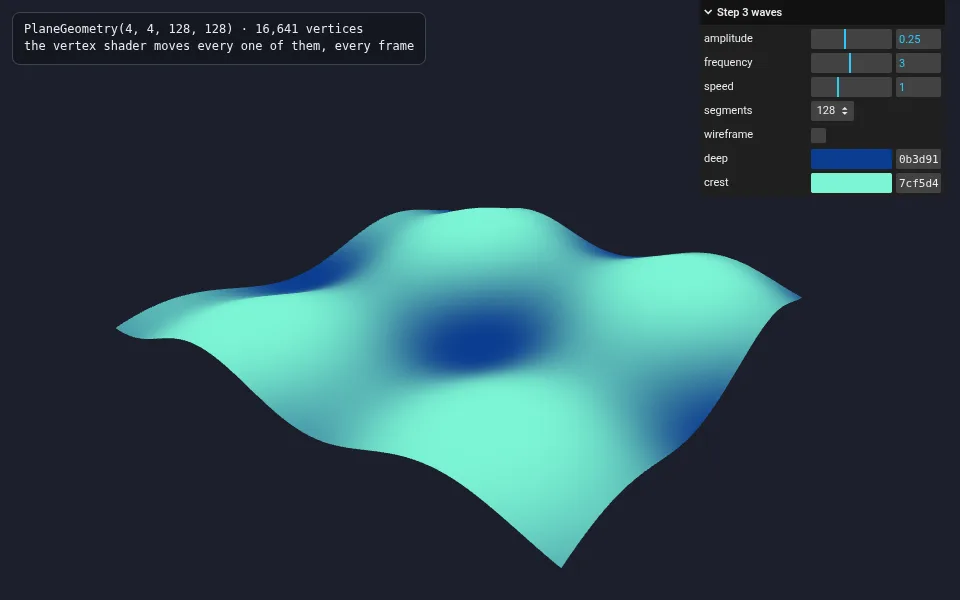
The vertex shader can only move vertices that exist. That is why the plane is built with 128 × 128 segments, 16,641 vertices. With few segments the waves turn into a few large flat triangles, because the GPU only bends the surface at the vertices and draws straight lines in between:
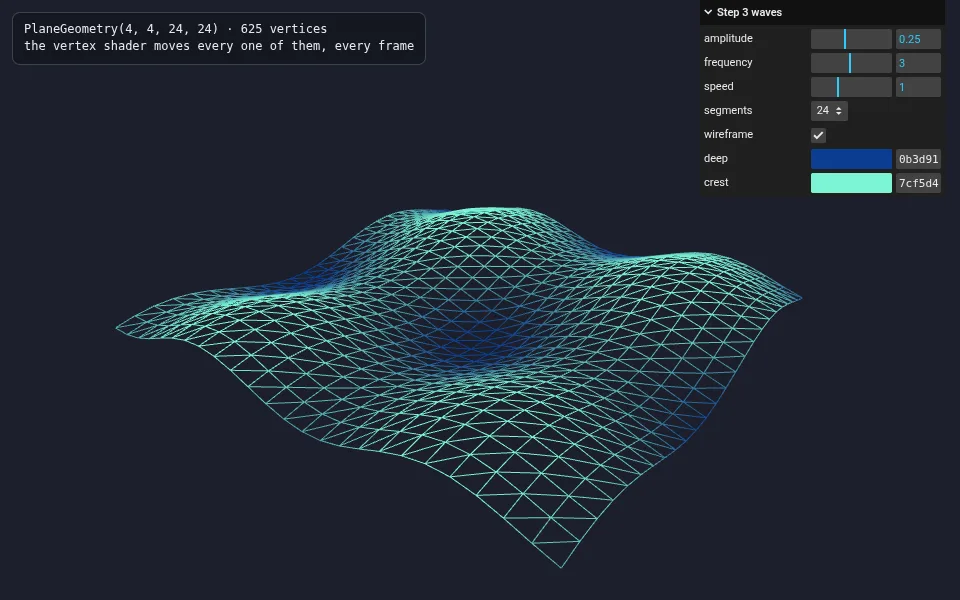
?segments=24&wireframe=1: the shader moves vertices, not pixels. Fewer segments, blockier waves. (step-3.html?segments=24&wireframe=1)Two things to know about this technique:
- Moving vertices on the GPU is cheap, far cheaper than changing
geometry.attributes.positionin JavaScript every frame, because nothing has to be sent from the CPU to the GPU. The geometry is uploaded once; only theuTimeuniform changes. That is how the final demo animates 148,000 vertices without effort. - Three.js does not know. Raycasting, bounding boxes and frustum culling all use the original, flat geometry. The final demo's ripples follow the pointer's hit on the flat plane, which is close enough. If you displace a mesh far outside its original bounds, set
mesh.frustumCulled = falseor enlargegeometry.boundingSphere, or it may disappear at the edge of the screen.
Normals for a moving surface
The waves in step 3 are coloured by height but not lit. To light them, the fragment shader needs a normal, and the geometry's normals all point straight up, because the plane was flat when they were computed. We moved the surface, so we have to compute new normals ourselves.
There is a simple, general way: sample the height function a tiny step away in x and in y. The two differences are the slopes, and a normal is perpendicular to both slopes:
float e = elevation(p.xy);
float eps = 0.01;
float ex = elevation(p.xy + vec2(eps, 0.0));   // height a little to the right
float ey = elevation(p.xy + vec2(0.0, eps));   // height a little further "up" the plane
vec3 objectNormal = normalize(vec3(-(ex - e) / eps, -(ey - e) / eps, 1.0));
It costs two more calls to elevation per vertex, which the GPU barely notices. This is called finite differences, and it works for any height function you can call, however complicated. The final demo uses it, then lights the water with the normal: a diffuse term, a sky reflection and a sun glint.
Fragment effects: gradients, noise and a fresnel rim
The fragment shader is where surfaces get their look. Three effects cover a surprising share of what you see in shader demos.
Gradients you have already met: mix(colorA, colorB, t), with t from a UV, a height or a distance, often shaped with smoothstep so the transition starts and ends softly.
Noise is how shaders fake natural detail: clouds, marble, fire, terrain. sin is too regular; the eye spots the repetition at once. Noise is smooth randomness. The simplest kind, value noise, puts a pseudo-random number on every corner of a grid and blends smoothly in between:
// A random-looking number from a 3D point (the same point always gives the same number)
float hash(vec3 p) {
  p = fract(p * 0.3183099 + 0.1);
  p *= 17.0;
  return fract(p.x * p.y * p.z * (p.x + p.y + p.z));
}

float noise(vec3 x) {
  vec3 i = floor(x);                 // which grid cell
  vec3 f = fract(x);                 // where inside the cell, 0..1
  f = f * f * (3.0 - 2.0 * f);       // smooth the blend (no visible grid)
  return mix(
    mix(mix(hash(i + vec3(0, 0, 0)), hash(i + vec3(1, 0, 0)), f.x),
        mix(hash(i + vec3(0, 1, 0)), hash(i + vec3(1, 1, 0)), f.x), f.y),
    mix(mix(hash(i + vec3(0, 0, 1)), hash(i + vec3(1, 0, 1)), f.x),
        mix(hash(i + vec3(0, 1, 1)), hash(i + vec3(1, 1, 1)), f.x), f.y),
    f.z);
}

// Fractal Brownian motion: the same noise at 5 sizes, each half as strong
float fbm(vec3 p) {
  float value = 0.0;
  float amplitude = 0.5;
  for (int i = 0; i < 5; i++) {
    value += amplitude * noise(p);
    p *= 2.02;
    amplitude *= 0.5;
  }
  return value;
}
One layer of noise looks like soft blobs. fbm stacks several layers, each twice as detailed and half as strong, which is what makes it look like clouds or fire: big shapes with small detail on top. We feed it the position on the sphere, not the UV, so there is no seam and no pinching at the poles, and add the time so it drifts:
float n = fbm(vPosition * uNoiseScale + vec3(0.0, uTime * 0.25, uTime * 0.1));
vec3 color = mix(uColorA, uColorB, smoothstep(0.35, 0.75, n));
Fresnel (say "fruh-NEL") is the effect you see on a lake: looking straight down you see into the water, looking towards the horizon it turns into a mirror. Surfaces seen edge-on reflect more. Shaders exaggerate this into a glowing rim: compare the surface normal N with the direction towards the camera V. Facing the camera, dot(N, V) is 1; at the silhouette it is 0. Flip that and raise it to a power to control how thin the rim is:
vec3 N = normalize(vNormal);    // view space, from the vertex shader
vec3 V = normalize(vViewDir);   // from the surface towards the camera
float fresnel = pow(1.0 - clamp(dot(N, V), 0.0, 1.0), uRimPower);
color += uRimColor * fresnel * uRimIntensity;
Both vectors must be in the same space. Step 4 works in view space, where the camera sits at the origin, so the direction to the camera is just minus the position: the vertex shader writes vViewDir = -mvPosition.xyz and vNormal = normalize(normalMatrix * normal). The final demo's water does the same in world space instead, with cameraPosition - vWorldPosition.
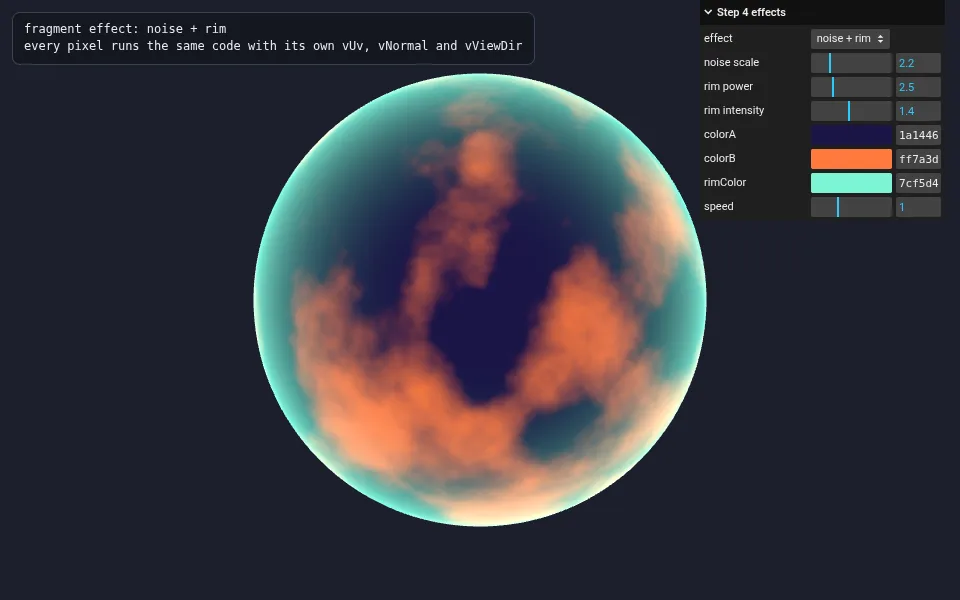
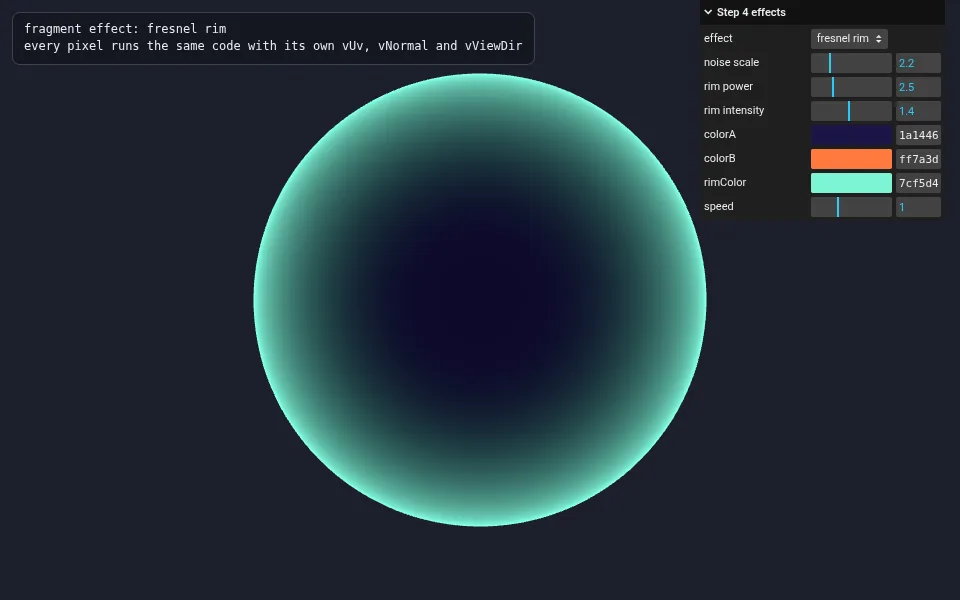
?effect=rim: the fresnel term alone. Raise "rim power" in the panel to make the edge thinner. (step-4.html?effect=rim)A rim like this is the cheapest way to make an object glow, look like a hologram or get an atmosphere. It is not real light, but it reads as one.
Changing a built-in material: onBeforeCompile
ShaderMaterial gives you total control, and with it total responsibility. Our waves have no shadows, no environment reflections, no physically based lighting. Rewriting MeshStandardMaterial by hand would be hundreds of lines. Often you only want to change one small thing about a built-in material: bend its vertices, tint its colour, and keep everything else.
onBeforeCompile is the hook for that. Three.js calls it with the material's generated shader source just before compiling it, and you may edit the strings. Since built-in materials are assembled from #include chunks, the trick is to find the chunk where the value you want is set, and add a line after it. Here we twist a lit box around its vertical axis:
const uniforms = { uTime: { value: 0 }, uTwist: { value: 1.2 } };

// GLSL we add at the top of the vertex shader
const twistPars = /* glsl */ `
  uniform float uTime;
  uniform float uTwist;

  // Radians to turn a point at height y around the vertical axis
  float twistAngle(float y) {
    return uTwist * sin(uTime) * (y - 1.25);
  }

  mat2 rotate2d(float a) {
    float s = sin(a), c = cos(a);
    return mat2(c, s, -s, c);
  }
`;

function addTwist(shader) {
  shader.uniforms.uTime = uniforms.uTime;   // the same objects, so updating them works
  shader.uniforms.uTwist = uniforms.uTwist;

  shader.vertexShader = shader.vertexShader
    .replace('#include <common>', `#include <common>\n${twistPars}`)
    // objectNormal is the normal before any transform: turn it with the surface
    .replace('#include <beginnormal_vertex>', /* glsl */ `
      #include <beginnormal_vertex>
      objectNormal.xz = rotate2d(twistAngle(position.y)) * objectNormal.xz;
    `)
    // transformed is the position before any transform: turn it too
    .replace('#include <begin_vertex>', /* glsl */ `
      #include <begin_vertex>
      transformed.xz = rotate2d(twistAngle(position.y)) * transformed.xz;
    `);
}

const material = new THREE.MeshStandardMaterial({ color: 0x3fc8a8, roughness: 0.3, metalness: 0.2 });
material.onBeforeCompile = addTwist;
How do you know the chunks are called begin_vertex and beginnormal_vertex, and that the variables inside are transformed and objectNormal? By reading them. Every chunk lives in src/renderers/shaders/ShaderChunk/ in the Three.js repo, and the material templates that use them are in ShaderLib/. begin_vertex is literally one line, vec3 transformed = vec3( position );, and everything after it (skinning, morphing, the projection) reads transformed. So changing it there moves the vertex for the rest of the shader. You can also log shader.vertexShader inside the callback to see the full source before the includes are expanded.
The rotation is a 2D one in the x/z plane, with an angle that grows with the height y: the bottom stays put and the top turns furthest. We turn the normal by the same angle, so the lighting follows the new shape. (Strictly, a twist also tilts the normals a little; at this amount nobody can tell.)
The shadow does not know
Run that and there is a surprise. The box twists, the lighting is right, but the shadow on the ground stays straight:
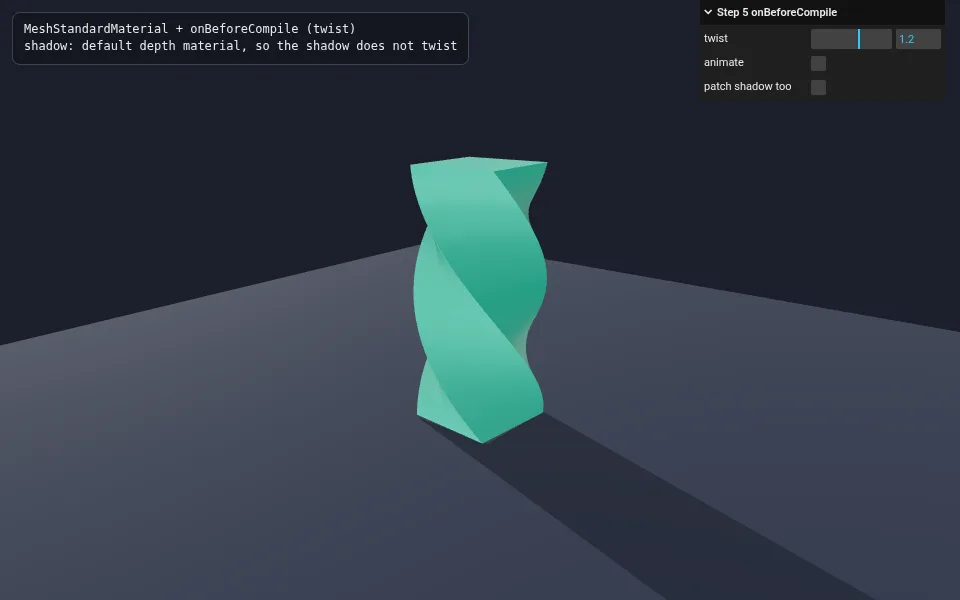
?shadowPatch=0: the mesh is twisted, its shadow is not. (step-5.html?shadowPatch=0)Remember from Part 3 how shadows work: the scene is drawn a second time, from the light, into a depth texture. That pass does not use your material. It uses a separate MeshDepthMaterial, which never ran our patch. The fix is to give the mesh its own depth material with the same patch:
const depthMaterial = new THREE.MeshDepthMaterial();
depthMaterial.onBeforeCompile = addTwist;
tower.customDepthMaterial = depthMaterial;   // use this one for the shadow pass
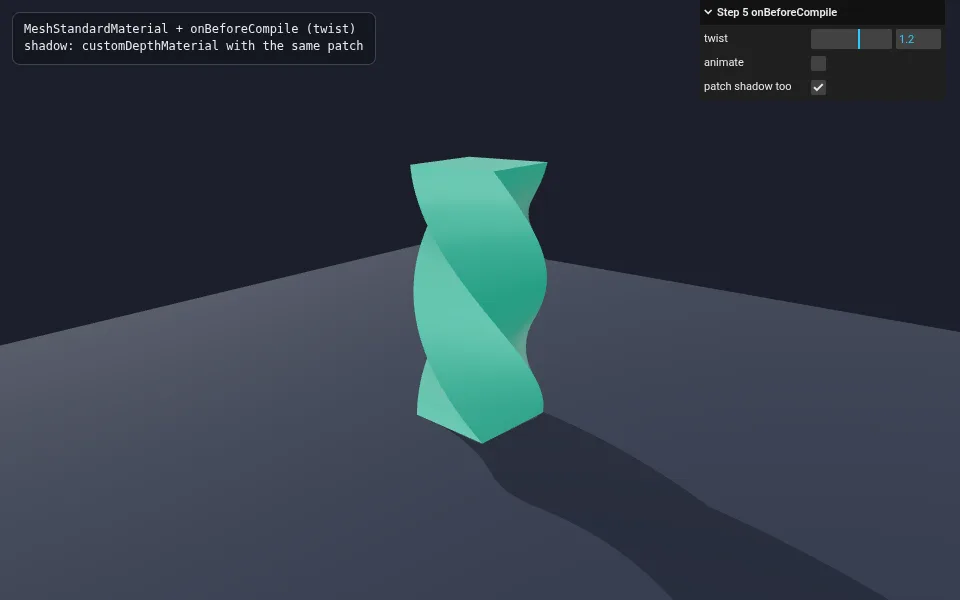
MeshStandardMaterial, twisted by onBeforeCompile, with a matching customDepthMaterial for the shadow. Toggle "patch shadow too" in the panel to compare. (step-5.html)The same addTwist works for both materials because the depth shader also includes common and begin_vertex. That is why the angle is a function, twistAngle(position.y), and not a variable set in one chunk and read in another: the depth shader skips beginnormal_vertex (it has no lighting), so a variable declared there would not exist. For point lights the shadow pass uses customDistanceMaterial instead; patch that too if your mesh is lit by one.
onBeforeCompile is powerful but fragile. It depends on chunk names and variable names that are internal to Three.js and can change between versions. Pin your Three.js version, and if a patch silently stops working after an upgrade, check that .replace still finds its target. One more trap: Three.js caches compiled programs. If two materials of the same type get different patches, give each one a customProgramCacheKey that returns a different string, or they may share one program.
GLSL, WGSL and TSL
Everything above is GLSL, the shading language of WebGL. If you have been following graphics on the web lately, you have also seen two other names. Here is how the three fit together.
GLSL is the language WebGL understands. WebGLRenderer, ShaderMaterial, RawShaderMaterial and onBeforeCompile all speak it. It is mature, it runs on every browser, and nearly every shader tutorial and example on the internet, including The Book of Shaders and Shadertoy, is GLSL. Nothing you learned in this article goes out of date.
WGSL (WebGPU Shading Language) is the language of WebGPU, the successor to WebGL. Same ideas, a more Rust-like spelling: types after names, explicit inputs and outputs. The UV-as-colour fragment shader in each:
// GLSL (WebGL)
varying vec2 vUv;

void main() {
  gl_FragColor = vec4(vUv, 0.0, 1.0);
}
// WGSL (WebGPU)
@fragment
fn main(@location(0) vUv: vec2f) -> @location(0) vec4f {
  return vec4f(vUv, 0.0, 1.0);
}
TSL (Three.js Shading Language) is not a third text language. It is a set of JavaScript functions that build a shader. You write sin(positionLocal.x.mul(frequency).add(time)) instead of a string, and Three.js turns the result into a graph of nodes. When the material compiles, the graph becomes WGSL if the browser runs the WebGPU backend, or GLSL if WebGPURenderer falls back to WebGL 2. You write the shader once; it runs on both.
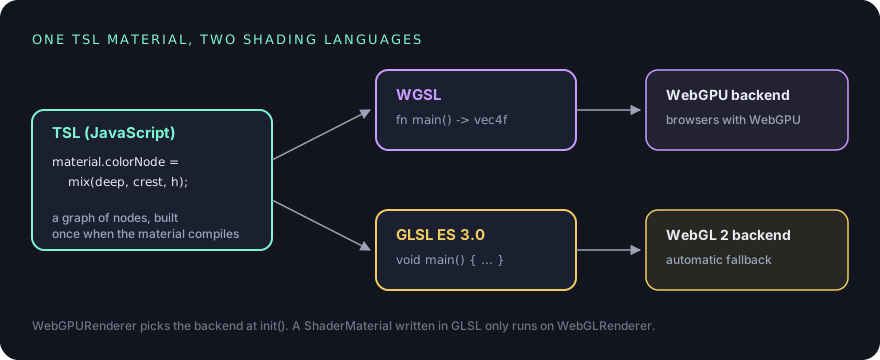
Here are the waves from step 3 in TSL. Compare it line by line with the GLSL version:
import * as THREE from 'three/webgpu';
import { positionLocal, time, sin, mix, smoothstep, uniform, varying, vec3 } from 'three/tsl';

const renderer = new THREE.WebGPURenderer({ antialias: true });
await renderer.init();   // picks WebGPU, or falls back to WebGL 2

const amplitude = uniform(0.25);
const frequency = uniform(3.0);
const deep = uniform(new THREE.Color('#0b3d91'));
const crest = uniform(new THREE.Color('#7cf5d4'));

const elevation = sin(positionLocal.x.mul(frequency).add(time)).mul(0.5)
  .add(sin(positionLocal.y.mul(frequency).mul(0.8).add(time.mul(1.3))).mul(0.5))
  .mul(amplitude);

const material = new THREE.MeshBasicNodeMaterial();
material.positionNode = positionLocal.add(vec3(0, 0, elevation));       // vertex stage
const vElevation = varying(elevation);                                    // like a GLSL varying
material.colorNode = mix(deep, crest, smoothstep(amplitude.negate(), amplitude, vElevation));   // fragment stage
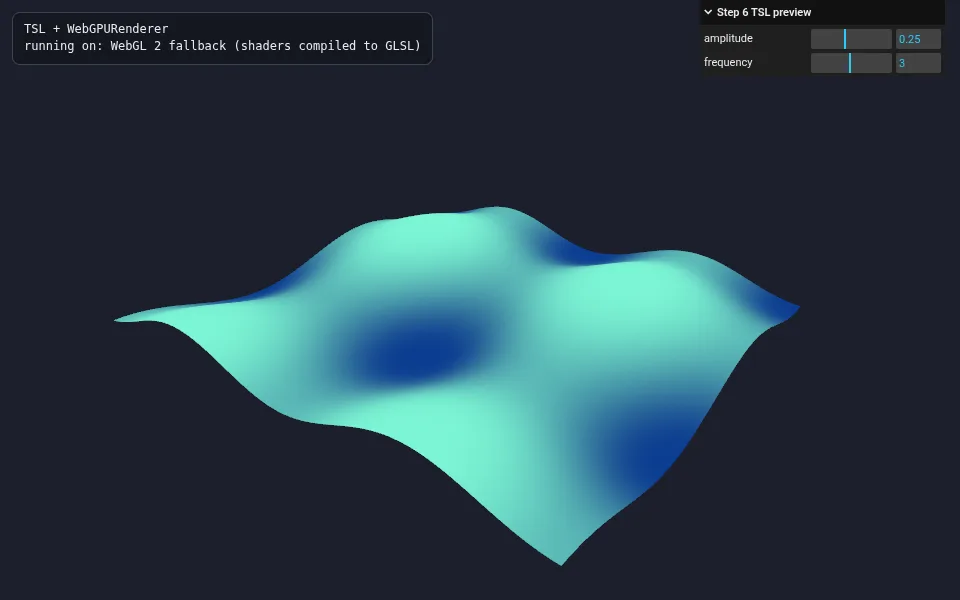
The building blocks are the same ones you learned in GLSL: sin, mix, smoothstep, uniforms, varyings, a vertex stage and a fragment stage. Arithmetic becomes method calls (a.mul(b) instead of a * b), because JavaScript cannot overload operators. In return you get JavaScript's imports, functions and tooling, and the same material runs on WebGPU and WebGL.
So which one should you learn? Both, in this order. GLSL is what WebGLRenderer runs today and what nearly every shader resource is written in, and its ideas carry over one-to-one. TSL is where Three.js is heading: WebGPURenderer does not run ShaderMaterial or onBeforeCompile at all; it works with node materials and TSL. That is the subject of the next part.
The final demo
The demo at the top puts everything together in two ShaderMaterials:
- The water is a
PlaneGeometry(24, 24, 384, 384). Its vertex shader adds three sine waves and rings that spread from the pointer, computes normals by finite differences, and passes on world position, normal, UV and height. Its fragment shader colours by height, adds diffuse light, a fresnel sky reflection, a sun glint and foam on the highest crests, then fades into distance fog. It ends with both#includes, so tone mapping and colour space match the rest of Three.js. - The orb is a sphere whose vertex shader pushes each vertex in and out along its normal with fbm noise, so its outline wobbles, and whose fragment shader is step 4: noise colour plus a fresnel rim.
- Both share one
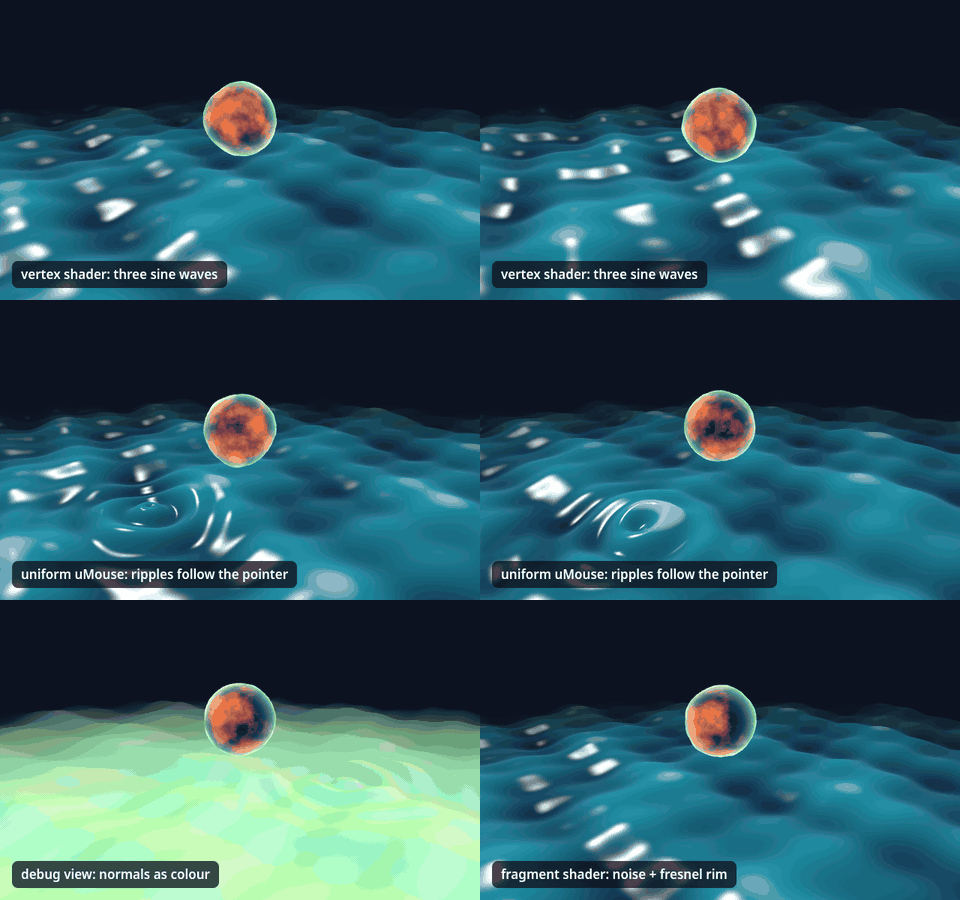
uTimeobject: the orb's uniforms are created withuTime: uniforms.uTime, the water's own object. Updating it once per frame updates both materials. - The debug view in the water panel shows the UVs, the normals or the height instead of the shading. This is the "print statement" of shaders, and the first thing to reach for when something looks wrong:
For the ripples, the pointer is raycast against the water plane and the hit point is converted into the plane's own x/y coordinates with water.worldToLocal, the same space the vertex shader's position uses. A second uniform, uRipple, fades from 1 to 0 over about two seconds after the pointer stops, so the rings calm down by themselves.
When it goes wrong: common pitfalls
- A black or missing mesh, and a long error in the console. That is a compile error. Three.js prints the whole shader with line numbers and marks the failing line; scroll up to the first
ERROR:line. The usual suspects:1instead of1.0, a missing semicolon, a varying declared in only one shader, or a typo in a uniform name. - Everything is too dark or too saturated. You forgot
#include <colorspace_fragment>, so linear colours were shown as if they were sRGB. - The uniform changes but nothing moves. You replaced the object instead of its value:
material.uniforms.uTime = { value: 1 }disconnects it; writematerial.uniforms.uTime.value = 1. WithonBeforeCompile, make sureshader.uniforms.uTimeis your object, not a copy. - Banding or dark stripes across triangles. A normal or direction read from a varying was not normalized.
- The displaced mesh disappears near the screen edge. Frustum culling uses the original bounding sphere. Enlarge it or set
frustumCulled = false. - Blocky or spiky waves. Not enough vertices, or an amplitude so large that neighbouring vertices fold over each other.
powreturns nonsense.pow(x, y)is undefined for negativexin GLSL. Clamp first, as the fresnel code does.- Works on desktop, breaks on a phone. Mobile GPUs may run the fragment shader at lower precision (
mediump). Large values, such as an ever-growinguTimefed intosin, lose precision first. Keep the numbers you feed intosinmodest, or wrap time withmod. - An
onBeforeCompilepatch does nothing after an upgrade. A chunk was renamed. Log the shader source and check that each.replacestill finds its target.
The full code
Here is the final demo in one file. It loads nothing but Three.js from the CDN, so you can save it and open it straight from disk.
<!doctype html>
<html lang="en">
<head>
  <meta charset="utf-8">
  <meta name="viewport" content="width=device-width, initial-scale=1">
  <title>Three.js from Scratch · Part 4 demo: Your First Shaders</title>
  <style>
    html, body { margin: 0; height: 100%; background: #000; }
    canvas { display: block; }
    .hint { position: absolute; left: 12px; bottom: 12px; font: 400 12px/1.45 ui-monospace, Menlo, Consolas, monospace; color: #9aa3b5; pointer-events: none; }
    .panel { position: absolute; left: 12px; top: 12px; max-width: calc(100% - 48px); font: 400 12px/1.45 ui-monospace, Menlo, Consolas, monospace; color: #e7eaf0; background: rgba(18, 21, 29, .85); border: 1px solid #3a4258; border-radius: 8px; padding: 8px 11px; white-space: pre; overflow: hidden; }
  </style>
  <script type="importmap">
    {
      "imports": {
        "three": "https://cdn.jsdelivr.net/npm/three@0.186.1/build/three.module.js",
        "three/addons/": "https://cdn.jsdelivr.net/npm/three@0.186.1/examples/jsm/"
      }
    }
  </script>
</head>
<body>
  <div class="hint">Drag to orbit · move the pointer over the water to make ripples</div>
  <script type="module">
    import * as THREE from 'three';
    import { OrbitControls } from 'three/addons/controls/OrbitControls.js';
    import { GUI } from 'three/addons/libs/lil-gui.module.min.js';

    const scene = new THREE.Scene();
    const fogColor = new THREE.Color('#0d1220');
    scene.background = fogColor;

    const camera = new THREE.PerspectiveCamera(45, innerWidth / innerHeight, 0.1, 100);
    camera.position.set(0, 3.1, 7.2);

    const renderer = new THREE.WebGLRenderer({ antialias: true });
    renderer.setPixelRatio(Math.min(devicePixelRatio, 2));
    renderer.setSize(innerWidth, innerHeight);
    document.body.appendChild(renderer.domElement);

    const controls = new OrbitControls(camera, renderer.domElement);
    controls.target.set(0, 0.6, 0);
    controls.enableDamping = true;
    controls.maxPolarAngle = Math.PI * 0.47;   // stay above the water
    controls.minDistance = 3;
    controls.maxDistance = 14;

    // ---------- Water: ShaderMaterial with vertex waves, normals, lighting and fog ----------

    const uniforms = {
      uTime: { value: 0 },
      uAmplitude: { value: 0.3 },
      uFrequency: { value: 1.6 },
      uChoppiness: { value: 0.8 },
      uMouse: { value: new THREE.Vector2(0, 0) },     // in the plane's own x/y
      uRipple: { value: 0 },                          // fades out when the pointer stops
      uDeep: { value: new THREE.Color('#06204f') },
      uCrest: { value: new THREE.Color('#1fa2b8') },
      uFoam: { value: new THREE.Color('#e8fbff') },
      uSky: { value: new THREE.Color('#6fb4e6') },
      uLightDir: { value: new THREE.Vector3(-0.4, 0.8, -0.45).normalize() },
      uFogColor: { value: fogColor },
      uFogNear: { value: 6 },
      uFogFar: { value: 16 },
      uView: { value: 0 },                            // 0 shaded, 1 UVs, 2 normals, 3 elevation
    };

    const waterVertex = /* glsl */ `
      uniform float uTime;
      uniform float uAmplitude;
      uniform float uFrequency;
      uniform float uChoppiness;
      uniform vec2 uMouse;
      uniform float uRipple;

      varying vec2 vUv;
      varying float vElevation;
      varying vec3 vWorldPosition;
      varying vec3 vWorldNormal;

      // Height of the water at a point p of the flat plane
      float elevation(vec2 p) {
        float e = sin(p.x * uFrequency + uTime) * cos(p.y * uFrequency * 0.6 + uTime * 0.7) * 0.6;
        e += sin((p.x + p.y) * uFrequency * 1.7 - uTime * 1.4) * 0.25 * uChoppiness;
        e += sin((p.x * 0.6 - p.y) * uFrequency * 3.1 + uTime * 2.1) * 0.12 * uChoppiness;

        // Rings spreading out from the pointer, weaker with distance
        float d = distance(p, uMouse);
        e += sin(d * 9.0 - uTime * 6.0) * exp(-d * 1.1) * uRipple * 0.5;

        return e * uAmplitude;
      }

      void main() {
        vUv = uv;
        vec3 p = position;
        float e = elevation(p.xy);
        p.z += e;
        vElevation = e;

        // The normal of a displaced surface: sample the height a tiny step away
        // in x and in y, and build the normal from the two slopes.
        float eps = 0.01;
        float ex = elevation(p.xy + vec2(eps, 0.0));
        float ey = elevation(p.xy + vec2(0.0, eps));
        vec3 objectNormal = normalize(vec3(-(ex - e) / eps, -(ey - e) / eps, 1.0));

        vec4 worldPosition = modelMatrix * vec4(p, 1.0);
        vWorldPosition = worldPosition.xyz;
        vWorldNormal = normalize(mat3(modelMatrix) * objectNormal);
        gl_Position = projectionMatrix * viewMatrix * worldPosition;
      }
    `;

    const waterFragment = /* glsl */ `
      uniform float uAmplitude;
      uniform vec3 uDeep;
      uniform vec3 uCrest;
      uniform vec3 uFoam;
      uniform vec3 uSky;
      uniform vec3 uLightDir;
      uniform vec3 uFogColor;
      uniform float uFogNear;
      uniform float uFogFar;
      uniform int uView;

      varying vec2 vUv;
      varying float vElevation;
      varying vec3 vWorldPosition;
      varying vec3 vWorldNormal;

      void main() {
        vec3 N = normalize(vWorldNormal);
        vec3 V = normalize(cameraPosition - vWorldPosition);   // cameraPosition is built in
        vec3 L = normalize(uLightDir);
        float h = smoothstep(-uAmplitude, uAmplitude, vElevation);

        vec3 color = mix(uDeep, uCrest, h);
        color *= 0.35 + 0.65 * max(dot(N, L), 0.0);                    // diffuse
        float fresnel = pow(1.0 - max(dot(N, V), 0.0), 4.0);
        color = mix(color, uSky, fresnel * 0.35);                        // sky reflection at grazing angles
        vec3 H = normalize(L + V);
        color += vec3(1.0) * pow(max(dot(N, H), 0.0), 300.0) * 1.2;     // sun glint
        color = mix(color, uFoam, smoothstep(0.9, 1.0, h) * 0.35);      // foam on the highest crests

        if (uView == 1) color = vec3(vUv, 0.0);
        if (uView == 2) color = N * 0.5 + 0.5;
        if (uView == 3) color = vec3(h);

        float fog = smoothstep(uFogNear, uFogFar, distance(cameraPosition, vWorldPosition));
        color = mix(color, uFogColor, fog);

        gl_FragColor = vec4(color, 1.0);
        #include <tonemapping_fragment>
        #include <colorspace_fragment>
      }
    `;

    const waterMaterial = new THREE.ShaderMaterial({ uniforms, vertexShader: waterVertex, fragmentShader: waterFragment });
    const water = new THREE.Mesh(new THREE.PlaneGeometry(24, 24, 384, 384), waterMaterial);
    water.rotation.x = -Math.PI / 2;
    scene.add(water);

    // ---------- Orb: noise, a little vertex wobble and a fresnel rim ----------

    const orbUniforms = {
      uTime: uniforms.uTime,                           // shared: one object, two materials
      uColorA: { value: new THREE.Color('#1a1446') },
      uColorB: { value: new THREE.Color('#ff7a3d') },
      uRimColor: { value: new THREE.Color('#7cf5d4') },
      uNoiseScale: { value: 2.2 },
      uWobble: { value: 0.08 },
      uRimPower: { value: 2.5 },
      uRimIntensity: { value: 1.4 },
    };

    const orbVertex = /* glsl */ `
      uniform float uTime;
      uniform float uWobble;
      uniform float uNoiseScale;

      varying vec3 vPosition;
      varying vec3 vNormal;
      varying vec3 vViewDir;

      // Value noise: random numbers on a 3D grid, smoothly blended in between
      float hash(vec3 p) {
        p = fract(p * 0.3183099 + 0.1);
        p *= 17.0;
        return fract(p.x * p.y * p.z * (p.x + p.y + p.z));
      }

      float noise(vec3 x) {
        vec3 i = floor(x);
        vec3 f = fract(x);
        f = f * f * (3.0 - 2.0 * f);                // smooth the blend (no visible grid)
        return mix(
          mix(mix(hash(i + vec3(0, 0, 0)), hash(i + vec3(1, 0, 0)), f.x),
              mix(hash(i + vec3(0, 1, 0)), hash(i + vec3(1, 1, 0)), f.x), f.y),
          mix(mix(hash(i + vec3(0, 0, 1)), hash(i + vec3(1, 0, 1)), f.x),
              mix(hash(i + vec3(0, 1, 1)), hash(i + vec3(1, 1, 1)), f.x), f.y),
          f.z);
      }

      // Fractal Brownian motion: the same noise at 5 sizes, each half as strong
      float fbm(vec3 p) {
        float value = 0.0;
        float amplitude = 0.5;
        for (int i = 0; i < 5; i++) {
          value += amplitude * noise(p);
          p *= 2.02;
          amplitude *= 0.5;
        }
        return value;
      }

      void main() {
        // Push each vertex out along its normal by a slowly changing noise value
        float n = fbm(position * 1.5 + vec3(uTime * 0.3));
        vec3 p = position + normal * (n - 0.5) * 2.0 * uWobble;

        vPosition = position;
        vec4 mvPosition = modelViewMatrix * vec4(p, 1.0);
        vNormal = normalize(normalMatrix * normal);
        vViewDir = -mvPosition.xyz;
        gl_Position = projectionMatrix * mvPosition;
      }
    `;

    const orbFragment = /* glsl */ `
      uniform float uTime;
      uniform vec3 uColorA;
      uniform vec3 uColorB;
      uniform vec3 uRimColor;
      uniform float uNoiseScale;
      uniform float uRimPower;
      uniform float uRimIntensity;

      varying vec3 vPosition;
      varying vec3 vNormal;
      varying vec3 vViewDir;

      // Value noise: random numbers on a 3D grid, smoothly blended in between
      float hash(vec3 p) {
        p = fract(p * 0.3183099 + 0.1);
        p *= 17.0;
        return fract(p.x * p.y * p.z * (p.x + p.y + p.z));
      }

      float noise(vec3 x) {
        vec3 i = floor(x);
        vec3 f = fract(x);
        f = f * f * (3.0 - 2.0 * f);                // smooth the blend (no visible grid)
        return mix(
          mix(mix(hash(i + vec3(0, 0, 0)), hash(i + vec3(1, 0, 0)), f.x),
              mix(hash(i + vec3(0, 1, 0)), hash(i + vec3(1, 1, 0)), f.x), f.y),
          mix(mix(hash(i + vec3(0, 0, 1)), hash(i + vec3(1, 0, 1)), f.x),
              mix(hash(i + vec3(0, 1, 1)), hash(i + vec3(1, 1, 1)), f.x), f.y),
          f.z);
      }

      // Fractal Brownian motion: the same noise at 5 sizes, each half as strong
      float fbm(vec3 p) {
        float value = 0.0;
        float amplitude = 0.5;
        for (int i = 0; i < 5; i++) {
          value += amplitude * noise(p);
          p *= 2.02;
          amplitude *= 0.5;
        }
        return value;
      }

      void main() {
        float n = fbm(vPosition * uNoiseScale + vec3(0.0, uTime * 0.25, uTime * 0.1));
        vec3 color = mix(uColorA, uColorB, smoothstep(0.35, 0.75, n));

        float fresnel = pow(1.0 - clamp(dot(normalize(vNormal), normalize(vViewDir)), 0.0, 1.0), uRimPower);
        color += uRimColor * fresnel * uRimIntensity;

        gl_FragColor = vec4(color, 1.0);
        #include <tonemapping_fragment>
        #include <colorspace_fragment>
      }
    `;

    const orbMaterial = new THREE.ShaderMaterial({ uniforms: orbUniforms, vertexShader: orbVertex, fragmentShader: orbFragment });
    const orb = new THREE.Mesh(new THREE.SphereGeometry(0.75, 128, 64), orbMaterial);
    scene.add(orb);

    // ---------- Pointer -> ripple centre ----------

    const raycaster = new THREE.Raycaster();
    const pointer = new THREE.Vector2();
    let lastMove = -Infinity;
    renderer.domElement.addEventListener('pointermove', (event) => {
      pointer.set(event.clientX / innerWidth * 2 - 1, -(event.clientY / innerHeight) * 2 + 1);
      raycaster.setFromCamera(pointer, camera);
      const hit = raycaster.intersectObject(water)[0];   // hits the flat plane; close enough for ripples
      if (hit) {
        const local = water.worldToLocal(hit.point.clone());
        uniforms.uMouse.value.set(local.x, local.y);
        lastMove = performance.now();
      }
    });

    // ---------- Panel ----------

    const settings = {
      speed: 1,
      ripples: 1,
      wireframe: false,
      view: 'shaded',
      deep: '#06204f',
      crest: '#1fa2b8',
      foam: '#e8fbff',
      orbA: '#1a1446',
      orbB: '#ff7a3d',
      rim: '#7cf5d4',
    };
    const views = { shaded: 0, 'UVs': 1, normals: 2, elevation: 3 };

    const gui = new GUI({ title: 'Part 4 controls' });

    const wavesFolder = gui.addFolder('Waves (vertex shader)');
    wavesFolder.add(uniforms.uAmplitude, 'value', 0, 0.8, 0.01).name('amplitude');
    wavesFolder.add(uniforms.uFrequency, 'value', 0.3, 3, 0.05).name('frequency');
    wavesFolder.add(uniforms.uChoppiness, 'value', 0, 1.5, 0.05).name('choppiness');
    wavesFolder.add(settings, 'speed', 0, 3, 0.05);
    wavesFolder.add(settings, 'ripples', 0, 2, 0.05).name('mouse ripples');
    wavesFolder.add(waterMaterial, 'wireframe');

    const waterFolder = gui.addFolder('Water (fragment shader)');
    waterFolder.add(settings, 'view', Object.keys(views)).name('debug view').onChange((v) => { uniforms.uView.value = views[v]; });
    waterFolder.addColor(settings, 'deep').onChange((v) => uniforms.uDeep.value.set(v));
    waterFolder.addColor(settings, 'crest').onChange((v) => uniforms.uCrest.value.set(v));
    waterFolder.addColor(settings, 'foam').onChange((v) => uniforms.uFoam.value.set(v));

    const orbFolder = gui.addFolder('Orb (noise + fresnel)');
    orbFolder.add(orbUniforms.uNoiseScale, 'value', 0.5, 8, 0.1).name('noise scale');
    orbFolder.add(orbUniforms.uWobble, 'value', 0, 0.3, 0.01).name('wobble');
    orbFolder.add(orbUniforms.uRimPower, 'value', 0.5, 8, 0.1).name('rim power');
    orbFolder.add(orbUniforms.uRimIntensity, 'value', 0, 3, 0.05).name('rim intensity');
    orbFolder.addColor(settings, 'orbA').name('colour A').onChange((v) => orbUniforms.uColorA.value.set(v));
    orbFolder.addColor(settings, 'orbB').name('colour B').onChange((v) => orbUniforms.uColorB.value.set(v));
    orbFolder.addColor(settings, 'rim').name('rim colour').onChange((v) => orbUniforms.uRimColor.value.set(v));

    waterFolder.close();
    orbFolder.close();
    if (innerWidth < 700) gui.close();

    function onResize() {
      camera.aspect = innerWidth / innerHeight;
      camera.updateProjectionMatrix();
      renderer.setPixelRatio(Math.min(devicePixelRatio, 2));
      renderer.setSize(innerWidth, innerHeight);
    }
    addEventListener('resize', onResize);

    const timer = new THREE.Timer();

    renderer.setAnimationLoop((time) => {
      timer.update(time);
      uniforms.uTime.value += timer.getDelta() * settings.speed;
      const t = uniforms.uTime.value;

      // Ripples fade out over about two seconds after the pointer stops
      const idle = (performance.now() - lastMove) / 1000;
      uniforms.uRipple.value = settings.ripples * Math.exp(-idle * 1.5);

      // The orb floats and turns slowly
      orb.position.y = 1.15 + Math.sin(t * 0.9) * 0.12;
      orb.rotation.y = t * 0.15;

      controls.update();
      renderer.render(scene, camera);
    });
  </script>
</body>
</html>
The step-by-step versions are in the repo too: step-1.html (first shader, UVs, a UV grid), step-2.html (uniforms: time, mouse and colours), step-3.html (vertex waves), step-4.html (gradient, noise and fresnel), step-5.html (onBeforeCompile and shadows) and step-6.html (the same waves in TSL on WebGPURenderer).
The value noise follows a widely shared public-domain pattern (a hash on the integer grid, blended with a smoothstep curve), the same idea Inigo Quilez and The Book of Shaders explain in detail.
A few things to try
- In step 1, change
8.0in the grid to20.0, then replacestepwithsmoothstep(0.0, 0.06, ...)and see the lines soften. - In step 2, replace the gradient with
0.5 + 0.5 * cos(uTime + vUv.xyx * 3.0 + vec3(0, 2, 4)). That one line is a whole rainbow palette. - In step 3, add a third wave running diagonally,
sin((p.x + p.y) * uFrequency * 1.7 + uTime), and switch on the wireframe to see the vertices move. - In the final demo, set the debug view to "normals" and turn choppiness up and down. Then set it to "elevation" and change the amplitude.
- In step 5, change
twistAngletouTwist * sin(uTime + position.y * 2.0)for a wobble instead of a twist. The shadow should follow, as long as "patch shadow too" is on. - Open the GLSL of any built-in material:
material.onBeforeCompile = (shader) => console.log(shader.fragmentShader). It is long, but you now know how to read it.
Next time
We can now write our own shaders: move vertices, colour pixels, react to time and the mouse, and splice our code into Three.js's own materials. Everything here ran on WebGL. In Part 5 we move to its successor: WebGPU and TSL. We will set up WebGPURenderer, rebuild materials as node graphs, see what TSL compiles to, and use the one thing WebGL never had, compute shaders, to move many thousands of particles on the GPU. A reader asked for a WebGPU chapter, and step 6 above was the trailer. See you there.