← Three.js from Scratch · all parts
Three.js from Scratch, Part 5: WebGPU and TSL
In Part 4 we wrote shaders by hand: GLSL strings inside a ShaderMaterial, patched into Three.js materials with onBeforeCompile. It works, and it will keep working for years. But the platform underneath it is changing. WebGL, the API behind everything we have built so far, is a design from 2011. Its successor, WebGPU, is now shipped in Chrome, Edge and Safari, and is rolling out in Firefox. It is faster to drive from JavaScript, it maps better onto how modern GPUs work, and it adds something WebGL never had: compute shaders, programs that run on the GPU without drawing anything.
Three.js has a renderer for it, WebGPURenderer, and a new way of writing shaders that goes with it, TSL (Three.js Shading Language). A reader on X asked me for a chapter on exactly this, and step 6 of the last part was the trailer. Here is the full film. We start by switching the renderer, then rebuild the water and the glowing orb from Part 4 as TSL node graphs, look at the shader code TSL generates for us, and finish with the part that is new to everyone: a swarm of 40,000 particles simulated entirely on the GPU. Drag the orb's sparks around with your pointer, and open the panel to change the numbers:
Open the demo full screen ↗ · Source on GitHub ↗
As before, everything uses Three.js r186 (npm version
0.186.1), but the import map changes:threeandthree/webgpunow both point at the WebGPU build (three.webgpu.js), and a newthree/tslentry gives you the shader nodes. Every step is one HTML file you can open from the repo or straight from disk. If your browser has no WebGPU, you will not see an error: each demo says which backend it picked, and falls back to WebGL 2. Add?backend=webglto any demo's URL to force the fallback and compare.
Why bother with WebGPU?
If WebGL works, why change? Four reasons, from most to least practical:
- Compute shaders. WebGL can only run code as part of drawing triangles. WebGPU can run general-purpose GPU programs: simulate particles, run a physics step, build a texture, cull objects. This is the headline feature and the reason this article ends where it does.
- Less CPU overhead. WebGL is a global state machine: every call changes hidden state, and the driver checks it again and again. WebGPU records commands into objects, validates them once, and submits them in batches. For scenes with many objects, that leaves more of your frame time for your own code.
- A modern shading language and one pipeline model. WGSL replaces GLSL, and the pipeline objects you create up front are what the GPU actually runs.
- It is where Three.js is heading. New renderer features, such as the node-based post-processing we will meet in the next part, are built for
WebGPURendererfirst.
None of this makes WebGL obsolete. As of this writing, WebGPU is enabled by default in Chrome and Edge 113 and later on Windows, macOS, ChromeOS and Android, and in Safari 26 on Apple's platforms. Firefox ships it on some platforms, and Linux support is still being rolled out. caniuse.com/webgpu has the current table. The point of WebGPURenderer is that you do not have to choose: it uses WebGPU where it can and WebGL 2 where it cannot, with the same scene and the same code.
Step 1: WebGPURenderer, and which backend you got
The renderer is a drop-in replacement for the one we have used so far, with one big difference: it starts asynchronously. Asking the browser for a GPU device takes a moment and can fail, so you must wait for it before rendering:
import * as THREE from 'three/webgpu';

const renderer = new THREE.WebGPURenderer({ antialias: true });
renderer.setSize(innerWidth, innerHeight);
document.body.appendChild(renderer.domElement);

await renderer.init();   // picks WebGPU, or falls back to WebGL 2
Top-level await works in an ES module (<script type="module">), which is what all our demos use. After that, the rest of the code is what you already know: renderer.setAnimationLoop(...), renderer.render(scene, camera), the same cameras, lights, meshes and controls.
What does init() do? It runs a short checklist and takes the first path that works:
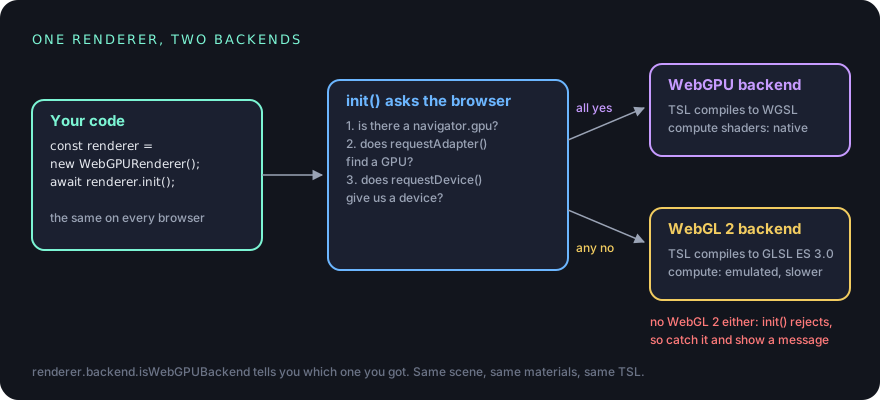
To find out which backend you are on, read renderer.backend.isWebGPUBackend. If you want to force the fallback, say to test it, pass forceWebGL: true to the constructor. And because init() can reject when the browser has neither API, wrap it:
const params = new URLSearchParams(location.search);
const renderer = new THREE.WebGPURenderer({ antialias: true, forceWebGL: params.get('backend') === 'webgl' });

try {
  await renderer.init();
} catch (error) {
  showMessage('Sorry: this browser has neither WebGPU nor WebGL 2.');   // your own UI
  throw error;
}

const isWebGPU = renderer.backend.isWebGPUBackend === true;
That ?backend=webgl switch is in every demo of this article. Open any of them twice, once with and once without it, and the picture will be the same.
You may also want to know before creating the renderer whether there is a real GPU behind the API, or which optional features it offers (timestamp queries for profiling, compressed texture formats, and so on). Ask the browser directly:
const hasApi = 'gpu' in navigator;
const adapter = hasApi ? await navigator.gpu.requestAdapter() : null;   // null: no usable GPU
const hasTimestamps = adapter ? adapter.features.has('timestamp-query') : false;
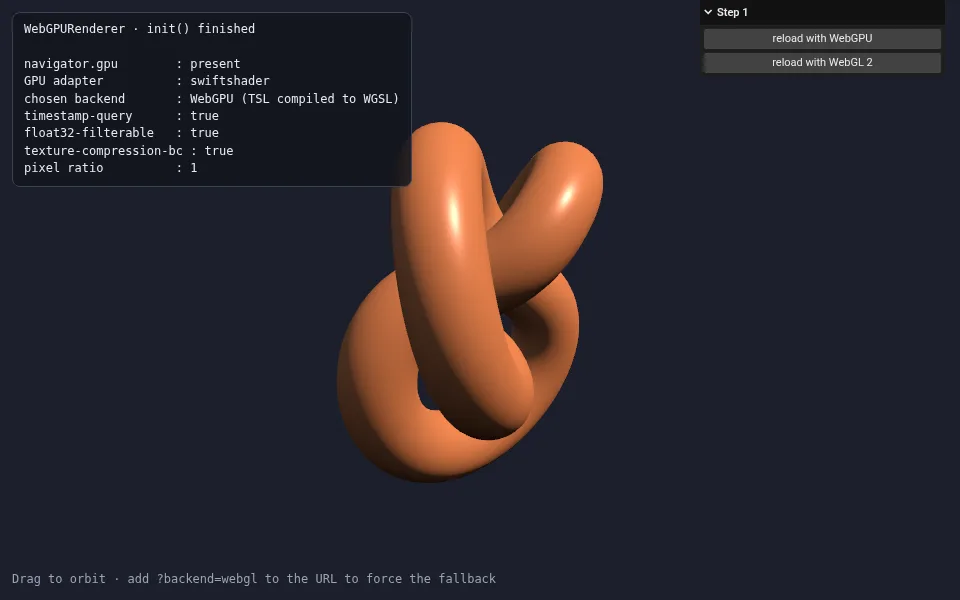
WebGPURenderer, with a panel that reports the checklist. Two buttons reload the page on either backend. This screenshot was taken on WebGPU. (step-1.html)One trap here: renderer.hasFeature('timestamp-query') looks like the same question, but it can answer true on the WebGL fallback too. For "does this browser have WebGPU feature X", read the adapter as above.
Step 2: node materials
Notice what changed in step 1's material: MeshStandardNodeMaterial instead of MeshStandardMaterial. With WebGPURenderer, materials are built from nodes. A node is a small piece of shader: "this colour", "that texture sampled at these UVs", "the camera position", "A times B". A material is a set of slots, and each slot holds a node graph. Every material in Part 2 has a node twin with the same options:
| Classic material | Node material |
|---|---|
MeshBasicMaterial |
MeshBasicNodeMaterial |
MeshLambertMaterial |
MeshLambertNodeMaterial |
MeshPhongMaterial |
MeshPhongNodeMaterial |
MeshStandardMaterial |
MeshStandardNodeMaterial |
MeshPhysicalMaterial |
MeshPhysicalNodeMaterial |
MeshToonMaterial |
MeshToonNodeMaterial |
You can create the node versions directly, with the same constructor options (color, roughness, metalness, map, and so on). Your old materials keep working too: when WebGPURenderer meets a classic MeshStandardMaterial, it quietly swaps in the matching node material. That is why Parts 1 to 3 would run on this renderer with almost no changes. Step 2 puts seven spheres under one light; the last one is a classic material:
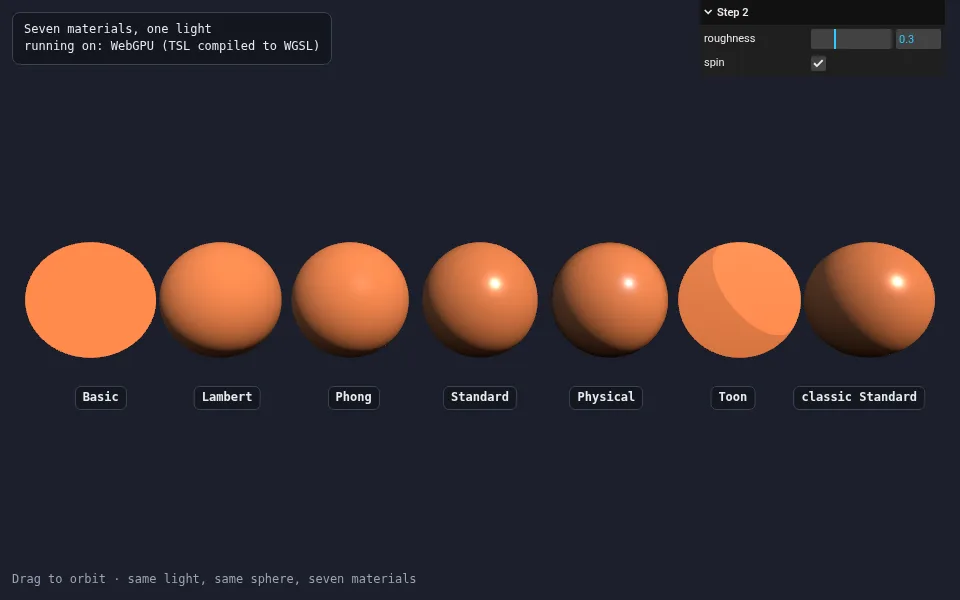
MeshStandardMaterial, converted automatically, and it matches its MeshStandardNodeMaterial neighbour. (step-2.html)There is one exception that matters for Part 4 readers. ShaderMaterial, RawShaderMaterial and onBeforeCompile do not work with WebGPURenderer. They are GLSL, and this renderer has no GLSL to patch: on the WebGPU backend it writes WGSL, and even on the WebGL fallback it builds the shader its own way, from nodes. Your GLSL knowledge is not wasted, because every idea carries over. But the code itself has to be rewritten, and TSL is the tool.
Step 3: TSL, a shader written in JavaScript
TSL is a library of node constructors. You import what you need from three/tsl and combine nodes with ordinary JavaScript:
import { uniform, uv, time, sin, mix, smoothstep } from 'three/tsl';

const top = uniform(new THREE.Color('#7cf5d4'));
const bottom = uniform(new THREE.Color('#5b2bd6'));
const stripes = uniform(14);
const speed = uniform(1.5);

const gradient = mix(bottom, top, uv().y);                                        // blend by height on the sphere
const wave = sin(uv().x.mul(stripes).mul(Math.PI * 2).add(time.mul(speed)));       // -1..1, drifting with time
const band = smoothstep(0.55, 0.95, wave);                                        // thin bright bands
const finalColor = mix(gradient, gradient.mul(0.25), band);                       // darken the bands

const material = new THREE.MeshStandardNodeMaterial({ roughness: 0.4, metalness: 0.1 });
material.colorNode = finalColor;
If you read Part 4, every word here is familiar. mix, sin and smoothstep are the GLSL functions. uv() is the UV attribute we wrote as vUv. time is a built-in uniform: elapsed seconds, advanced by the renderer every frame, so we no longer update uTime ourselves. uniform(14) makes a value you can change from JavaScript while the shader runs: set stripes.value = 20 and the stripes change next frame, with no recompiling. The big difference is the arithmetic. JavaScript cannot overload * and + for objects, so you write method calls: a.mul(b), a.add(b), a.sub(b), a.div(b).
Nothing in that code computes anything yet. uv().x.mul(stripes) does not multiply two numbers; it creates a node that means "multiply these two". The whole expression is a graph, and the renderer walks it when the material compiles and turns it into shader code. Here is step 3's colour as the graph TSL sees:
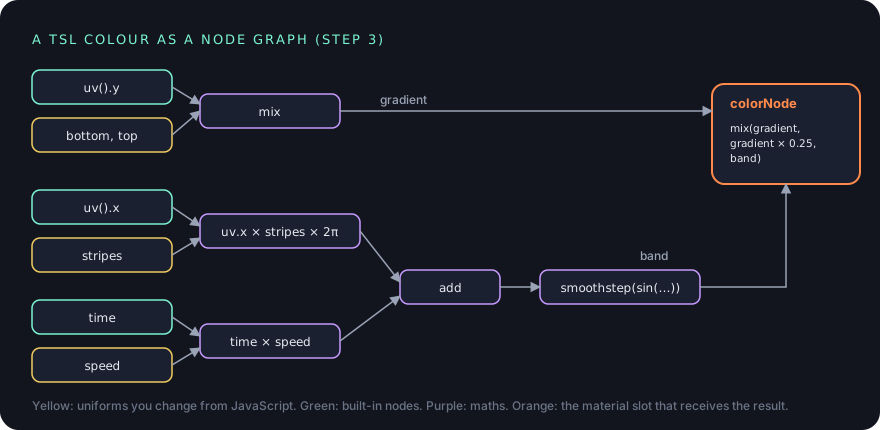
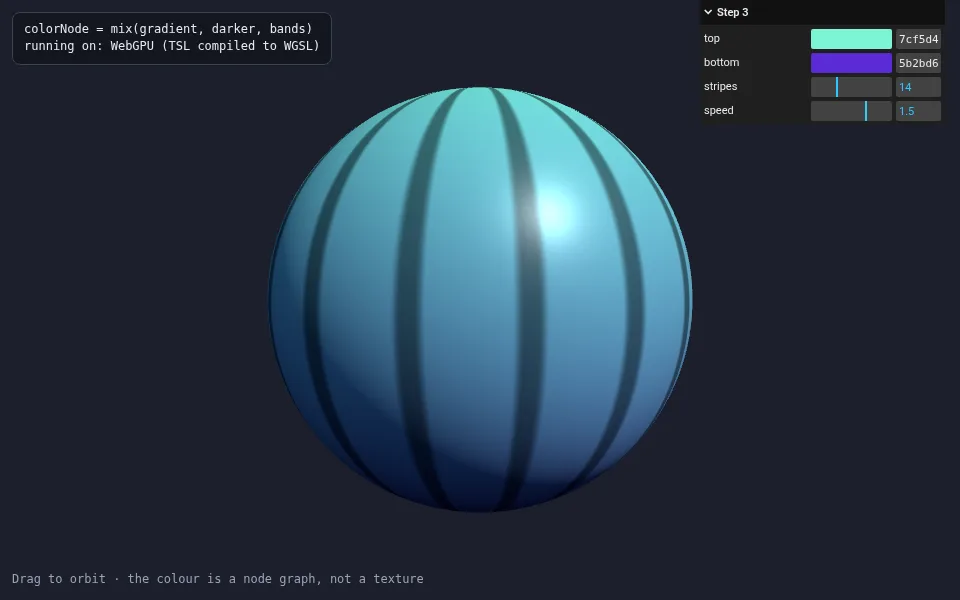
uniforms: the stripes drift because of time, and the whole graph runs on the GPU. (step-3.html)TSL has a small vocabulary of its own for things GLSL gave you as built-in variables. These are the ones used in this article:
| GLSL (Part 4) | TSL | Notes |
|---|---|---|
uniform float uAmp; |
const amp = uniform(0.25); |
change it with amp.value = … |
uTime |
time |
built in, seconds |
vUv |
uv() |
the UV attribute |
position |
positionLocal |
model space; positionWorld, positionView exist too |
normal |
normalLocal |
normalView and normalWorld too |
a * b + c |
a.mul(b).add(c) |
also sub, div, pow, negate |
clamp(x, 0.0, 1.0) |
x.saturate() |
|
dot(a, b), normalize(v) |
a.dot(b), v.normalize() |
the function form also works: normalize(v) |
mix, smoothstep, sin |
mix, smoothstep, sin |
same names, imported from three/tsl |
varying |
varying(node) |
per-vertex value, blended per pixel |
| a helper function | Fn(([x]) => …) |
becomes a function in the shader |
if (c) { … } |
If(c, () => { … }) |
a shader if, not a JavaScript one |
Two habits to build early. First, a plain JavaScript number is fine wherever a node is expected (.mul(0.5)), TSL wraps it for you. Second, JavaScript if, for and Math.sin run once, on the CPU, while you build the graph. Use If, Loop and sin from TSL when the decision has to happen on the GPU, per pixel or per particle.
Where nodes plug in
Step 3 assigned a node to colorNode. That is the idea behind the whole system: a node material has slots, and each slot takes a node graph that replaces one stage of the built-in material. Leave a slot empty and the material behaves as before.
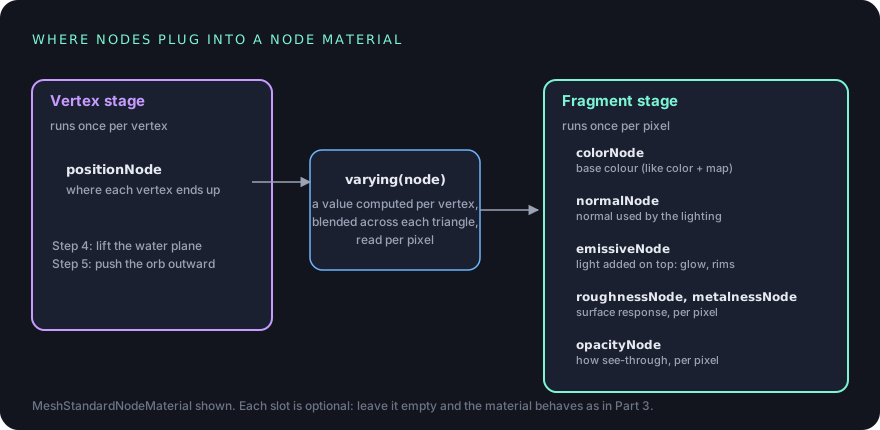
This is a big step up from onBeforeCompile. In Part 4, we had to find a chunk name such as begin_vertex in Three.js's internal GLSL and .replace a string inside it. Here material.positionNode = … is a public, documented property. The lighting, shadows and fog still come from the material; you only replace the pieces you care about.
Step 4: porting the waves
Let us rebuild the vertex waves of Part 4 as nodes. The GLSL version added sine waves to position.z, rebuilt the normal by finite differences, and passed the height to the fragment shader through a varying. We need the same four things, and each maps onto one slot:
import { Fn, uniform, time, positionLocal, vec2, vec3, sin, mix, smoothstep,
         normalize, varying, transformNormalToView } from 'three/tsl';

const amplitude = uniform(0.25);
const frequency = uniform(3.0);
const speed = uniform(1.0);
const deep = uniform(new THREE.Color('#0b3d91'));
const crest = uniform(new THREE.Color('#7cf5d4'));

// Fn() wraps a function so it becomes a reusable piece of shader.
// Give it a point on the plane, get the height of the water there.
const waveHeight = Fn(([p]) => {
  const t = time.mul(speed);
  const a = sin(p.x.mul(frequency).add(t));
  const b = sin(p.y.mul(frequency).mul(0.8).add(t.mul(1.3)));
  return a.add(b).mul(0.5).mul(amplitude);
});

// Vertex stage: lift every vertex of the plane by waveHeight
const p = positionLocal.xy;
const h = waveHeight(p);

// Normals by finite differences, like in Part 4: sample the height a tiny step away along x and y.
// The plane lies in the xy plane, so its normal points along +z.
const e = 0.01;
const hx = waveHeight(p.add(vec2(e, 0)));
const hy = waveHeight(p.add(vec2(0, e)));
const slope = normalize(vec3(h.sub(hx), h.sub(hy), e));

const material = new THREE.MeshStandardNodeMaterial({ roughness: 0.22, metalness: 0.0 });
material.positionNode = positionLocal.add(vec3(0, 0, h));
material.normalNode = transformNormalToView(varying(slope)).normalize();
material.colorNode = mix(deep, crest, smoothstep(amplitude.mul(-0.2), amplitude.mul(0.9), varying(h)));
Read it top to bottom and compare with the GLSL of Part 4:
Fnis how you write a helper function. It is called like a normal JavaScript function,waveHeight(p), but each call inserts the same math into the shader. We call it three times (the point itself and two neighbours), and the finite-difference normal costs nothing extra to write.positionNodereplaces the vertex position. We take the originalpositionLocaland add the height on its z axis, exactly whattransformed.z += …did.varying(h)is the same idea as a GLSLvarying: compute at the vertices, interpolate across each triangle, read per pixel. TSL often inserts varyings for you where a value is used in the fragment stage, but wrapping a value invarying(...)makes the choice explicit and guarantees it is computed in the cheaper vertex stage.colorNodeis amixbetween two colours by the height, asmoothstepof it.normalNodeis where a gotcha lives. Our finite-difference normal is in the plane's local space, but the lighting code of a node material expects a normal in view space (relative to the camera). So we convert it withtransformNormalToView(...). Skip that line and the lighting will look wrong in a way that is hard to diagnose: the shading would not follow the waves, or would swim as the camera moves.
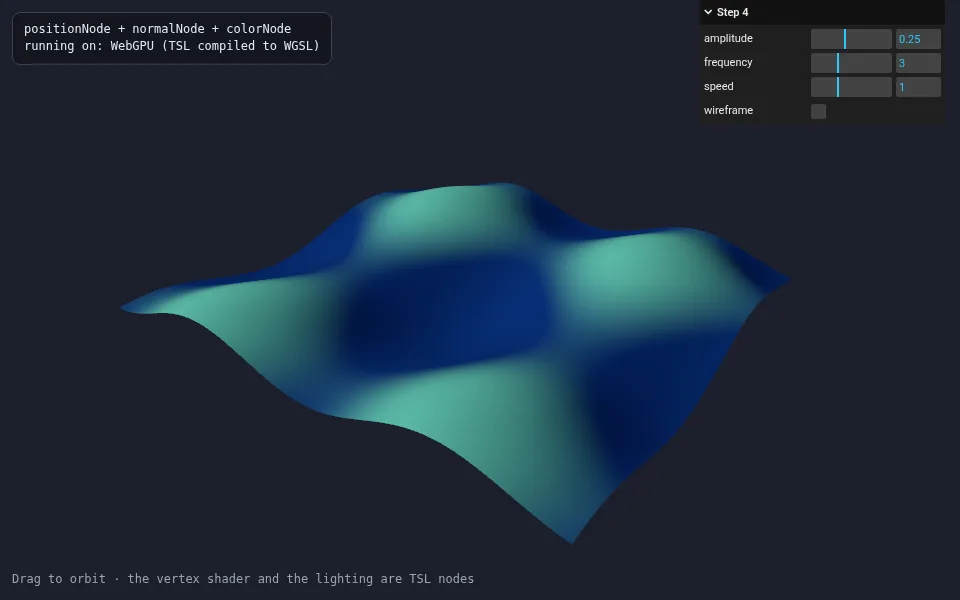
Switch on the wireframe box in the panel to see the vertices move, and drag the amplitude slider. That slider is a uniform, so the change is instant. Because the material is a lit MeshStandardNodeMaterial, the waves also respond to the lights, shadows and environment maps of Part 3, which in the ShaderMaterial version we would have had to write ourselves.
Step 5: noise and a fresnel rim
The second effect of Part 4 was the glowing orb: noise that wobbles the outline, a noise-driven colour, and a fresnel rim. In TSL it is shorter than in GLSL, because Three.js ships a noise library as nodes. Here is the whole thing:
import { Fn, uniform, time, mix, oneMinus, normalView, normalLocal, positionLocal,
         positionViewDirection, mx_fractal_noise_float } from 'three/tsl';

// Fresnel: surfaces seen at a grazing angle glow. 0 when facing the camera, 1 at the silhouette.
const fresnel = Fn(([exponent]) => {
  const facing = normalView.dot(positionViewDirection).saturate();
  return oneMinus(facing).pow(exponent);
});

// Fractal noise, evaluated at the vertex position and slowly moving through 3D space
const noise = mx_fractal_noise_float(positionLocal.mul(1.4).add(time.mul(0.3)), 3, 2.0, 0.5);

const material = new THREE.MeshStandardNodeMaterial({ roughness: 0.5, metalness: 0.0 });
material.positionNode = positionLocal.add(normalLocal.mul(noise.mul(wobble)));   // push vertices along their normals
material.colorNode = mix(inner, outer, noise.mul(0.5).add(0.5));
material.emissiveNode = rimColor.mul(fresnel(power)).mul(rimStrength);           // glow added on top of the lighting
mx_fractal_noise_floatcomes from the MaterialX noise functions that ship with Three.js (themx_prefix). The arguments are the 3D position to sample, the number of octaves (3), the lacunarity (2.0, how much finer each octave is) and the gain (0.5, how much weaker each octave is). It is the same fbm idea as the hand-written noise of Part 4, in one call.normalViewandpositionViewDirectionare built-in nodes: the surface normal and the direction to the camera, both in view space. Their dot product is the "how directly are we looking at this surface" number that fresnel is built on. Same maths as Part 4, new spelling.emissiveNodeis the right slot for a rim. Emissive light is added after the lighting, so the glow stays bright on the shadowed side too.
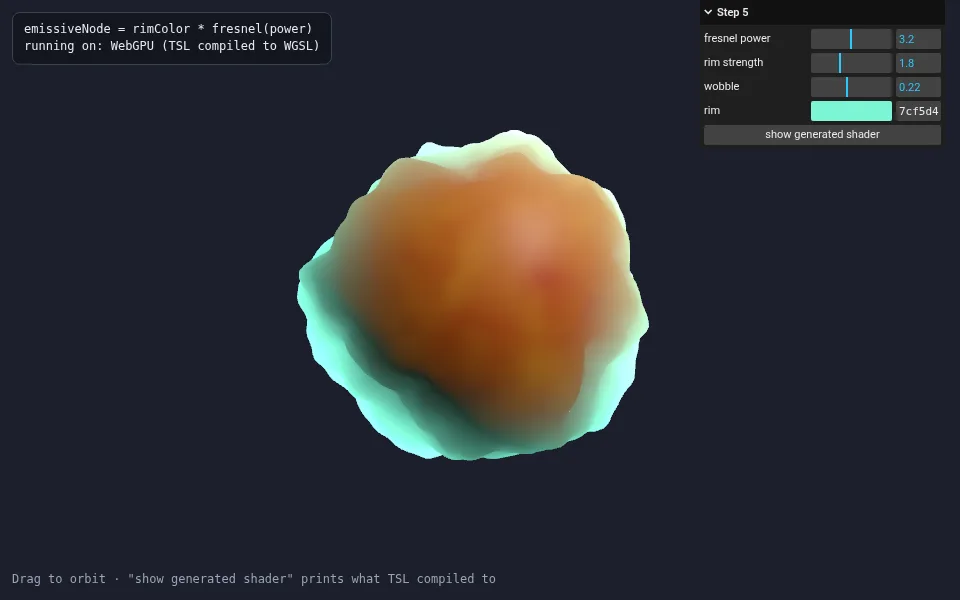
positionNode, noise colour in colorNode and a fresnel rim in emissiveNode. (step-5.html)A caveat that is the same in GLSL and TSL: displacing vertices does not recompute the normals. The lighting on the orb still thinks it is lit as a perfect sphere, so the bumps are visible in the outline but shaded smoothly. For a small wobble that looks fine, and the colour noise hides it. For a large displacement, do what we did for the water: compute the displaced normal yourself and put it in normalNode.
What TSL actually generates
TSL is not magic, and the best way to trust it is to read what it produces. The renderer can show you the shader source it built from a graph:
const { vertexShader, fragmentShader } = await renderer.debug.getShaderAsync(scene, camera, mesh);
console.log(fragmentShader);
Step 5 has a "show generated shader" button in its panel that does exactly this and prints the result over the scene. Here is the line that matters, for a tiny material whose colour is mix(warm, blue, sin(uv().y * 8 + time) * 0.5 + 0.5). The first block is what the WebGL 2 fallback produces, in GLSL ES 3.0:
// generated GLSL (WebGL 2 backend), fragment shader, trimmed
DiffuseColor = vec4( mix( nodeUniform0, vec3( 0.1, 0.2, 0.9 ), ( ( sin( ( ( nodeVarying5.y * 8.0 ) + nodeUniform1 ) ) * 0.5 ) + 0.5 ) ), 1.0 );
The same graph on the WebGPU backend comes out as WGSL:
// generated WGSL (WebGPU backend), fragment shader, trimmed
DiffuseColor = vec4<f32>( mix( object.nodeUniform0, vec3<f32>( 0.1, 0.2, 0.9 ), ( ( sin( ( ( nodeVarying5.y * 8.0 ) + render.nodeUniform1 ) ) * 0.5 ) + 0.5 ) ), 1.0 );
Compare the two lines with the graph above and with what you wrote in JavaScript. nodeVarying5 is the UV the vertex shader passed on; nodeUniform0 is our warm colour and nodeUniform1 is time, both read from uniform buffers; the maths is the maths you wrote, in the language the backend speaks. That is the answer to "which language do I write?": none of them. You write the graph once, and Three.js compiles it to WGSL for the WebGPU backend and GLSL for the WebGL 2 fallback. Around that one line is a few hundred lines of lighting code, also generated, which is why a lit node material is so much shorter to write than the onBeforeCompile patch from Part 4.
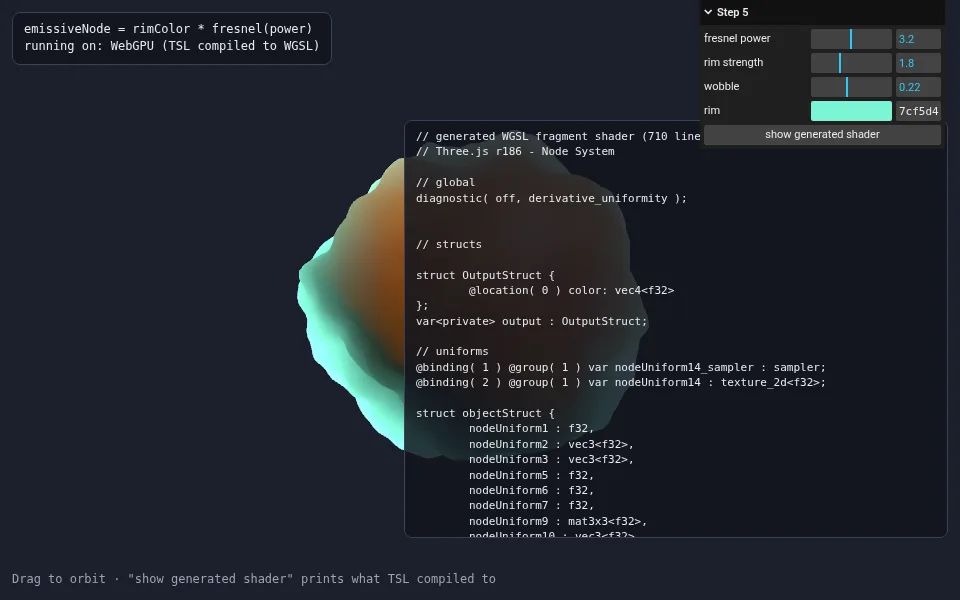
The generated names are machine-made (nodeVar7, nodeUniform0), so this output is for reading and debugging, not editing. If you ever need to drop hand-written code into a graph, TSL has wgslFn and glslFn to wrap a snippet of raw WGSL or GLSL as a node. The price is that the snippet is then tied to one backend, so use it sparingly.
Step 6: compute shaders, particles that never leave the GPU
Now the feature that WebGL cannot offer. We want 40,000 particles that are attracted to a point, swirl around it and slow down through drag. Done on the CPU, that is a JavaScript loop over 40,000 positions per frame, then uploading the result to the GPU: slow, and it gets worse with every particle you add. A compute shader turns the loop inside out. The particle data lives in GPU memory, and the GPU runs the update function once per particle, all in parallel. JavaScript only says "run it now":
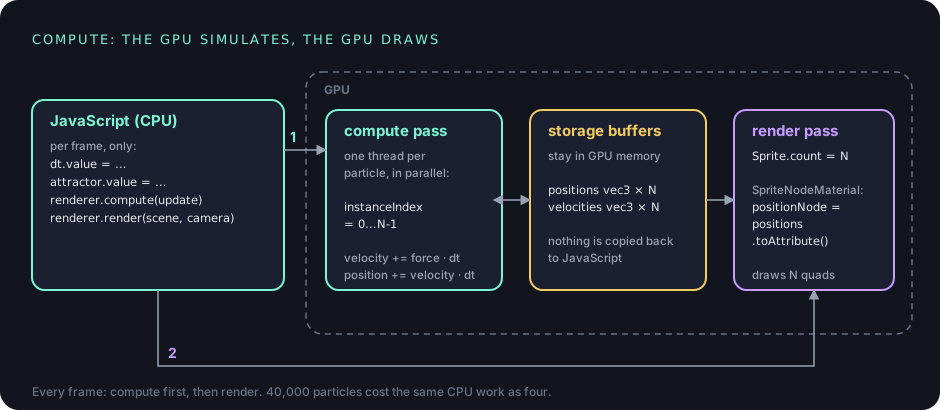
Three new pieces make this work:
instancedArray(count, type)creates a storage buffer: an array ofcountitems that lives on the GPU, readable and writable by shaders. We need two, onevec3position and onevec3velocity per particle.Fn(() => { … })().compute(count)builds a compute node. The function body is a shader that runscounttimes. Inside it,instanceIndexis the number of the current run: 0 for the first particle, 39,999 for the last.positions.element(instanceIndex)is "my particle".renderer.compute(node)runs it. Call it once for a one-time setup pass and every frame for a simulation.
Here is the core of step 6:
import { Fn, instancedArray, instanceIndex, uniform, hash, vec3, float, mix, shapeCircle } from 'three/tsl';

const COUNT = 40000;

// Two buffers that live on the GPU: one vec3 position and one vec3 velocity per particle
const positions = instancedArray(COUNT, 'vec3');
const velocities = instancedArray(COUNT, 'vec3');

const attractor = uniform(new THREE.Vector3(0, 0, 0));
const pull = uniform(9);
const swirl = uniform(7);
const drag = uniform(0.8);
const dt = uniform(1 / 60);   // seconds since the last frame, set from JavaScript

// Compute pass 1 (runs once): scatter the particles randomly in a box.
const init = Fn(() => {
  const position = positions.element(instanceIndex);
  position.assign(vec3(
    hash(instanceIndex).sub(0.5),
    hash(instanceIndex.add(1)).sub(0.5),
    hash(instanceIndex.add(2)).sub(0.5),
  ).mul(12));
})().compute(COUNT);

// Compute pass 2 (runs every frame): pull towards the attractor, spin around it, move
const update = Fn(() => {
  const position = positions.element(instanceIndex);
  const velocity = velocities.element(instanceIndex);

  const toAttractor = attractor.sub(position);
  const distance = toAttractor.length().max(0.5);
  const direction = toAttractor.div(distance);

  // sideways push (perpendicular to the direction and to "up") makes the cloud orbit
  const sideways = vec3(direction.z.negate(), 0, direction.x);

  // every particle gets its own strength, so they settle on different orbits instead of one thin ring
  const strength = hash(instanceIndex.add(7)).mul(0.9).add(0.55);
  const force = direction.mul(pull).add(sideways.mul(swirl)).mul(strength).div(distance.add(1));

  velocity.addAssign(force.mul(dt));
  velocity.mulAssign(float(1).sub(drag.mul(dt)));
  position.addAssign(velocity.mul(dt));
})().compute(COUNT);

renderer.compute(init);   // once

renderer.setAnimationLoop((t) => {
  dt.value = Math.min((t - lastTime) / 1000, 1 / 30);   // never take a huge step, e.g. after a tab switch
  lastTime = t;
  renderer.compute(update);          // 1. simulate on the GPU
  renderer.render(scene, camera);    // 2. draw the result
});
Some things to notice:
- Inside a compute
Fn,.assign(),.addAssign()and.mulAssign()write to a variable or a buffer element, so the code reads like a normal imperative shader. Outside ofFnwe only build values; inside, we run statements. hash(instanceIndex)is a cheap pseudo-random number from an integer, between 0 and 1. A shader has noMath.random(), and a hash of the particle number gives each particle a stable personal random value. We use it for the starting position and for each particle's own pull strength, which is why the cloud spreads into a fuzzy ring rather than one thin line.- No two threads touch the same element. Thread i reads and writes only
positions[i]andvelocities[i], so they never conflict and we need no locks or synchronisation. This is the easy, common case, and the one to design for first. - Nothing comes back to JavaScript. The positions never leave GPU memory. That is the whole reason it is fast. Reading them back is possible, but asynchronous and slow, so avoid it every frame.
Drawing uses the same buffers. A SpriteNodeMaterial is a camera-facing quad material that takes nodes like the others, and positions.toAttribute() turns the storage buffer into a per-instance vertex attribute:
const material = new THREE.SpriteNodeMaterial({ transparent: true, depthWrite: false, blending: THREE.AdditiveBlending });
material.positionNode = positions.toAttribute();
material.scaleNode = uniform(0.045);
// colour by distance to the attractor: warm in the middle, cool outside
material.colorNode = mix(vec3(1.0, 0.5, 0.2), vec3(0.2, 0.55, 1.0), positions.toAttribute().sub(attractor).length().mul(0.16).saturate());
material.opacityNode = shapeCircle().mul(0.4);   // a round dot instead of a square

const particles = new THREE.Sprite(material);
particles.count = COUNT;          // draw COUNT instances of the quad
particles.frustumCulled = false;  // the bounding box is not the cloud's
scene.add(particles);
There is no geometry with 40,000 vertices and no BufferAttribute we update from JavaScript. The sprite is one quad, drawn COUNT times, and the vertex shader reads each instance's position straight from the buffer the compute pass just wrote. Additive blending makes overlapping dots add up to bright cores, which is where the glow comes from.
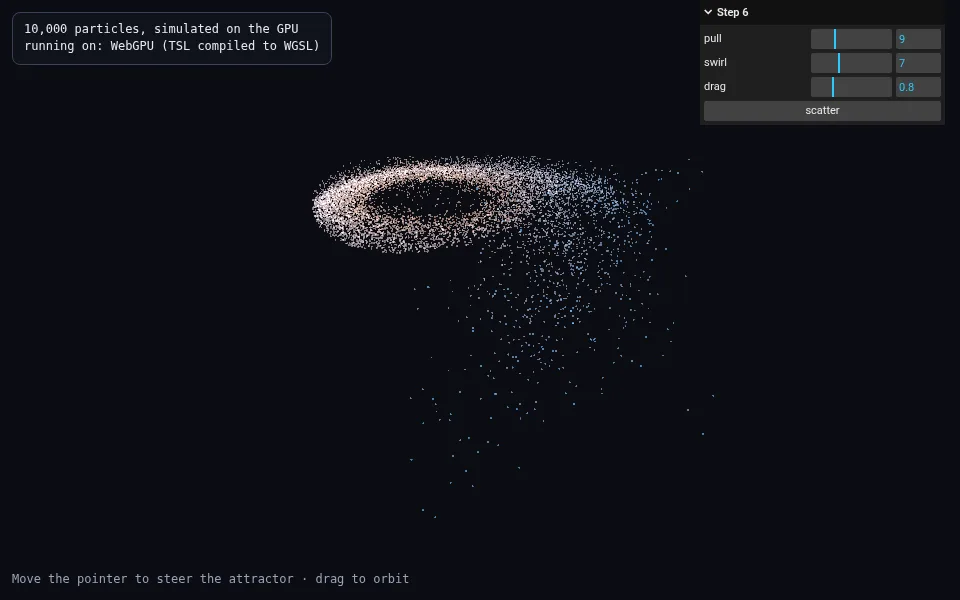
?count=10000 so a software renderer could draw it; the live page defaults to 60,000. Move the pointer to steer the attractor. (step-6.html)Does it work on the WebGL fallback? Yes: WebGPURenderer runs the same compute node there, by emulating it with older WebGL 2 features, so the demos still work, just slower and with fewer limits. Real compute power, with big counts, many buffers and more advanced tricks, is the part where having an actual WebGPU backend matters. Try step 6 once normally and once with ?backend=webgl, and push ?count= up to see where each one starts to struggle.
The final demo
The demo at the top of the article puts all the pieces in one scene:
- The water is step 4 with a third wave, a bigger plane (
PlaneGeometry(40, 40, 320, 320)), and one new ingredient: a fresnel term inemissiveNode, so the water reflects a little sky at grazing angles. - The orb is step 5, with a warm self-lighting term added to its emissive so it reads as glowing.
- The sparks are step 6: 40,000 particles with an
Ifadded to the compute shader, so they bounce softly off the water instead of sinking into it. The attractor is not a fixed point any more: it follows the orb, and your pointer when you move it. - A
PointLightsits inside the orb, so its glow lights the waves around it. Because these are node materials, this just works, no shader code involved. - The
fresnelhelper is shared: it is oneFn, used by the water and the orb. Writing a shader as ordinary JavaScript functions is the main way TSL beats string templates.
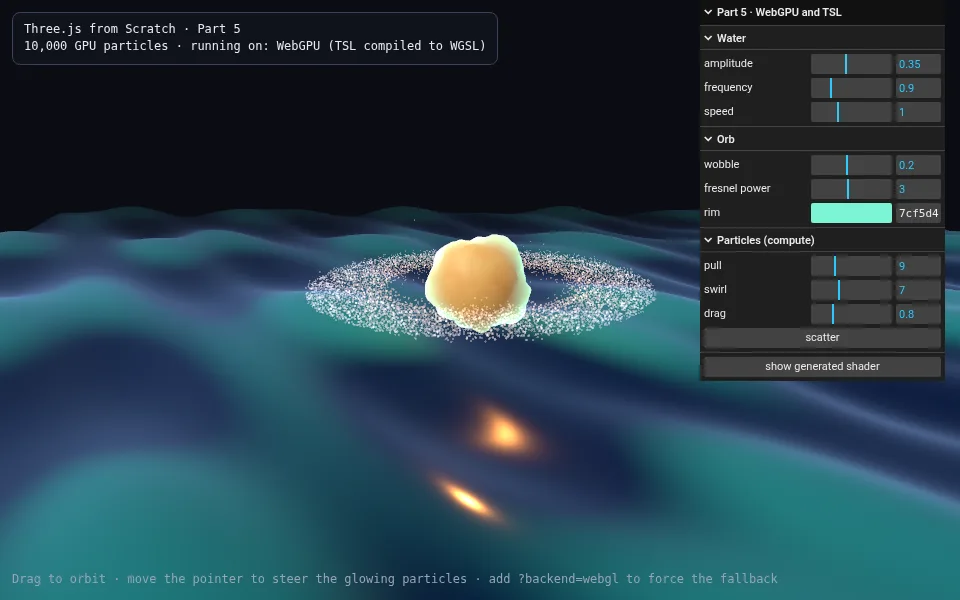
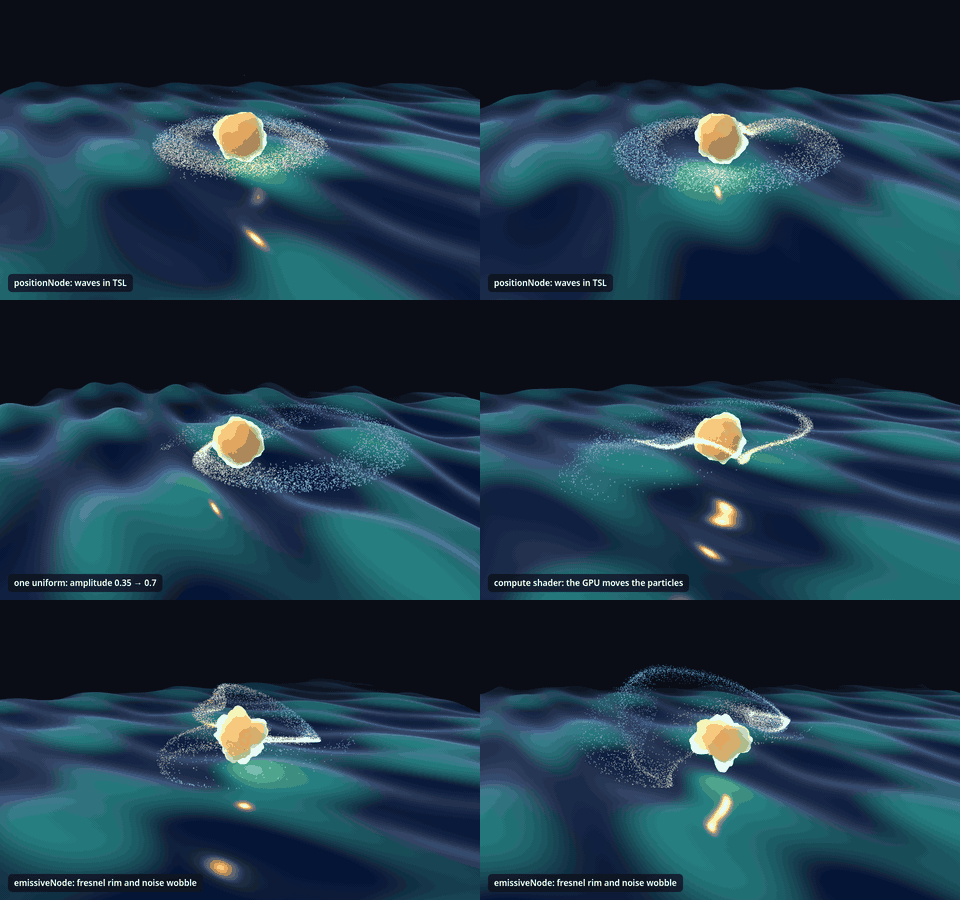
The panel has one more trick: "show generated shader" prints the water's real fragment shader, in WGSL or GLSL depending on the backend you are on. It is the print statement of node materials.
When it goes wrong: common pitfalls
- A blank canvas, or an error saying the backend is not initialized. You used the renderer, or something that needs it, such as
PMREMGeneratorfor an environment map, beforeawait renderer.init()finished. Until it resolves there is no GPU device. Always await it first. Also avoidrenderAsync: in r186 it is deprecated, andrenderafterinit()is all you need. ShaderMaterialshows nothing or throws. It is GLSL andWebGPURendererdoes not run it. Rewrite it in TSL (this article), or stay onWebGLRendererfor that scene. The same goes foronBeforeCompile.- A console warning, "Multiple instances of Three.js being imported", or materials that behave strangely. The import map points
threeandthree/webgpuat different builds, so Three.js is loaded twice. Point both atthree.webgpu.js, as the demos do, and import TSL fromthree/tsl. - Lighting looks wrong after you set
normalNode. Node materials want a view-space normal. Convert one computed in local space withtransformNormalToView(...), as in step 4. - A JavaScript
iforMath.sinin a shader. They run once, when the graph is built, not per pixel. Use TSL'sIfandsin, anduniforms for values that change. a * bgivesNaN. Operators do not work on nodes. Usea.mul(b).- A uniform does not change. Change
u.value, notu. If you replace the node, the graph keeps pointing at the old one. hasFeaturesays yes, but the feature is missing. On the WebGL fallback it can answertrue. For "does this browser have WebGPU feature X" readadapter.featuresas in step 1.THREE.Clockshows a deprecation warning. In r186 it is deprecated, in favour ofTHREE.Timeror a hand-keptlastTime, as in step 6.- The orb's shading ignores its bumps. Displacement does not update normals. See step 5.
- The compute pass runs, but nothing moves. Check that
renderer.compute(update)is called every frame, thatdt.valueis not zero, and that the sprite'scountequals the number of particles you simulate. - Slower than the CPU version on the WebGL fallback. The fallback emulates compute. Expect smaller particle counts there, and check
isWebGPUBackendbefore choosing one.
The full code
Here is the final demo in one file. It loads Three.js from the CDN, so you can save it and open it straight from disk.
<!doctype html>
<html lang="en">
<head>
  <meta charset="utf-8">
  <meta name="viewport" content="width=device-width, initial-scale=1">
  <title>Three.js from Scratch, Part 5 · WebGPU and TSL</title>
  <style>
    html, body { margin: 0; height: 100%; background: #000; overflow: hidden; }
    canvas { display: block; }
    .panel { position: absolute; left: 12px; top: 12px; max-width: calc(100% - 48px); font: 400 12px/1.45 ui-monospace, Menlo, Consolas, monospace; color: #e7eaf0; background: rgba(18, 21, 29, .85); border: 1px solid #3a4258; border-radius: 8px; padding: 8px 11px; white-space: pre; overflow: hidden; }
    .panel a { color: #7cf5d4; }
    .hint { position: absolute; left: 12px; bottom: 12px; font: 400 12px/1.45 ui-monospace, Menlo, Consolas, monospace; color: #9aa3b5; pointer-events: none; }
    .label { position: absolute; transform: translate(-50%, 0); font: 600 12px/1.3 ui-monospace, Menlo, Consolas, monospace; color: #e7eaf0; background: rgba(18, 21, 29, .8); border: 1px solid #3a4258; border-radius: 6px; padding: 3px 7px; white-space: nowrap; pointer-events: none; }
  </style>
  <script type="importmap">
    {
      "imports": {
        "three": "https://cdn.jsdelivr.net/npm/three@0.186.1/build/three.webgpu.js",
        "three/webgpu": "https://cdn.jsdelivr.net/npm/three@0.186.1/build/three.webgpu.js",
        "three/tsl": "https://cdn.jsdelivr.net/npm/three@0.186.1/build/three.tsl.js",
        "three/addons/": "https://cdn.jsdelivr.net/npm/three@0.186.1/examples/jsm/"
      }
    }
  </script>
</head>
<body>
  <div id="status" class="panel">Starting WebGPURenderer…</div>
  <div id="code" class="panel code" hidden></div>
  <div class="hint">Drag to orbit · move the pointer to steer the glowing particles · add ?backend=webgl to force the fallback</div>
  <style>
    .code { left: auto; right: 12px; top: auto; bottom: 12px; width: min(560px, calc(100% - 24px)); height: 46%; overflow: auto; font-size: 11px; line-height: 1.4; }
    .code[hidden] { display: none; }
  </style>
  <script type="module">
    import * as THREE from 'three/webgpu';
    import { Fn, If, uniform, time, vec2, vec3, float, sin, mix, smoothstep, normalize, oneMinus, varying, hash,
      positionLocal, normalLocal, normalView, positionViewDirection, transformNormalToView,
      instancedArray, instanceIndex, shapeCircle, mx_fractal_noise_float } from 'three/tsl';
    import { OrbitControls } from 'three/addons/controls/OrbitControls.js';
    import { GUI } from 'three/addons/libs/lil-gui.module.min.js';

    const scene = new THREE.Scene();
    scene.background = new THREE.Color(0x0b0d14);
    scene.fog = new THREE.Fog(0x0b0d14, 12, 34);

    const camera = new THREE.PerspectiveCamera(50, innerWidth / innerHeight, 0.1, 100);
    camera.position.set(0, 4.2, 11);

    // WebGPU if the browser has it, WebGL 2 if not. ?backend=webgl forces the fallback.
    const params = new URLSearchParams(location.search);
    const status = document.getElementById('status');

    const renderer = new THREE.WebGPURenderer({ antialias: true, forceWebGL: params.get('backend') === 'webgl' });
    renderer.setPixelRatio(Math.min(devicePixelRatio, 2));
    renderer.setSize(innerWidth, innerHeight);
    document.body.appendChild(renderer.domElement);

    try {
      await renderer.init();   // async: asks the browser for a GPU device, or falls back
    } catch (error) {
      status.textContent = 'Sorry: this browser has neither WebGPU nor WebGL 2.\n' + error.message;
      throw error;
    }
    const isWebGPU = renderer.backend.isWebGPUBackend === true;
    const backendName = isWebGPU ? 'WebGPU (TSL compiled to WGSL)' : 'WebGL 2 fallback (TSL compiled to GLSL)';
    const controls = new OrbitControls(camera, renderer.domElement);
    controls.target.set(0, 1.2, 0);
    controls.enableDamping = true;
    controls.maxPolarAngle = Math.PI * 0.49;
    controls.update();

    // ---------- Shared pieces ----------

    // Fresnel: 0 when a surface faces the camera, 1 at grazing angles. Used by the water and the orb.
    const fresnel = Fn(([normal, power]) => {
      const facing = normal.dot(positionViewDirection).saturate();
      return oneMinus(facing).pow(power);
    });

    // ---------- Water: positionNode + normalNode + colorNode + emissiveNode ----------

    const amplitude = uniform(0.35);
    const frequency = uniform(0.9);
    const speed = uniform(1.0);
    const deep = uniform(new THREE.Color('#041b45'));
    const crest = uniform(new THREE.Color('#2a9d9a'));
    const sky = uniform(new THREE.Color('#8fb8ff'));

    const waveHeight = Fn(([p]) => {
      const t = time.mul(speed);
      const a = sin(p.x.mul(frequency).add(t)).mul(0.5);
      const b = sin(p.y.mul(frequency).mul(0.8).add(t.mul(1.3))).mul(0.5);
      const c = sin(p.x.add(p.y).mul(frequency).mul(1.7).add(t.mul(1.9))).mul(0.25);
      return a.add(b).add(c).mul(amplitude);
    });

    const p = positionLocal.xy;
    const h = waveHeight(p);
    const e = 0.02;
    const slope = normalize(vec3(h.sub(waveHeight(p.add(vec2(e, 0)))), h.sub(waveHeight(p.add(vec2(0, e)))), e));
    const waterNormal = transformNormalToView(varying(slope)).normalize();

    const waterMaterial = new THREE.MeshStandardNodeMaterial({ roughness: 0.18, metalness: 0.0 });
    waterMaterial.positionNode = positionLocal.add(vec3(0, 0, h));
    waterMaterial.normalNode = waterNormal;
    waterMaterial.colorNode = mix(deep, crest, smoothstep(amplitude.mul(-0.3), amplitude.mul(0.9), varying(h)));
    waterMaterial.emissiveNode = sky.mul(fresnel(waterNormal, 4)).mul(0.4);   // reflected sky at grazing angles

    const water = new THREE.Mesh(new THREE.PlaneGeometry(40, 40, 320, 320), waterMaterial);
    water.rotation.x = -Math.PI / 2;
    scene.add(water);

    // ---------- Orb: noise displacement + fresnel rim ----------

    const wobble = uniform(0.2);
    const rimPower = uniform(3.0);
    const rimColor = uniform(new THREE.Color('#7cf5d4'));

    const noise = mx_fractal_noise_float(positionLocal.mul(1.4).add(time.mul(0.3)), 3, 2.0, 0.5);

    const orbMaterial = new THREE.MeshStandardNodeMaterial({ roughness: 0.5, metalness: 0.0 });
    orbMaterial.positionNode = positionLocal.add(normalLocal.mul(noise.mul(wobble)));
    const orbColor = mix(vec3(0.95, 0.28, 0.05), vec3(1.0, 0.7, 0.2), noise.mul(0.5).add(0.5));
    orbMaterial.colorNode = orbColor;
    orbMaterial.emissiveNode = rimColor.mul(fresnel(normalView, rimPower)).mul(1.8).add(orbColor.mul(0.35));   // rim glow + a little self-light

    const orb = new THREE.Mesh(new THREE.SphereGeometry(0.85, 128, 96), orbMaterial);
    scene.add(orb);

    // ---------- Particles: compute shaders ----------

    const COUNT = Number(params.get('count')) || 40000;   // ?count=10000 for a lighter run
    const positions = instancedArray(COUNT, 'vec3');
    const velocities = instancedArray(COUNT, 'vec3');

    const attractor = uniform(new THREE.Vector3(0, 1.6, 0));
    const pull = uniform(9);
    const swirl = uniform(7);
    const drag = uniform(0.8);
    const dt = uniform(1 / 60);

    const init = Fn(() => {
      const position = positions.element(instanceIndex);
      position.assign(vec3(
        hash(instanceIndex).sub(0.5).mul(12),
        hash(instanceIndex.add(1)).mul(5).add(0.6),
        hash(instanceIndex.add(2)).sub(0.5).mul(12),
      ));
    })().compute(COUNT);

    const update = Fn(() => {
      const position = positions.element(instanceIndex);
      const velocity = velocities.element(instanceIndex);

      const toAttractor = attractor.sub(position);
      const distance = toAttractor.length().max(0.5);
      const direction = toAttractor.div(distance);
      const sideways = vec3(direction.z.negate(), 0, direction.x);
      const strength = hash(instanceIndex.add(7)).mul(0.9).add(0.55);

      velocity.addAssign(direction.mul(pull).add(sideways.mul(swirl)).mul(strength).div(distance.add(1)).mul(dt));
      velocity.mulAssign(float(1).sub(drag.mul(dt)));
      position.addAssign(velocity.mul(dt));

      // stay above the water
      If(position.y.lessThan(0.5), () => {
        position.y.assign(0.5);
        velocity.y.assign(velocity.y.abs().mul(0.3));
      });
    })().compute(COUNT);

    const sparkMaterial = new THREE.SpriteNodeMaterial({ transparent: true, depthWrite: false, blending: THREE.AdditiveBlending });
    sparkMaterial.positionNode = positions.toAttribute();
    sparkMaterial.scaleNode = uniform(0.032);
    sparkMaterial.colorNode = mix(vec3(1.0, 0.55, 0.2), vec3(0.25, 0.6, 1.0), positions.toAttribute().sub(attractor).length().mul(0.18).saturate());
    sparkMaterial.opacityNode = shapeCircle().mul(0.3);

    const sparks = new THREE.Sprite(sparkMaterial);
    sparks.count = COUNT;
    sparks.frustumCulled = false;
    scene.add(sparks);

    renderer.compute(init);

    // ---------- Lights ----------

    const sun = new THREE.DirectionalLight(0xffffff, 2.0);
    sun.position.set(-4, 5, 3);
    const glow = new THREE.PointLight(0xffa24a, 22, 14, 2);
    scene.add(sun, glow, new THREE.HemisphereLight(0x9ec5ff, 0x0b0d14, 0.4));

    // ---------- Status, shader viewer and the panel ----------

    status.textContent = 'Three.js from Scratch · Part 5\n' + COUNT.toLocaleString('en') + ' GPU particles · running on: ' + backendName;

    const codePanel = document.getElementById('code');
    async function showShader() {
      if (!codePanel.hidden) { codePanel.hidden = true; return; }
      const { fragmentShader } = await renderer.debug.getShaderAsync(scene, camera, water);
      codePanel.textContent = '// generated ' + (isWebGPU ? 'WGSL' : 'GLSL') + ' fragment shader of the water (' + fragmentShader.split('\n').length + ' lines)\n' + fragmentShader;
      codePanel.hidden = false;
    }

    const gui = new GUI({ title: 'Part 5 · WebGPU and TSL' });
    const waterFolder = gui.addFolder('Water');
    waterFolder.add(amplitude, 'value', 0, 0.8, 0.01).name('amplitude');
    waterFolder.add(frequency, 'value', 0.2, 3, 0.01).name('frequency');
    waterFolder.add(speed, 'value', 0, 3, 0.05).name('speed');
    const orbFolder = gui.addFolder('Orb');
    orbFolder.add(wobble, 'value', 0, 0.45, 0.01).name('wobble');
    orbFolder.add(rimPower, 'value', 0.5, 6, 0.05).name('fresnel power');
    orbFolder.addColor({ rim: '#7cf5d4' }, 'rim').onChange((v) => rimColor.value.set(v));
    const sparkFolder = gui.addFolder('Particles (compute)');
    sparkFolder.add(pull, 'value', 0, 30, 0.1).name('pull');
    sparkFolder.add(swirl, 'value', 0, 20, 0.1).name('swirl');
    sparkFolder.add(drag, 'value', 0, 3, 0.05).name('drag');
    sparkFolder.add({ scatter: () => renderer.compute(init) }, 'scatter');
    gui.add({ showShader }, 'showShader').name('show generated shader');
    if (innerWidth < 700) gui.close();

    // ---------- Interaction ----------

    const orbitPlane = new THREE.Plane(new THREE.Vector3(0, 1, 0), -1.6);
    const raycaster = new THREE.Raycaster();
    const pointer = new THREE.Vector2();
    const hit = new THREE.Vector3();
    const home = new THREE.Vector3();
    let lastMove = -Infinity;
    renderer.domElement.addEventListener('pointermove', (event) => {
      pointer.set((event.clientX / innerWidth) * 2 - 1, -(event.clientY / innerHeight) * 2 + 1);
      lastMove = performance.now();
    });

    addEventListener('resize', () => {
      camera.aspect = innerWidth / innerHeight;
      camera.updateProjectionMatrix();
      renderer.setSize(innerWidth, innerHeight);
    });

    let lastTime = 0;
    renderer.setAnimationLoop((t) => {
      const seconds = t / 1000;
      orb.position.y = 1.6 + Math.sin(seconds * 1.1) * 0.12;
      orb.rotation.y = seconds * 0.15;
      glow.position.copy(orb.position);

      // the particles circle the orb, or the pointer while it is moving
      home.copy(orb.position);
      raycaster.setFromCamera(pointer, camera);
      const aiming = performance.now() - lastMove < 3000 && raycaster.ray.intersectPlane(orbitPlane, hit);
      attractor.value.lerp(aiming ? hit.clampLength(0, 9) : home, 0.08);

      controls.update();
      dt.value = Math.min((t - lastTime) / 1000, 1 / 30);
      lastTime = t;
      renderer.compute(update);          // 1. simulate on the GPU
      renderer.render(scene, camera);    // 2. draw
    });
  </script>
</body>
</html>
The step-by-step versions are in the repo too: step-1.html (WebGPURenderer, init and feature detection), step-2.html (the node material family), step-3.html (a colour node graph), step-4.html (waves with positionNode and normalNode), step-5.html (noise, fresnel and the generated shader) and step-6.html (compute particles).
The fresnel and fbm ideas are the same ones Part 4 explained. The noise itself comes from the MaterialX noise nodes that ship with Three.js.
A few things to try
- In step 1, open the page with
?backend=webgl, then without, and compare the panel and the frame rate. - In step 3, replace the
smoothstepband withwave.mul(0.5).add(0.5)for soft stripes, or swapuv().xforuv().yinwaveto turn the vertical stripes into horizontal bands. - In step 4, add a third wave running diagonally,
sin(p.x.add(p.y).mul(frequency).mul(1.7).add(t.mul(1.9))), as the final demo does. - In step 5, change
fresnel(power)tofresnel(power).mul(sin(time.mul(3)).mul(0.5).add(0.5))for a pulsing rim, or movenoiseintoroughnessNodeto make the orb patchy and glossy. - In step 6, change
sidewaystovec3(direction.z, 0, direction.x.negate())to make the cloud orbit the other way, or setswirlto 0 and watch it fall into a single point. - In the final demo, raise
?count=to 200000 on a desktop GPU and compare with?backend=webgl. - Print the shader of any material you have built so far:
console.log((await renderer.debug.getShaderAsync(scene, camera, mesh)).fragmentShader).
Next time
We can now render with WebGPU, write materials as node graphs and move tens of thousands of particles on the GPU. In Part 6 we look at post-processing: rendering the scene to a texture first and then running effects over the whole image. We build bloom, a lens effect and anti-aliasing with EffectComposer first, then rebuild the same chain with TSL nodes, including a bloom that only picks up what glows. See you there.