How Do You Draw a Wall?
Translated from Russian. Originally published on Oct 5, 2012 as “Как нарисовать стену?”.
Let's start with a straightforward question on gamedev.stackexchange.com:
I'm curious as to how games like Prelude of the chambered handle graphics. If you play for a bit you will see what I mean. It made me wonder how it works. (it is open-source so you can get the source on This page) I did find a few tutorials but I couldn't undertand some of the stuff but it did help with some things. However, I don't like doing things I don't understand. Does anyone know of any good sites for this kind of 2.5D? Any help is appreciated. After all I've been googling all day. Thanks :)
Aidan Mueller asks how games like Prelude of the Chambered (PoC) were made and asks for links on the topic. By the way, it's an interesting game in its own right. It was written by Notch, the creator of Minecraft, in 48 hours during a competition called Ludum Dare. If you haven't played it yet, I strongly recommend it — the game is short on the one hand and engaging on the other. At one point PoC caught my interest from a technical point of view too, and I started diving into the wild and dangerous world of software renderers.
Back then I wanted to figure everything out on my own, and I ignored the original source code. Soon I came across a wonderful article on raycasting, a rendering method that lets you create a 3D perspective from a two-dimensional map. The same approach, in one form or another, was used in Wolfenstein. At that moment it seemed to me that this would be enough to implement everything PoC had. But I was wrong.
The whole problem was that PoC's renderer supported objects such as doors. Not doors as flat sprites, but real doors — blocks of asymmetric shape:
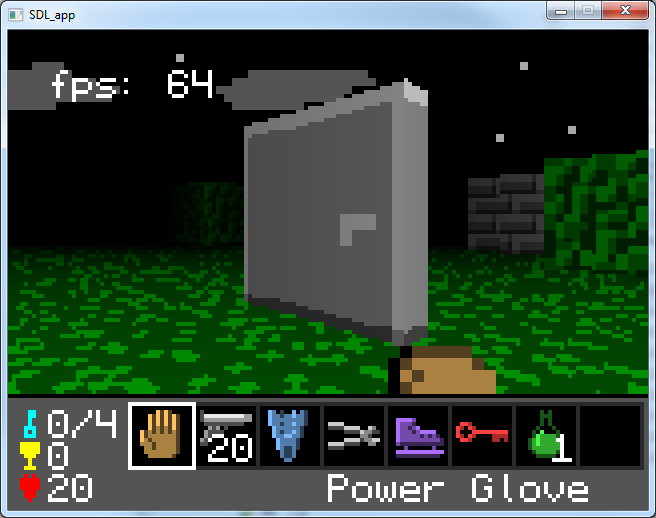
That was too much for a simple raycaster. I tried to come up with a hack that would make it display nice-looking doors after all, but every approach turned out to be either too complicated or too silly. I was done with the raycaster, and I decided to look into the original source code.
So: the RenderWall function. It was the alpha and omega of the whole renderer, designed to render a textured wall at an arbitrary location given by two 2D coordinates. It was thanks to this function that the engine could render blocks of arbitrary shape, including the long-suffering doors. Honestly, I spent quite a lot of time working out all the math on my own, but now, looking back, I'm sure it was entirely worth it. First, a simplified listing from my project.
What's going on? Step by step:
- Transform the wall coordinates into the player's coordinate system
- Clip the invisible parts of the wall
- Project the wall onto the picture plane (almost)
- Rasterize and texture the wall
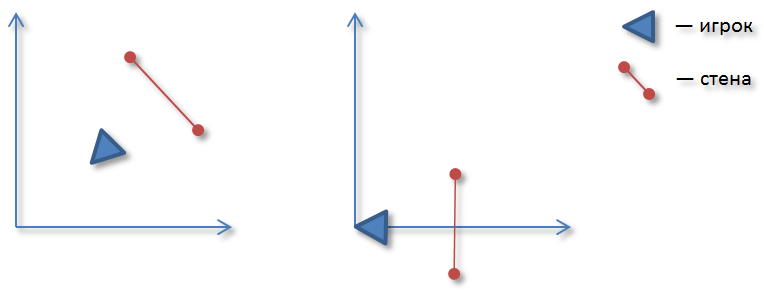
1) It only makes sense to render walls from the player's point of view. That's what the change of coordinate system is for. The player has three degrees of freedom (XY coordinates on the map and the rotation angle relative to the X axis), so the transformation just subtracts the player's coordinates and rotates by the corresponding angle. Graphically it looks like this:
2) How do you render the parts of walls that lie between the player and the screen (see the diagram below)? Right: you don't. That's what clipping is for. Otherwise you'll get terrible graphical artifacts.
3) In computer graphics, projection usually means mapping 3D primitives to 2D ones on the picture plane. In our case we project 2D line segments onto the screen. As a result we get a pair of points. That's not enough to create a 3D perspective, if only because all walls would always have the same height. So we need something else, namely depth — the distance of a given point from the camera. Consider the diagram:
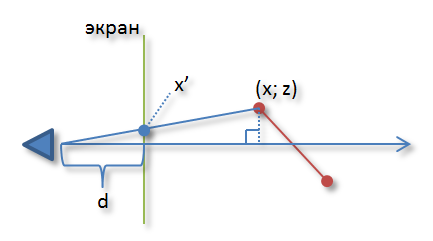
The triangle marked with the right-angle symbol is split by the green segment into two similar triangles. So we can write the following formulas:
where
4) Rasterization is the process of producing a raster image. The wall is a quadrilateral bounded by [startX, endX] along the X axis. So we loop over all the horizontal points and for each one determine the current wall height by linear interpolation between lineHeight1 and lineHeight2, not forgetting the depth test. All that remains is to fetch the right texel and put it on the screen.
It's worth noting that for rendering sprites — the various flat objects of the game world such as enemies — there's no need to reinvent the wheel. Small modifications to the existing RenderWall function are enough. That doesn't apply to floors and ceilings, though: they have to be rendered on a different principle, but that's a story for another time.